21 September 2011

Mini Fluffy Pancakes

I'm constantly looking out for different ideas for dear son's daily afternoon tea snack. I try to give him variety so that he doesn't get bored of his snack. And as far as possible I try to make the snacks (such as muffins, egg tarts, french toast, yogurt with fruits), rather than give him store bought ones. But of course there are times when convenience over-rule :p. Dear son can be quite picky when it comes to his food, if the taste and texture isn't right or to his liking, he won't eat them, certainly becoming a discerning eater (just like daddy and mummy)! Poor mummy has to make sure his food is yummy yet healthy (or at least not junk food) all the time. 

Recently I came across a Mini Fluffy Pancake recipe by LK of Food 4 Tots and it's just what I'm looking for :) I have tried other recipes of pancakes before and they always turn out too "cakey". So this recipe which promises soft and fluffy is perfect! The key is to whip the egg whites separately (till soft peak) so that the pancakes would puff up when cooked. This technique and theory is similar to the concept of chiffon cakes which yield soft and fluffy texture as well. Another great tip is the use of refillable plastic ketchup bottle to control the flow of batter so as to achieve these cute mini size pancakes.
My pancakes turned out ok, not as pretty as the ones by LK, not as round as they should be and the colour not really uniform. Nevertheless they tasted great, soft and fluffy even when turned cold. Dear son was naturally attracted to the cute mini pancakes which were just nice for his little hands, and ate several pieces at one go :) (I ate the rest :p).


I halved the recipe based on LK's and the batter was just nice to fill one plastic bottle. If you are interested, check out her recipe which gave specific details and great tips too. http://food-4tots.com/2011/09/03/mini-fluffy-pancakes/2/

16 September 2011

Home-made Char Siew

Pardon for the long absence. I was busy catching all the episodes of Shining Inheritance/Brilliant Legacy that's currently airing on Channel U. The show time is from 7 to 8pm which coincides with dear son's bath time and bed time preparation, so usually I have to miss the full episode. But I really like the show a lot so hubby rented the full DVD for me. So yep, have been "k-ing" the episodes whenever I have free time and at night :p

I digressed; back to my topic - Home-made Char Siew. Since attending Chef Chris's workshop on Sauces & Seasonings two weeks ago, I have been wanting to make the Char Siew using the tub of Home-made Plum Sauce which I brought home from the class. After procrastinating for so long, I finally made the Char Siew today!

As the recipe is under copyright of the cooking school and chef, I'm not at liberty to share it here. Nevertheless, many versions of home-made char siew recipes can be found in various cook books and other internet sites.
The original recipe calls for 1kg of meat which is too much for my family. Moreover, this is my first time doing it so I cut down the recipe by half; at least it won't be too much of a waste if it turns out inedible :p
I used pork shoulder meat (五花肉) bought from my usual butcher store at the wet market and marinade the meat overnight using a blended mixture of garlic, rose rice wine, maltose, sugar, light soy sauce, taucheo, dark soy sauce and nam yee.

The next morning, first roasted the meat in the oven for 15 mins at 220 degree celsius. Then reduced temperature to 200 degree celsius and glazed the meat with a mixture of the home-made plum sauce, honey and dark soy sauce. Thereafter, baked for another 15 to 20 mins, brushing the meat with glaze repeatedly every 5 mins.

Was actually quite surprised by how simple the whole process was. The end product - delicious, succulent, juicy and chewy char siew! The sauce was slightly sweet and salty and more than that, a special umami taste to it. Hubby liked it too.

Really pleased with my first-ever home-made char siew. I guess will be making it from time to time. But the next time, I need to make the home-made plum sauce first. Ok, another recipe to add to my to-do list! Till then :)

01 September 2011

Our Food Heritage: Sauces & Seasonings Workshop

Sauces and seasonings are a very important part of my life. Seasonings are definitely a must, especially in Chinese cooking, and sauces are like complementary to food, most often to bring out or enhance the taste. I almost always have to have some sauces to go with my food, be it chilli sauce, sweet & sour sauce or sambal, so when I saw Chef Christoper Tan offering a demo class in Sauces and Seasonings at Shermay's Cooking School, I signed up immediately.

Recipes that were demo-ed in class included chilli sauce base, plum sauce, char siew marinade, char siew, fragrant chilli oil, char siew mein and nyonya salad with plum dressing. The recipe pack also included bonus recipes of sweet soy-sauce, tomato sambal and aromatic infused soy sauce.

 Nyonya salad with home-made plum dressing. The plum sauce is quite easy to make albeit a little time consuming. But hey, it beats using commercial sauce which has added preservatives. This is made with real plums and boasts of a rich fruity and tangy flavour with a vibrant red-purplish colour. Goes very well with salad! I think I could use this sauce with Yusheng as well :)

Home-made Char Siew with home-made Char Siew Marinade and special glaze. Oh, just look at the gorgeously baked Char Siew, which could be achieved using our home oven. Patience is needed here as the Char Siew needs to be glazed a few times in between baking. The marinate could also be used for chicken wings, pork chops and such.
 Home-made Fragrant Chilli Oil or "Lat Jiu Yao". Everyone was raving about this chilli oil as it was so robust and fragrant. Only a quarter left from a full bowl after the food tasting. This was the vegetarian version, for a more luxe version, I thought of adding some dried scallops or shrimps :p

 Home-made Char Siew Mein, with home-made chilli sauce base, topped with home-made char siew and some fragrant chilli oil. Oh My Goodness, I would patronise the stall everyday if anyone were to sell Char Siew Mein like this! But then again, with this much hard work put into each and every component, I doubt not many hawkers these days would be willing to sell it, and certainly not for $3 a bowl.

The home-made chilli sauce tasted very special, it was spicy, yet a tad fruity and tangy, gave the noodles an unique umami taste. The char siew was sooooo succulent and bouncy and very well marinated and well grilled with just the right bits of charred meat and also the fatty parts (I like!). Tip of the ice-berg, the fragrant chilli oil, just enhanced all the flavours altogether. Yum!

Each participant brought home a small tub of plum sauce and chilli sauce. I'm thinking of using the plum sauce for salad. For the chilli sauce, thinking of replicating the Char Siew Mein, but oh, so much work to do for the char siew and fragrant chilli oil! Well, the sauce should be able to keep for 2-3 more weeks, I must find time for the Char Siew Mein.

26 August 2011

"Tan Tan Tan Tan" Tan-Tart (Egg Tart)

Hahaha. No, this post isn't about the Singapore Presidential Election nor BreadTalk's latest creation the "Tan-Tart" :p BreadTalk is once again very witty in coming up with this creation :)

This is my very own Egg Tart, a second attempt using Shirley's (Kokken69) recipe :) The first attempt was made 2 weeks ago using Edith's (Precious Moment) recipe.

This time round, I made cutesy mini ones so that it's easier for dear son to eat, and for us adults too, we can pop one directly into the mouth!
Bought this mini 'chwee kueh' moulds which to me, very worthwhile as I can use them to make mini Chwee Kuehs, mini Egg Tarts, mini Kueh Koswee and possibly mini Chicken Pie.
Look at the size of my mini Egg Tart. Dainty and cutesy :)

Shirley's recipe was as straightforward as Edith's. But once again my stumbling block came with the dough which was really soft and pliable, making it impossible to cut into rounds using a cutter then line the moulds. Upon reading her steps closely one more time, I realised she said "Press the dough into a tart mold and press well to line the tart mold". So I took a lump of dough, and just press the dough into the mould as neatly as I could. It worked! And initially was worried that the tart might stick to the mould after baking making it difficult to unmould, but it was actually easy to unmould the tart as the dough itself was quite buttery. Hurray!

As my moulds are really small, I could only use up half of the custard. Thus I made another batch of dough in order to use up all the custard; I yielded about 40-44 pieces of egg tarts based on double portion of dough and single portion of custard. I reduced amount of sugar as I didn't want my tarts to be too sweet, they still turned out quite sweet. I also made some adjustments to the oven temperature. For my first batch of tarts, I baked them at 240C (max temp of my oven) for 10 minutes and some of the tarts were slightly burnt. So for the second batch, I reduced temperature to 220C and the tarts turned out just nice.


Egg Tarts (40-44 mini size)
Pastry
  • 180g Unsalted butter
  • 70g Powdered (Icing) sugar
  • 24g Egg
  • 340g Plain flour
  • 16g Evaporated Milk
Custard
  • 160g Eggs
  • 65g Castor Sugar
  • 50g Evaporated milk
  • 210g Water
Method:
  1. Cream softened butter with sugar until white and creamy.
  2. Add egg (24g) and mix until well incorporated.
  3. Add evaporated milk (16g) and mix until well incorporated.
  4. Add in flour and mix well. A soft dough will form.
  5. Chill the dough in the fridge for an hour
  6. Press the dough into a tart mold and press well to line the tart mold, as evenly and thinly as possible.
  7. Chill the lined tart molds for 15 mins. In the mean time, prepare custard.
  8. Prepare custard by mixing all ingredients for custard together. Sift the custard before using.
  9. Pour custard mixture into tart casings.
  10. Bake at 220C for 10 mins until custard sets. The custard will still be a bit woobly, let cool till lukewarm before eating.
As usual I couldn't wait till the tarts cool completely and pop one into my mouth once they are cooled enough to eat. Hmmm, the crust was slightly crispy and crumbly and egg tarts really silky smooth this time. And the taste tests by hubby and dear son? Hubby said they were good, in fact slightly better than the previous attempt. As for dear son, he ate two pieces, his actions already proved the worth of my egg tarts since he is such a discerning eater.

The tarts turned a little soft the next day despite being kept in an airtight container (I didn't keep them in the fridge), probably due to our high humidity. Just need to pop them into a pre-heated oven (180C) for a couple of minutes and they'd turn crispy again.

24 August 2011

Pau Workshop

Attended a Pau making workshop conducted by Chef Valerie Kong at Shermay's Cooking School the past Saturday. And boy I had so much fun! It's been a while since I last attended any hands-on class and I was really looking forward to this one. I'm hopeless in pleating pau skin (tried before) and hence wish to get some practical tips from Chef Valerie.

The recipe pack included the basic dough, sweet and savoury fillings of red bean (tau sar), chicken and vegetable, as well as bonus recipes on Char Siew Pau, Egg Yolks Custard Pau, Tua Pau and Lotus Bean Paste Longevity Pau.

Chef Valerie first demo-ed the steps in preparing the steamer which is crucial in ensuring that the paus are well-steamed; followed by the three fillings.

Vegetable Pau is supposedly the easiest among the three Paus that we were attempting, in terms of the wrapping. Preparing and frying the vegetable was pretty straightfoward, the filling could also be used for wrapping spring roll.
Followed by Chicken Pau, which even included half a quail's egg. The essential step in preparing the meat filling was 'whacking' the meat to tenderise it.
Don't underestimate the simple, plain looking Red Bean (Tau Sar) Pau. The filling was the hardest and most tedious to prepare, and wrapping the filling was no mean feat! It was even harder than pleating the Veg and Meat Pau, if not wrapped properly, the filling would burst out of the skin during steaming. You'll see how later.
Finally, action time! Chef Valerie first went through with us the weighing of ingredients followed by kneading the dough. Then it's our turn. I would say preparing the dough was rather easy, all you need is to combine the ingredients (carefully), and then put your heart and soul (and strength) into kneading the dough. At first the dough looked rough but after a good kneading of 10 minutes, it became as smooth as a baby's buttocks :p

After that, we let our dough proof while Chef Valerie demo-ed how to wrap the three types of filling.
Like I said earlier, the Vegetable Pau was the easiest to wrap. Actually, I thought the Chicken Pau was easier as the filling was firmer and drier to wrap. The veg filling was oozing with sauce hence quite difficult to pleat properly. The advice was to avoid scooping too much liquid or to squeeze the veg a little before wrapping.

Tadah, the top photo was my wrapped Paus before steaming and the bottom photo after steaming. The Red Bean Pau looked alright before steaming but actually I stretched the skin too much during wrapping so the red bean burst out of the skin during steaming, resulting in the ugly looking buns :( For the Veg Pau, the liquid oozed out a little and stained the skin :( The Chicken Pau looked the 'most presentable' of the lot :)
Nonetheless, not bad for a first timer right? At least I learnt how to pleat the skin properly. With more practice, my Paus could possibly improve in appearance next time?
What mattered at that point was the taste :p Hmmm, the Veg Pau was yummy! The bun was soft and fluffy (my labour of love was worth it) and veg filling savoury.
We also tried the Chicken and Red Bean Paus made by Chef Valerie during the class. The buns tasted great even when cold. Nothing beats home-made buns! Definitely going to try making them one of these days!

17 August 2011

Kueh: Asian Desserts 2 Workshop

Last Friday, I attended an Asian Kueh Demo Workshop by Chef Valerie Kong at Shermay's Cooking School. The recipes demo-ed are local favourites and certainly hubby's and mine too! So I was really keen to join the class.

4 recipes were demo-ed during the 3hr workshop with 2 bonus recipes included in the recipe pack.
  • Rainbow Lapis - also known as 九层糕, probably due to the 9-layers of pretty colours in the kueh. Made with mainly tapioca, rice flour and coconut milk, not to be mistaken with the Indonesian Kueh Lapis.
  • Onde Onde - small round balls of pandan-flavoured glutinous rice and sweet potato, coated in grated coconut, filled with melted gula melaka.
  • Kueh Kochi - Pyramid-shaped gula melaka-flavoured coconut, encased in pandan-flavoured glutinous rice, wrapped in leaves and steamed.
  • Kueh Koswee - Gula melaka-flavoured kueh made of glutinous rice, covered in grated coconut.
  • Bonus recipes are mung bean filling for Kueh Kochi and Kueh Dardar.

Hubby loves Onde Onde! Me too :) I love how the sweet caramel flavour gula-melaka syrup bursts into my mouth each time I chew into a piece of the onde onde.
Each participant was given one piece of onde onde to try during class and everyone commented that one was not enough! Yep, the onde onde was addictive indeed, very bouncy, chewy and flavoursome with the tastes of coconut, gula melaka and fragrance of pandan. I like it that each ball was made very small so not a mouthful when popped into the mouth (no pun intended!).

We brought home two pieces of Onde Onde and hubby finished the two pieces all by himself, claiming that they were very nice! Looks like this recipe has gotten his stamp of approval, will KIV for making some when I have the time.
Actually I have never eaten Kueh Kochi before. But during the class, I learnt that the dough for Kueh Kochi is the same as that of the Onde Onde, just that one is boiled and the other steamed. The inti (means filling) demonstrated during class is grated coconut fried with gula melaka (which is same as the filling for Kueh Dardar). I thought the combination of the dough with the inti was a little heavy for me. Probably the mung bean filling might be better? Well, still not a fan of Kueh Kochi at this point.
Kueh Koswee is actually very easy to make. So far, I like the ones sold at Poison Ivy, Bollywood Veggies. Their version is softer texture, whereas Chef Valerie's is more bouncy and chewy which I now much prefer :)
Chef Valerie made the Kueh Koswee using mini chwee kueh moulds and they looked simply adorable. I like mini versions of kueh and cakes, easier to eat just pop one whole piece into the mouth and let the flavours fill our senses.
I'm sure most of us have this sweet childhood memory of peeling the soft and chewy rainbow lapis and eating them layer by layer. Sometimes, we even stick them on our tongues and pretend that we have extra long colourful tongues :p

Chef Valerie's version of Rainbow Lapis looks more poised and elegant with just three colours, white, green and red. The texture is also much softer and stronger in coconut taste, akin to the ones sold at Bengawan Solo. But I find the coconut taste a little too strong for my liking and the layers a little thin and soft, not easy to peel. Probably would reduce the amount of coconut milk when I attempt this recipe. And try adding more colours too :p

Now I have 3 more recipes to my to-do list. Uh-oh, too many recipes, too little time!

12 August 2011

My first attempt at Egg Tarts

Dear son loves egg tarts. I guess most kids and even many adults like the egg tart, for the crispy crust with silky smooth sweet egg custard, quite a matchmade in heaven. Personally I prefer the Hong Kong Dim Sum type with flaky crust (using oil dough and water dough), rather than the simpler version made using sweet shortcrust pastry.

So far I have hesitated to attempt the egg tart as I know the difficulties in handling such dough in our humid climate. Attended a hands-on class on flaky egg tart at Creative Culinare before and I was totally hopeless in rolling, beating and folding the dough, resulting in really ugly looking egg tarts that were very hard. Therefore, I have not attempted this before at home.

But recently, I came across two recipes using shortcrust pastry method from Precious Moments and Kokken69 and rekindled my interest in making the tarts. The recipes look quite easy to manage with basic ingredients that I already have in my pantry.

Decided to try the recipe from Precious Moments first.

Well, preparing the dough and egg custard was pretty straightforward. And I was happily thinking to myself that I could do this every other day! But the tough part came with cutting the dough into round shape and then moulding the dough into the tart mould. I had already chill the dough sufficiently in the fridge but the dough turned soft very quickly making it very pliable; couldn't even lift up the dough after cutting them using the cutter. I had to stick the dough into the fridge every now and then. Many of my tarts turned out with uneven edges.

Then, I also realised that the surface of the egg custard turned brown rather quickly. I had to remove the tarts from the oven short of the required baking time. Probably my oven was too hot. Anyway, the tarts turned out not too bad, the crust was quite crispy and custard soft (but not silky smooth enough) and sweet. I thought it was a little too sweet even though I had already reduced the amount of sugar, could do with even lesser next time then.

Dear son didn't take well to it though, he ate only half and rejected the rest. Hmmm... wonder what's wrong with the tart or is he too jaded already? Anyway, will attempt the recipe from Kokken69 next to compare the difference.

Egg Tarts(Recipe from Precious Moments. I halved the recipe and yielded 12 egg tarts)

For the crust:
  • 95g unsalted butter, softened
  • 113g plain flour
  • 38g custard powder
  • 30g icing sugar (original recipe uses caster sugar)
  • 1/2 egg (about 27g), beaten
Method:

  1. Crumb the butter with the plain flour, custard powder and icing sugar together into fine crumbs.
  2. Add in the beaten egg and form a dough.
  3. Rest dough in fridge for 10 mins or more till the dough is slightly harder (easy to handle) but not too hard (dough will break easily).
  4. Using a plastic sheet, roll the dough thinly and using a cookie cutter, cut into disc and place into tart mould.
  5. Using a fork, prick some holes into the dough. Set aside.
For filling:
  • 100g boiling water
  • 50g caster sugar (original recipe uses 75g)
  • 2 and 1/2 eggs (about 80g), beaten
  • 125g fresh milk
Method:

  1. Preheat oven at 200C for 15mins
  2. Dissolve sugar in boiling water, let cool, add egg and fresh milk. Do not beat, just stir and mix.
  3. Strain the mixture and pour into the tart mould.
  4. Bake at 180C for 25mins or until cooked.

09 August 2011

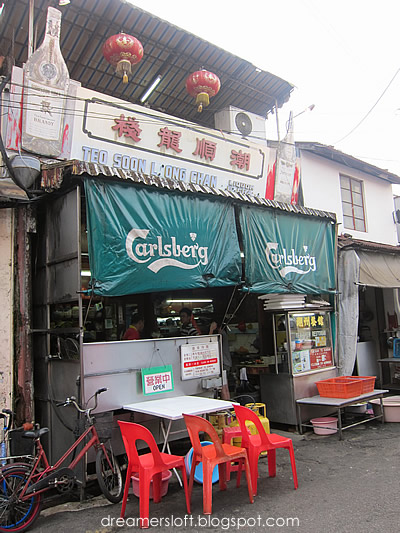
Teo Soon Loong Chan Teochew Seafood Restaurant, Melaka

Two Saturdays ago, hubby, dear son and I joined a group of our Uni friends on a Durian Degustation trip to Sim Koa Yen, a large durian estate in Melaka. The durian feast was ok, but our highlight of the trip turned out to be dinner at a Teochew Restaurant in Melaka. If not our friends' recommendation, we wouldn't have know that there's such a gem hidden in Melaka, in the Jonker Street area.

Our friends had to make prior reservations, for this restaurant is strictly by reservations only. I think mainly due to the limited seating capacity, at most 5 or 6 tables, packed brim to brim, and of course food is good.


Judging from the shop front, you hardly realise that it is a restaurant.

And the shop front is the kitchen. Yup, that's right, we entered the restaurant through the kitchen! How cool was that?

The whole place looks dated and very retro but this is the charm of the place. I enjoyed the boisterous atmosphere with loud chatters and laughters as diners tucked in the feast heartily.
Did I mention that the restaurant is tiny?
Yup, I was basically seated next to the vegetables and seafood! See that plate of mangoes to the top left of this photo? Dear son's seat was just next to the mangoes and he kept "stealing" taking them to play :p LOL!! The owner, a very friendly and nice Teochew grandpa, was so gracious and said never mind to dear son's mischief.
Basically, we just look at the seafood and veggies available and place order, cooking methods will be recommended by the chefs.
The first course was their signature oyster noodles aka "black" noodles. The gravy was very savoury and fragrant and the noodles al dente. Dear son loved it!
Braised Pork with bittergourd. The bittergourd was very soft and no longer very bitter; braised pork very tender and succulent. The sauce was perfect with rice!
Deep fried prawn and pork wrapped in beancurd skin. I love this, the skin was very crispy and the innards fresh and juicy.
Stir-fried spinach. Fresh and crunchy, personally I'm a fan of spinach so no complaints.
Steamed Pomfret "Teochew" Style. The fish was quite fresh, dear son kept asking for more.
Stir fried bamboo clams in sambal sauce. I love this, the clams were succulent and the sambal was perfect!
Ginger Wine Chicken. I like the taste of this chicken, very fragrant with ginger and wine. Reminded me of my confinement food :)
And finally Orh Nee (yam paste) dessert which was another signature dish. The yam paste was cooked perfectly, very creamy and smooth and not too sweet. And even better complemented with steamed pumpkin and ginko. A must-try dish here! They even sell convenient packs for this.

All in all, it was a nice dining experience here, good food with great company. Next time we visit Melaka, will definitely be back for a meal and try the other dishes.

For more info, visit their website at http://www.tslcmalaysia.com/. Remember to make reservations!

05 August 2011

Tokyo May 2011 - Part III

Hope you have enjoyed my ramblings on the Tokyo trip in May (Part I and II) :p

Well, here's just a short one sharing some of the interesting pastries and zakka that I brought back.

This was the swiss roll I bought from 自由が丘swiss roll house at Jiyugaoka. Since it was perishable, I ate it immediately upon reaching the hotel. The sponge was so tender and light and perfect with the cream. No wonder it was so popular.

When I was at Isetan Shinjuku, I was totally overwhelmed by the desserts and pastries there. Later I found out that Isetan Shinjuku has the best and largest number of pastries and desserts specialty counters. So for those who are fans of pastries, this would be a haven. Famous brands like Pierre Hermes, Patisserie Sadaharu Aoki, Patisserie Kihachi and soooo many more which I don't even know.

I bought these Canelé and Financiers from Patisserie noix de beurre. Saw many people queueing for them so decided to try too! The financiers were very good, slightly crispy on the outside with tender and moist crumbs. Love it! This could probably replace my lost Financier from Mont-Blanc at Jiyugaoka. The Canelé was quite well done too, with crunchy caramelized crust and soft and tender custard centre. I also bought a lemon cake which was shaped just like a lemon, but forgot to take photo before eating :p

This was a very interesting pound cake from 365 Loriod re-by anniversaries. It's amazing how creative the Japs are, turning an ordinary looking pound cake into something special. This was a lemon pound cake, the top decorated with bits of candied orange peel and ginger, chopped pistachios and some lemon glaze.
And the centre of the pound cake was a heart-shaped apricot jelly-candy. Pretty right? Taste-wise, quite good too, the pound cake was quite moist and tender. There were another rose version, topped with tiny bits of rose petals and chopped pistachios and the jelly-candy was strawberry flavoured.

This was from Yoku Moku, once again at Isetan Shinjuku. Tiny little financiers topped with sugared jelly-sweets, five flavours in total like earl grey, coffee, green tea.... Couldn't resist buying them as they looked so pretty, like little pieces of jewellery. Despite its small size, the financiers tasted good as well.

Another interesting, couldn't remember from which deli already. An earl grey madeleine, topped with white chocolate tinted baby pink and topped with rose petals and chopped pistachios.
How did the Japs managed to make an ordinary looking madeleine look so pretty, simple yet stunning? And unlike some madeleines I tried before, this was not dry at all, quite tender and moist. Anyway, this gave me the inspiration and some ideas on cake decoration.

It was definitely a feast for the eyes at Isetan Shinjuku. As I had very little time there, I could only scan through everything briefly :( Wished I could stay longer. Next time perhaps.

Anyway, these are just some of my shopping. Have hiddened packed everything into my cabinets before taking photo and hence too lazy to take out everything again :p
Cabbage shredder, cutesy food decorating tools from Loft; clock cum kitchen timer from francfranc, large size flour sifter with base lid from Tokyu Hands, mini size glass jar from Natural Kitchen and so on...
Lip gloss, bath gels and hand soaps from Apivita, Timeless Comfort, Afternoon Tea; pouches, umbrellas from Afternoon Tea, pretty iphone counter from Loft....

Zakka Shopping in Japan is really fulfilling! I love Japan!!! LOL :p

Shopping Resources