Showing posts with label Baking Workshop. Show all posts

10 February 2018

Croissant-making with Bakerz@Work Academy

Back in October last year, I attended a Basic Croissant Workshop at Bakerz@Work Academy. I've always been curious about croissant making; heard that the process is very difficult and tedious. Since my family loves croissant especially the kiddo, I decided to go for the one-day hands-on workshop to experience the art of making hand-rolled croissants.

The workshop started at 10am and ended at 5pm with an hour lunch break. Class size was small with six students and the "classroom" is a comfortable commercial bakery kitchen. The Chef-Instructor was Chef Kel who is very friendly, patient and very willing to share his experience and tips about making croissants in home kitchen.

During the workshop, we learnt about dough composition and lamination techniques, yeast fermentation, gluten development and flavour formation. Chef Kel would go through each topic with theory, followed by demo and then we proceeded to hands-on with supervision and guidance.


Tadah, proudly presenting my first-ever hand-rolled or hand-laminated croissants! They were certainly a far cry from being perfect, but I was already very happy and satisfied with the results. I mean, I could actually make my own croissants now!

That was me, super excited to have finally reached the stage of proofing for my hand-laminated croissants.


Although it's a little daunting at first, trying the grasp the techniques of folding and rolling, but as we proceeded, we began to get the hang of it. It was helpful that we worked in a buddy system where we reminded each other the steps; and Chef Kel was around to render assistance whenever we were stuck and unsure.


Some might feel that all the work that took one whole day just for what? Eight Croissants? Is it worth it? To me, totally! It felt satisfying being able to churn out homemade artisan croissants using the best quality ingredients and serving them to family members. Freshly baked croissants made with love tasted extra yummy :)

Actually the whole day process can be separated into two or even three days so that it's not so tedious. With careful planning and time management, it's not difficult after all. Patience is the key to croissant making as a lot of time is spent waiting between the proofing, folds, rolling and especially if our home kitchen is hot without air-con, the dough has to be put back to the fridge/freezer more times as it turns soft very quickly.

Chef Kel also showed us the process of making Pain Au Chocolat using a laminate machine. Wow, using a machine makes the rolling job a breeze and the layers are more uniform and neat! See how nicely the layers of the Pain Au Chocolat turned out? Beautiful!

I'm afraid it would be almost impossible to achieve such uniform and distinct layers using hand-rolled method, but it's not possible to buy a commercial machine at home lah.
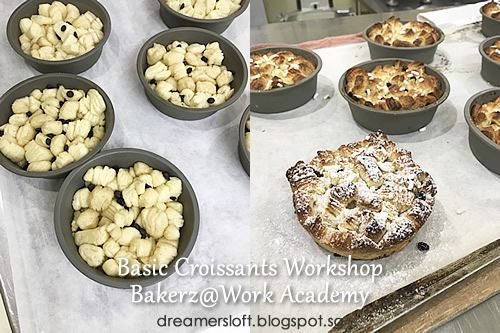

When making croissants, there will be leftover dough after cutting and shaping the croissants but they don't go to waste at all. We can either keep the dough as old dough for making sweet breads/buns, or add on to the next batch of croissants or make them into Monkey Bread, by cutting the dough into small pieces and toss them with sugar, chocolate chips, dried fruits, nuts, cheese etc. These were really yummy!


Here were the works of the six students who attend this workshop. Mine's forth from the left. All in a day's work.

All in all, I would highly recommend this workshop to anyone who wish to learn how to hand-roll croissants and make their own croissants at home. It's advisable to attend a hands-on workshop to learn the technique and get a feel of the entire process. I can confidently say that the recipe and techniques taught here is foolproof. And after practising croissant making a few times and familiar with the technique, it became easier and manageable, and being patient and meticulous is more crucial in ensuring success in croissant making.


Here's sharing my practices so far :)

Practice I


My first practice one week after the workshop. For this very first practice, I must say it was not easy at all since I was working in a hot kitchen without air-con, unlike the workshop where the classroom is fully air-conditioned. There were some frustrations as the dough got soft very quickly and had to go in and out of the fridge and freezer many more times than expected.

Nevertheless, managed to complete the croissant making. The croissants didn't turn out great but hey I was just happy to be able to try it at home. And must keep reminding myself PATIENCE PATIENCE PATIENCE.


Practice II


A batch I thought cannot make it and wanted to give up halfway as I didn't thaw the butter properly and parts of it broke during lamination resulting in many butter patches. Proceeded half-heartedly anyway, and the croissants were poorly cut, shaped and rolled.

They still looked like croissants and tasted ok, but the crumbs look terrible. A reminder to self, every step in the croissant making is important.

Practice III


My third practice before my kitchen was closed for my relocation.

Took the time to ensure that each step was followed through meticulously and exercise more patience when it came to resting the dough in the freezer/fridge in between folds and rolls.

Was quite happy with the results, the crumbs turned out nicely, although the shaping and sizing still needed improvement.


Practice IV


My first practice after shifting to Thailand. Glad that I managed to find pastry butter and T45 flour for making croissants at a baking supplies shop in BKK.

A good chance for me to test my oven for baking croissants as well, as this oven at my rental house is an analog one instead of digital which I'm used to.

Tried my best to be patient and rest the dough well between the folds and rolls; the croissants didn't turn out as well as Practice III. Could probably proof 10-15 mins longer, but I was rushing to go out to pick up my kiddo from school ("rushing" is a no-no in croissant making! Could have placed the croissants in the fridge for low temperature proofing while I was out).

Although not totally satisfied, was happy that I could continue to practise on my croissant making here.

Practice V


My latest practice which was just last week; this batch I really took the time to rest the dough well in the freezer/fridge each time, and took extra care to roll properly.

Just when I thought it's going to be THE perfect batch, alas, life is not perfect.

Crumbs turned out beautiful I believe. But somehow all the shapes came out different, some lopsided and some plain ugly, only the shapes of one or two could make it.

Not sure what went wrong? Was it the weather which was really hot and humid and I over-proofed croissants, was it because I didn't rest the dough enough between the folds and rolls? I think during the final rolling, although I rolled the dough to about 3-4mm thickness, somehow after cutting, it became 5-6mm thick, resulting in bigger croissants. Probably due to the size, it affected the proofing?

Oh well, all I can say is, every croissant making is a new learning experience, and I shall continue to strive for the best possible homemade croissants!

03 September 2016

Korean Buttercream Cake

Presenting my first-ever Korean Buttercream Flower Cake!

I must say this was the most tedious cake I have done so far, took me almost two days to complete. Nonetheless I liked how it turned out, given that it was my second attempt at making Korean buttercream and third attempt at practising flower piping. The piped flowers were not perfect yet, as compared to the ones you see on internet or instagram but I'm happy with the current result :)


I couldn't remember, did the Korean buttercream flower cake craze start last year or the year before? I always marveled at how pretty the cakes look, so dreamy and sweet looking right? However, I have somewhat a concern over the amount of buttercream used. First of all, I'm not a buttercream fan, don't really eat much of it as it's too heavy and sweet for my palate, and secondly the aftermath washing up is rather tedious with the tools, bowls, utensils used oily and messy.


So I usually prefer just a simple rose design using a star tip which can turn out quite pretty too (check out those designs at http://megpastrystudio.blogspot.sg). There are customers who asked me whether I could make Korean buttercream flower cakes, which I had to turn down their requests or provide them with alternative of simple rose design.


Well, I know I wanted to learn if given the opportunity, but so far the workshops conducted by some baking schools here cost a princely sum of more than $2000 as they specially fly in Korean bakers to teach the class.

Then recently I chanced upon BakeFresh Studio which offered a basic hands-on class at $200+ which is so much more affordable, with a local baker teaching the class. She had learnt from a Korean baker and perfected her piping skills and hence started conducting classes.


Hence, I jumped at the opportunity and attended the Korean Buttercream Flower Cake hands-on workshop two weeks ago :) The class was 5-hours long and I learnt how to make Korean buttercream which uses Italian meringue buttercream technique with a twist to the method in order to make the buttercream look glossy. And thereafter 3 types of flowers, namely rose, ranunculus and apple blossom were taught, as well as flower bud and leaf. The learning curve was quite steep for me, and it took me a while to grasp the piping technique. Towards the end of the class where we were required to assemble the cake, I couldn't manage to create a proper wreath design as my piped flowers were too big and I make-do with a dome-shaped design. But was really quite disappointed with how my creation turned out :(


Hence within the next two days, I decided to make the buttercream at home as well as practise the piping techniques while I could still remember the steps clearly. Otherwise with my goldfish memory these days, I'm afraid I would forget and the workshop would have been wasted.

Making the buttercream is not difficult with the right tools and technique; however I'm working without air-con and hence the buttercream melted very quickly using piping. After piping a few flowers, I realised that it is important to have the right temperature and consistency of buttercream in order to pipe the flowers properly. After sweating it out the whole afternoon, these were the only more acceptable ones :(

I must therefore think of a better workflow (since there are a few flower designs and colours involved) and work on small batch of buttercream each time and keep the remaining in the fridge.


The following week, I decided to try again. Spent half a day making 3 layers of Japanese genoise sponge cake in ombre colours then fill and crumbcoat with chantilly cream frosting. Yes, I could have made my life easier by making any old cake which is simple, but I really wanted to see how the ombre cake layers would turn out with the flowers.

The next day, started with making the Korean buttercream. Thereafter worked on piping the flowers a few pieces at a time, and made sure to store them in airtight box and chill them in fridge prior to use. Then iced the entire cake with buttercream, chill sufficiently and finally assembly of the cake with touch-ups using flower buds and leaves. Had to chill the cake for 15-20 mins to let it set before I could finally take photos and cut the cake. *phew* really tedious and time consuming, and I haven't even mention the amount of washing and cleaning up!

Funny thing was, both hubby and I as well as the kiddo enjoyed the cake and chantilly cream and scrapped away most of the buttercream :p LOL! We are indeed not fan of buttercream. Managed to eat only 2/5 of the cake and gave the remaining to a friend :)


I guess I would open up this cake for orders, but subject to availability as much more work, planning and time is required. Prices would also be at least 1.5 to 2 times higher than my usual cake due to the effort and amount of ingredients used.

The cake layers would be my signature Japanese-style genoise sponge, made using Japanese cake flour, Japanese sugar, egg, milk and unsalted butter. The cake texture is tender and light, and less sweet.

The cake filling and crumbcoat is chantilly cream frosting, made using dairy whipping cream and mascarpone cheese and snow powder (optional, can be omitted for sugarless version).

And finally the Korean buttercream flowers, made using unsalted butter (French butter, either Elle & Vire or President), caster sugar, water and egg white. The buttercream would be on the sweet side.

This particular cake is 7" round and 3 layers, good to serve 10-12 slices.

Please drop me an email at megtan@singnet.com.sg if interested!

14 April 2014

Modern Vintage Cupcakes Hands-on Workshop

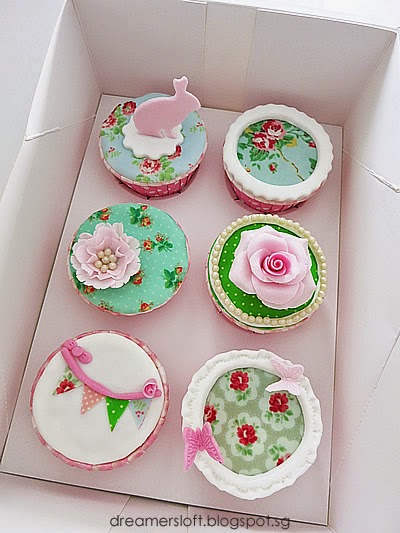
Last Friday, I attended a Modern Vintage Cupcake Decoration Hands-on Workshop at Shermay's Cooking School conducted by Chef Jackie Tay. The workshop focused on basic techniques and applications in using fondant, gumpaste and edible icing images, and I got to decorate 6 cupcakes during the 4hr workshop :)

Although I shun away from fondant and gumpaste in my bakes because I don't like their cloyingly sweet and chemical taste, I do agree that fondant and gumpaste can create intricate and pretty looking edible decorations that look too good to eat.

When I saw the workshop put up at Shermay's Cooking School, I was immediately tempted because the cupcakes look irresistibly pretty and the vintage old English kind of theme appeals to me. It's always good to learn more, in case I may really need to apply fondant, gumpaste or icing images on my bakes in future. Moreover, I still have some credits left over from my expiring membership.

Here's my work. Sweet looking right? I couldn't bare to eat them!

Each student was provided with all the tools and materials but only edibles could be brought home. The earl grey cupcakes were pre-baked already, recipe was given in the recipe pack.

First we had to level the cupcakes and then prepare the fondant for the cupcake surface. Realised it's not that easy to smoothen the fondant surface.

Next, we cut the edible icing images and lay them on top of the fondant surface. Basically any images can be printed onto icing sheets with edible ink and there are a number of suppliers in Singapore that provide the printing service albeit quite expensive; an A4 size icing sheet cost about $12! Actually most ink jet printers could do the job so long as you have special edible ink cartridges but I guess maintenance would be an issue and it's not practical to have an ink jet printer dedicated to icing image printing only at home unless doing such printing regularly.

We then proceed to make buntings, bunny silhouette, butterflies, sugar plaque, pink carnation and english rose using fondant and gumpaste. I was so absorbed in making them that I forgot to take photos along the way.

At the end of the workshop, my 6 cupcakes for takeaway!

This carnation is my favourite of all the designs, created using 3 layers of gumpaste cut-outs from 3 sizes of PME carnation cutters. The difficulty in this was rolling the gumpaste till paper thin and then rolling the edges of the petal using a tool to create a slight ruffle effect.

I like this hand moulded English Rose as well. As this is done using free hand petal by petal, it's the most tedious of all the designs. Each petal had to be paper thin as well so that the rose could look soft and realistic.

The gumpaste butterflies were created using a motif stamp so it's not difficult but have to handle very carefully as it's very flimsy. The sugar plaque was made using fondant cut-outs of 2 circles. The outer edge of the plaque was then crimped using a crimper to create a raised ruffle design.

The bunny was quite straight forward, simply traced the silhouette from a bunny cut-out on a piece of gumpaste. The base was just a scalloped plaque stamped from fondant.

The buntings were cut-outs from leftover icing images and glued onto the fondant surface. The rope, bow and rose bud made using gumpaste.

This was the simplest design of the six. Just cut out a circle using scalloped stamp then cut out a smaller circle using another circular stamp. Although this was very straightforward, it was not easy to make sure the circles look balanced.

I was very glad to attend the workshop and gained useful knowledge and tips that I'm sure would be useful one of these days :)

Did I eat the cupcakes? Well, I ate half a cupcake just to try. Still don't like the taste of fondant, gumpaste as well as the icing image :( Doesn't matter, so long as they are pretty to look at!

10 November 2013

SCS - Channel 8 Facebook Friends Event at Capella Hotel, Sentosa

I just returned from Hokkaido a few days back and was feeling rather sluggish and grumpy (due to the humidity, as compared to the nice cold climate in Hokkaido). So was really looking forward to this SCS - Channel 8 Facebook Friends Event - Sweet Culinary Sensations Workshop held at the Capella Hotel, Sentosa this afternoon.

When I first saw the announcement, I knew that I wanna attend coz I've never attended such events before, I can learn to make a new cake, it's held at Capella with a delectable high tea spread and the attractive goodie bag sponsored by SCS dairy worth $128!! I managed to convince hubby to join in the event with me and we were lucky to be selected after submitting our details via Channel 8 FB page :)))


The event was hosted by Yes933 DJ Jiahui and the cakes were demo-ed by Chef Sam Yong from Capella Hotel. 2 recipes were demo-ed, the Strawberry Fraisier Cake and Capella's Signature Chewy Chocolate Chip Cookie.

There was also a Bake-off Challenge, where 5 pairs of contestants (selected from participants who opted in for the challenge) would re-create the Fraisier Cake within 45 mins and judged by SCS Dairy Singapore, 2 renown food bloggers and votes from remaining participants. I had wanted to opt in for this challenge but hubby wasn't keen. But he sort of regretted after hearing that winners could get Capella vouchers. Haha.


 Tadah! And this was the Strawberry Fraisier Cake created by Chef Sam.


Throughout the workshop, he provided many useful tips about baking and answered any queries which the participants have. With Chef Sam's detail explanations, I'm definitely gonna to bake this cake soon!


Besides the Strawberry Fraisier Cake, he also demo-ed the Capella's Signature Chewy Chocolate Chip Cookie which was supposedly so popular that his kitchen had to churn out thousands each month and guests also requested for the recipe repeatedly!

Here's a different presentation of the cookie. The giant dough was baked in a cast iron pan and then topped with Vanilla Bean ice-cream and drizzled with salted caramel sauce. Yummy!


All participants were also treated to a delectable high tea spread of pastries all made using SCS butter. The photos only showed a fraction of what's available, there were at least 10 different types of pastries!

I loved the chewy chocolate chip cookie and lemon meringue tart and hubby liked the choux pastry oozing with cream and the cranberry scones.


The Strawberry Fraisier Cake was a delight as well, the sponge was really soft! Only let-down was the banana cake which tasted a little stale and hard.


After the event, all participants received a limited edition baker's kit worth, kindly sponsored by SCS Dairy Singapore! There's an apron, oven glove, 2 silicone baking pans, measuring cups, measuring spoons, non-stick baking tray, spatula, whisk, silicone cupcake mould and even an electronic timer! So generous of SCS.


Hubby and I each received a set of the kit and dear son immediately claimed one box for himself. Our little budding baker was extremely pleased with his own set of baker's kit!


I can't wait to attempt the Fraiser Cake recipe soon. Uh-oh, I still have hundreds of photos from the Hokkaido trip and 5 rainbow/ombre cake orders upcoming! Stay tuned!!

04 September 2013

Hokkaido Desserts Workshop by Chef Aki Watanabe

HELLO I'M BACK!

Woah, it's good to be back blogging again. Penning my thoughts in cyberspace and wondering who are the people who read my blog? LOL. I have so many backlogs that I don't know where to start. I think I'll just do it randomly whichever way I fancy :p

Ok first up, the Hokkaido Desserts Workshop by Chef Aki Watanabe at Shermay's Cooking School a week ago. I've never been to Hokkaido YET (will be going in November, yippeeee!) but I've heard so much about the abundant produce in Hokkaido, how sweet and fresh everything is. So I signed up for the class immediately when it was published in the school's website.

4 recipes were demo-ed during class:
  • Lavender Shio Milk Gelato
  • Hokkaido Pumpkin Custard Pudding with Candied Pumpkin Seeds
  • Rum Raisin White Chocolate Butter Cream Cookie
  • Camembert and Cream Cheese Tart
 
2 bonus recipes, no demo-ed during class:
  • Milk and Honey Jam
  • Camembert and Cream Cheese Chiffon Cake


Chef Aki demo-ed on how to make a crispy tart case first, followed by the camembert cheese and cream cheese filling. Some prunes were also added into the filling for a tinge of fruity sweetness. And finally topped with sliced camembert cheese.


This Rum Raisin White Chocolate Butter Cookie is a replica of the famous Hokkaido cookie, Shiroi Koibito 白い恋人, except for the addition of rum and raisin.

Everyone was given a generous portion of the cheese tart and butter cookie. Oooh I love the both of them and I'm so going to bake them when I have the time.

The tart base was buttery, light and crispy unlike some tarts I've tried before which were heavy and doughy. The cheese filling was creamy and slightly saltish and well complemented by the sweetness of the prunes. Nice combination!

I love the butter cookies. It's actually a tad different from the original Shiroi Koibito, which was thinner and with more melt-in-the-mouth texture. The texture of this cookie was denser and more crunchy. And the rum raisin white chocolate filling, woah, it was so good!


The Hokkaido pumpkin custard pudding was very unique, made with Hokkaido pumpkin and milk. Very smooth and creamy texture. The candid pumpkin and sesame seeds topping could be eaten on its own, albeit a little too sweet.

But somehow, I'm not a very big fan of custard nor pumpkin, so this was ok only.

 
Oh I love the Lavender Shio Milk Gelato. Made with Hokkaido milk, lavender and sea salt. It's very fragrant (not the soapy kind!), milky with a tinge of saltiness. I love this kind of sweety, salty taste. Now I wish I could just fly to Hokkaido to have a cone of their lavender soft-serve!
 
 
Everyone also received a take-home box with the rum raisin white chocolate butter cookie, camembert and cream cheese chiffon cake and milk & honey jam.
 
The milk & honey jam tastes very similar to condensed milk, but a tad too sweet for me.
 
But I love the camembert and cream cheese chiffon cake, very fluffy and cottony soft with strong notes of cheese. I'm definitely going to try baking this chiffon cake coz I really like baked treats that are not too sweet and with a bit of saltiness.
 
Ok, more recipes to add on to my already very long to-bake list!