Showing posts with label Cooking - Asian. Show all posts

27 July 2019

Hainanese Chicken Rice Pau

[ Collaboration with Dancing Chef and Singapore Home Cooks ]


* "Hainanese Chicken Rice" Pau using Hainanese Chicken Rice Paste *


Presenting my new creation using Dancing Chef Hainanese Chicken Rice Paste!

My family loves chicken rice, so I thought of a "on-the-go" finger food with chicken rice flavour that's different from the conventional.

The concept is like a kong bak bao or gua bao but chicken rice flavour :) In fact, this is versatile and can be made into the traditional enclosed bao too.


Chicken rice paste is added to the Pau dough; in addition I added pandan juice for the green colour Pau as I like the aroma of pandan chicken rice.


The Pau has a subtle taste of chicken rice (smells really aromatic during steaming!) and is good to eat on its own but even better with poached chicken, ginger sauce, chilli sauce as well as cucumber, chilli shreds and coriander. *Both the ginger sauce and chilli sauce have Dancing Chef chicken rice paste added too!

It's literally like eating chicken rice, without the rice!
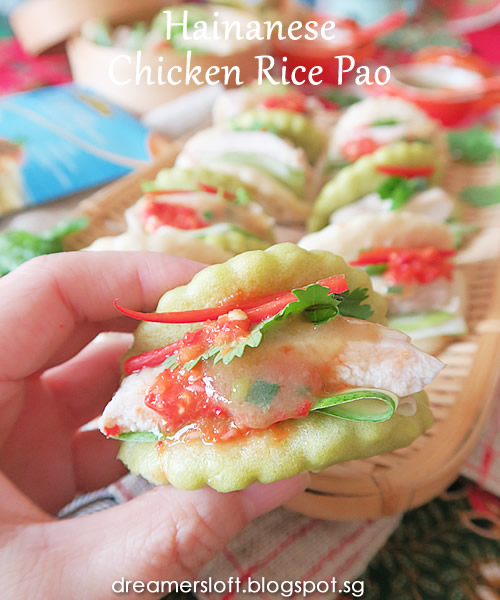

Isn't this cute, I love small size finger food like this, which can be eaten in one or two bites :p

Preparing this Pau is not difficult, just a tad tedious, but trust me it will be popular, especially for those who love chicken rice and/or pau or both LOL :p


For the original chicken rice flavour Pau, the dough is made using Pau flour, baking powder, sugar, yeast/sugar/water mixture, chicken rice paste and water.

Mix all the ingredients together using spatula till a rough dough forms and then knead for 10 mins. Initially the dough might be a little wet and sticky, sprinkle just a little bit of flour will help but not too much, just keep kneading and the dough will turn smooth and non-sticky. Cover and proof for 30 mins.


For the pandan chicken rice flavour Pau, the dough is made using Pau flour, baking powder, sugar, yeast/sugar/water mixture, chicken rice paste and pandan juice.

Likewise, mix all the ingredients together using spatula till a rough dough forms and then knead for 10 mins. Initially the dough might be a little wet and sticky, sprinkle just a little bit of flour will help but not too much, just keep kneading and the dough will turn smooth and non-sticky. Cover and proof for 30 mins.


Once dough is proofed, roll it out to about 5-6mm, use a 7cm mould to stamp the dough skins. Gather the scraps and repeat. If the dough shrinks, let it rest for 5-10 mins before stamping again. I manage to get 7 pcs.

Next use a rolling pin to roll each dough skin into oval shape thickness about 3-4mm. Brush the dough skin with some olive oil, fold it into half, place onto a piece of pau or baking paper (cut into 6cm square), and finally proof for 30 mins. Once proofing is done, steam on high heat for 20 mins and the pau skin is ready!


Repeat the same steps for the pandan chicken rice dough.

My freshly steamed chicken rice flavour paus, they look quite good, don't they? The pau is quite soft and fluffy with nice aroma and subtle chicken rice taste, I couldn't resist eating it plain ;)


Hainanese Chicken Rice Pau
(Makes 14 small size portions, 7pcs of original flavour and 7pcs of pandan flavour)

(A) Pau dough

Original chicken rice flavour (7 pcs)
  • 100g Pau flour or Hong Kong flour
  • 1/2 tsp double acting baking powder
  • 20g caster sugar
  • 30g Dancing Chef Hainanese Chicken Rice Paste (include some oil in the packet)
  • 35-38g water
  • 1/4 heap tsp instant yeast
  • 1/4 heap tsp caster sugar
  • 1.5 tsp water
Pandan chicken rice flavour (7 pcs)
  • 100g Pau flour or Hong Kong flour
  • 1/2 tsp double acting baking powder
  • 20g caster sugar
  • 30g Dancing Chef Hainanese Chicken Rice Paste (include some oil in the packet)
  • 35-38g Pandan juice (blend 10 pandan leaves with 80-100g water, strain to get juice)
  • 1/4 heap tsp instant yeast
  • 1/4 heap tsp caster sugar
  • 1.5 tsp water
  1. Steps are the same for both flavours.
  2. Mix yeast, sugar and water in a small bowl, set aside till the mixture turns frothy.
  3. Add flour, baking powder and caster sugar in a large mixing bowl, stir till well blended.
  4. Add chicken rice paste, water (or pandan juice) and yeast mixture into the mixing bowl. Mix the ingredients together till a rough dough forms.
  5. Transfer the rough dough onto a kneading mat. Knead the dough for 10 mins. The dough may be a little wet and sticky initially, dust just a little bit of flour but not too much. Keep kneading and the dough will turn smooth and non-sticky.
  6. Cover and proof the dough (first proof) for 30 mins.
  7. Once dough is proofed, roll it out using rolling pin to about 5-6mm thickness.
  8. Use a 7cm scalloped round mould to stamp out the dough skins. Gather scraps and repeat. If the dough shrinks, rest for 5-10 mins before continuing. Total yield is 7 pieces for each flavour.
  9. Using the rolling pin to roll the dough skin into oval shape about 3-4mm thickness. Brush the surface with some olive oil, fold into half, place onto a piece of pau paper (6cm square). Repeat for all, cover and proof for another 30 mins (second proof).
  10. Once the dough skins are proofed, steam on high heat for 20 mins and the Pau are ready to serve. Best eaten warm.
(B) Poached chicken
  • 2-3 pieces boneless chicken thighs
  • 2 stalks spring onion, 3 slices ginger, 2 cloves garlic
  1. Bring a pot of water to boil, add chicken thigh, spring onion, ginger and garlic.
  2. Let the ingredients simmer for 10 mins.
  3. Remove the chicken thighs and place in iced water for 10 mins.
  4. Drain and brush the thighs with sesame oil, set aside till ready to use.
(C) Chilli sauce
  • 2 pcs big red chilli
  • 2 pcs chilli padi
  • 20g Dancing Chef Hainanese Chicken Rice Paste
  • 2 cloves garlic
  • 2 tbsp chicken stock
  • 1 tbsp ketchup
  • 1 tsp sugar
  • Juice from 1 lime
  1. Blend all the ingredients in a food processor till fine and well-blended. Adjust seasonings to taste.
(D) Ginger & Spring Onion Sauce
  • 20g Dancing Chef Hainanese Chicken Rice Paste
  • 2 stalks spring onion, finely chopped
  • 80-100ml chicken stock
  • 1 tsp sugar
  • corn starch water
  1. Add chicken rice paste and spring onion to a small pot, stir fry on low heat for 30s.
  2. Add water and sugar, stir till well-mixed.
  3. Thicken with corn starch water if the sauce is too watery.

(E) Assemble
  • 14 pcs original and pandan flavour chicken rice pau (from A)
  • 14 pcs chicken thigh (from B, cut the chicken thigh into sizes that fit the pau)
  • Cucumber, coriander, chilli shreds
  • Chilli sauce, Ginger & spring onion sauce (from C & D)
  1. To serve, take a piece of pau, open up, place cucumber, chicken thigh, coriander and chilli into the pau, and finally drizzle some chilli sauce and ginger spring onion sauce.
  2. Best eaten warm.

NOTES:

  • This pau is best eaten warm, it will turn a little hard when cold (just like mantou). To reheat, steam for 5 mins. 
  • As no preservatives, bread improvers or softener is added, the pau is best eaten on the same day, or keep in fridge for 1-2 days. Reheat before eating.
  • I made the pau to be small size, eaten in 1-2 bites. For regular or bigger size pau, increase quantity of ingredients and use bigger mould to stamp the dough.
  • This dough can be made into conventional enclosed pau too, or simply eaten as mantou.


This Pau is visually appealing and taste yummy, suitable for parties and gatherings, especially for the upcoming National Day!

So this is also my tribute to Singapore's 54th Birthday :)


Hope that all of you like my creation :)

Dancing Chef™️: One Paste, Many DishesBe (surprisingly) different

#DancingChefSG

AUGUST PROMOTION:  Dancing ChefTM Pastes 100g 2 for S$5.00 (UP: S$2.85) Available at Cold Storage, Giant, NTUC FairPrice and Sheng Siong

Give it a try today with Dancing Chef convenient pastes!

01 March 2019

Asam Laksa

How many of you are like me, love to eat Asam Laksa but scared of overwhelming fishy smell, and also dislike handling raw mackerel fish or Ikan Kembong, the small fish that's used to make the laksa?

The thing is, I've been craving for Asam Laksa, missing the flavourful, tangy and spicy fish broth with smooth & chewy rice noodles as well as the different textures/colours toppings for the laksa. And no, Asam Laksa is definitely not available where I stay currently (in Thailand).

I'm so glad to find Ayam Brand Sardines in Extra Virgin Olive Oil at the supermarkets here! It has nearly no fishy smell (probably because the sardines are brined in EVOO) and so much easier to handle (fish bones are teeny tiny and can be mashed up easily, or just remove the centre bone with ease).


This is my quick and easy Asam Laksa, without having to go through the trouble of cleaning raw Ikan Kembong fish, preparing complicated fish broth or removing bones from the fish etc etc. Do note that I replaced or omitted a few ingredients as they are not available where I stay.

What I did was, blend the rempah spice paste ingredients with some EVOO brine from the can, then stir-fry the rempah using the remaining brine as well as the sardines together until fragrant. Next add water, instant fish or ikan bilis cube (yes, it's cheating but hey, I'm looking for quick & easy & fuss-free) and Thai basil, boil for 10-15 mins, season with tamarind paste, salt and sugar and viola, the asam laksa soup broth is ready!

Finally, cook some rice noodles, add toppings of choice (I add more sardine fish, chopped salad leaves, pineapple, cucumber, red onion, chilli padi, lime juice as well as Hei Ko or sweet shrimp paste (which I brought from SG last year to make rojak! Yay!) and a bowl of yummy Asam Laksa is ready!


Asam Laksa
(serves 3 big or 4 small servings)

(A) Rempah/Spice Paste
  • 5 pcs shallots
  • 3 dried chilli, soak in hot water till softened and remove seeds
  • 2 big red chilli, remove seeds
  • 1 pc lemongrass, bottom 3" only, cut into small slices
  • 1 cm turmeric root, cut into small slices
  • 1 tsp belachan, toasted
  • 1-2 tbsp brine from Ayam Brand Sardines in EVOO
  1. Add all the ingredients into a blender/food chopper and blend till smooth paste.
(B) Fish broth
  • 1 can Ayam Brand Sardines in EVOO
  • Rempah spice paste from (A)
  • 4 cups water
  • 2 pcs instant fish stock cube (or ikan bilis cube)
  • 6 pcs thai basil
  • 3 tbsp instant tamarind paste
  • 1 tbsp sugar
  • 1/2 tsp salt
  1. Add the remaining brine from the can, all the sardines (not necessary to remove bones) and the rempah spice paste into a pot, stir-fry the mixture till aromatic for a few minutes. Crush and mash up the sardines when frying.
  2. Add water, stock cube and Thai basil, and bring to boil on medium heat. After the broth boils, lower heat to low and simmer for 10-15 mins.
  3. Season with instant tamarind paste, sugar and salt (to taste) and the broth is ready to use.
(C) Asam Laksa and Garnish
  • 1 can Ayam Brand Sardines in EVOO
  • 200g thick rice noodles (dried ones)
  • Fish broth from (B)
  • 1/2 pc cucumber, julienned
  • 1/4 pc pineapple, sliced into small pieces
  • 1 red onion, cut into thin slices
  • Handful of mint leaves
  • Handful of salad leaves, chopped
  • 1-2 pcs chilli padi, cut into small slices
  • 3-4 wedges lime
  • 3-4 tbsp hei ko / sweet shrimp paste
  • *torch ginger, omitted as not available
  1. Open another can of sardines, remove centre bones from the sardines if desired and tear the sardines into flakes.
  2. Cook the thick rice noodles for 10-12 mins till the noodles are fully cooked, al dente. Drain and rinse in ice water. Add the rice noodles into 3-4 individual bowls.
  3. Scoop the fish broth into the bowls of noodles.
  4. Add desired toppings - sardine flakes, salad leaves, red onion, pineapple, cucumber, mint leaves, chilli padi, lime and hei ko. 
  5. Mix well to eat and best enjoyed hot!

I'm really pleased with how my quick and easy Asam Laksa turned out! The broth is quite flavourful, tangy and spicy, but not fishy and lighter on the palate as well, love the combination of different colours and textures of the toppings. Even the hubby enjoyed it and said it was not bad at all.

Glad that I can cook this dish anytime I have cravings now. And also thinking of making more dishes with Ayam Brand Sardines in Extra Virgin Olive Oil =D

15 October 2018

Beef & Chicken Rendang Burgers

[ Collaboration with Dancing Chef and Singapore Home Cooks ]

* Beef & Chicken Rendang Sliders using Padang Rendang Paste *


I'm very fond of making mini burgers because I think they look so cute and I feel less sinful about eating them sine they are mini ;p

I've been making different flavours of sliders such as classic beef & cheese, fish fillet and teriyaki chicken, this time I thought of using #DancingChef #RendangPaste to create my very own Beef & Chicken Sliders, an East-meet-West creation.


For the chicken patty, I use boneless chicken thigh and cut them into pieces around 5-6cm. Marinate the pieces with the Padang Rendang paste for around 2-3hrs. Coat the marinated chicken with tapioca flour, rest for 5 mins then deep-fry on medium heat till crispy and golden brown.

For the beef patty, I use minced beef; marinate the beef with the paste for 2-3hrs, shape into mini patties around 5cm, then pan-fry on medium heat till browned on both sides.

*If your family doesn't take beef, simply use chicken only and omit beef.

I also use the leftover paste to make a thick and creamy sauce, to add to the burger as well as a dipping sauce for the fries. The sauce tastes so aromatic, creamy and yummy! Similar to McD's curry sauce but much more fragrant and rich. I like!


And not forgetting the mini burger buns which I baked using the Yudane method, which yields a soft and fluffy texture, very suitable for making burgers. Dough weight for each bun is 35g, and each burger is around 5 - 5.5cm in diameter.

If you don't have time to bake your own burger buns, Gardenia and Sunshine have mini butter rolls which can be used as well.


Assembling the burgers is always fun, feel free to add any ingredients you fancy or none at all! For me, besides the chicken and beef patties, I added just coral salad leaves, cucumber, rendang sauce, as well as some cherry tomatoes and pickled gherkins as decorations.


Just look at these tantalising sliders, I bet you couldn't stop at one! They make great party food and everyone especially kids love burgers right?

The rendang marinate and sauce goes really well with the chicken and beef, it's a western burger yet with our favourite curry and spices flavouring that we Asians love. The paste is not overwhelming and not too spicy, even my son who doesn't take much spicy food enjoyed the burger.

I'm going to serve these for my next gathering!


Beef & Chicken Rendang Sliders
(Makes 12 sliders)

  • 250g boneless chicken thigh, cut into 6 pieces around 5-6cm
  • 300g minced beef
  • 1 packet Dancing Chef Padang Rendang Paste
  • 1 large shallot, finely chopped
  • 150g coconut milk
  • 1 stalk lemongrass, smashed
  • 3 pieces kaffir lime leaves, remove centre vein and tear into pieces
  • 1 tbsp desiccated coconut
  • Tapioca flour, cooking oil
  • Salad leaves, cucumber, cherry tomatoes, pickled gherkins, mayonnaise
  1. Marinate chicken pieces wth 2 tsp of rendang paste for 2-3hrs.
  2. Marinate minced beef with 1 heap tbsp of rendang paste and finely chopped shallots for 2-3hrs.
  3. Rendang sauce: Add remaining rendang paste (around 50-55g left), coconut milk, lemongrass, kaffir lime leaves into a cooking pot, bring to boil, stirring continuously to prevent burning. Add desiccated coconut and reduce heat, simmer till sauce thickens. Set aside.
  4. Coat the marinated chicken pieces with tapioca flour and set aside for 5 mins. Deep-fry the chicken pieces using medium heat till golden brown and crispy.
  5. Shape the minced beef into patties around 5-6cm diameter each. Pan-fry the beef patties using medium heat till browned on both sides.
  6. Assemble the burgers: Slice burger bun into half, spread a dollop of mayonnaise on the bottom half of the bun, top with a few pieces of salad leaves, follow by a slice of cucumber. Add a tsp of rendang sauce, top with chicken or beef patty, add another tsp of rendang sauce, cover with top half of burger bun. Finally decorate top of burger bun with halved cherry tomatoes or sliced pickled gherkins using toothpick or skewers.
*If not using beef, replace with another 250g boneless chicken thigh.

Mini Burger Buns (bonus recipe!)
(dough weight is about 500g, makes 14 buns about 35g each)

Japanese Yudane
(prepare night before)
  • 50g bread flour
  • 50g boiling water
  1. Place the bread flour in a heat-proof bowl. Add boiling water and quickly mix the flour with the water using a spatula.
  2. Initially the dough will be bits and pieces but keep pressing and bring the dough together, a rough dough will form.
  3. Cover the bowl with clingwrap and once the dough cool to room temperature, transfer the bowl to chill in fridge till next day.

Dough
  • Yeast mixture: 20g lukewarm water, 6g instant dry yeast, 5g caster sugar
  • 200g bread flour
  • 1 recipe Japanese Yudane (above recipe)
  • 1 recipe yeast mixture (above recipe)
  • 50g water 
  • 45g caster sugar
  • 2g fine sea salt 
  • 1 egg yolk
  • 1/2 egg white (reserve remaining half for brushing on burger bun)
  • 40g unsalted butter, cubed and slightly softened
  1. In a small bowl, mix water, yeast and sugar and let the mixture rest for a few minutes to turn frothy.
  2. Add bread flour, Yudane, yeast mixture, water, sugar, salt, egg yolk and egg white into a mixing bowl. Using a dough hook, mix the dough ingredients on low speed (speed 1 KitchenAid) for a minute, then switch to medium low speed (speed 2) and knead the dough till rough dough forms. 
  3. Add the butter, piece by piece into the dough. Once all the butter cubes are added, turn up mixer speed to medium (Speed 4) and knead the dough for about 10-12 mins. The dough is ready when it leaves the bottom of the bowl and "rides up" to the top of the dough hook. Or use the window pane method by stretching a piece of dough, it will be stretchy and almost translucent without breaking.
  4. The dough is quite soft and slightly sticky, oil both hands and take out the dough from the mixing bowl. Lightly knead for a minute, round the dough and place the dough into a well-oiled bowl for first proof. Cover the bowl with clingwrap and let the dough proof for about 30-45 mins or till dough doubles in size. *based on summer weather, hot & humid
  5. After 30-45 mins, take out the dough and knead lightly to press out the gas. Divide the dough into desired portions. Dough weight is about 500g, I divided the dough into 14 pieces of 35g each. Slightly round the dough portions, cover them with clingwrap and rest for 10 mins.
  6. After 10 mins, tighten and round the dough (by cupping the dough in the middle of your palm), and place the dough on a baking tray lined with baking paper. Cover loosely with clingwrap and proof for 45 mins. *Preheat the oven at 200 degree celsius after 30 mins.
  7. Bake the burger buns at 190-200 degree celsius for 10-12 mins. *turn down temperature to 180 or 190 degree celsius, and cover buns with aluminum foil if the buns browned too fast.
  8. Let the buns cool on a wire rack. If keeping till next day, cool completely before storing in an airtight box.

19 August 2018

Chwee Kueh 水粿

My kiddo and hb love Chwee Kueh very much and the kiddo has been bugging me to make it for him. Both of them used to eat it at the hawker centres at least once or twice a week! We used to go to Ghim Moh market for the chwee kueh; the kueh is excellent, but my kiddo doesn't like their savoury type of chai poh. Alternatively, we would go to Clementi or West Coast markets where their chai poh are the sweet type. Well, now they can only get to eat this when they request and if I feel like making it :p


Frankly I've never make this in SG before because it's simply too convenient and much quicker if we were to eat it at hawker centres. For a batch like this, it took me around 1.5hrs! But now that we are in Thailand, cravings could only be satisfied by homemade I guess, which means OT for me in the kitchen -_-"

I like to make my chwee kueh mini size because I can literally put the whole piece in the mouth and munch away without the chai poh falling all over the place =D

The size of the mini chwee kueh is around 4.5cm and the chai poh topping is around 1 heap teaspoon, it's like a golden proportion to me ;p


I started off with cooking the chai poh or preserved radish first. I like my chai poh to have some crunch, not too oily and well-balanced between sweet and savoury. In Thailand, I can only find the sweet type of chai poh; it's actually not very sweet after rinsing and soaking in water for 15 mins.

Basically add some cooking oil to a pot, sautee minced dried shrimps, garlic and shallot till fragrant, then add the preserved radish and stir-fry on medium heat for about 10 mins. Thereafter add seasonings like light soy sauce, fish sauce, white pepper and sugar to taste; add a little bit of dark soy sauce for the colour, and also some toasted sesame seeds for the fragrance. Continue to simmer for about 10 mins on medium low heat and the chai poh is ready.


The chwee kueh or "water cake" is the trickier one to make as it's not easy to get the correct texture and consistency. The batter mixture of rice flour, wheat starch, corn flour, salt and water (room temp & boiling) might seem so simple but I realised that following proper steps are actually quite important. 

After mixing the flours and water (first room temp then boiling) together to form the batter, it's crucial to stir the batter each time you want to use it, otherwise the flours tend to settle at the bottom with the top being more diluted. As a result, chances are the initial batches of kueh will be very soft, and towards the end very hard.

Hence it's also important to work fast when filling the batter into the moulds, otherwise by the time all the moulds are filled, once again the flours settle at the bottom. Hence to overcome this, I oil the moulds and place them in the wok steamer as the water is boiling. Then using a jug/measuring cup with spout, I quickly pour the batter into the moulds (water is still boiling at the bottom of the steamer) and stirring the batter after a few pours to ensure it remains homogeneous.
And after the chwee kueh are done steaming, it's important exercise some patience and let the chwee kueh cool down slightly and set before unmoulding because otherwise the whole piece of kueh is too mushy and will break!

I learnt all these through trial and error. Actually I wonder how the hawkers do it as they prepare such large batches of chwee kueh daily!


Anyways, I'm glad that I could satisfy my family's cravings for this quintessential hawker food of Singapore from time to time.

Chwee Kueh 水粿
*reference from Bear Naked Food, Eat What Tonight
(makes 50 pieces, using mini moulds measuring 5cm top, 2.5cm bottom)


Ingredients
Chai Poh
  • 200g sweet preserved radish, rinsed and soak for 15 mins.
  • 2 tbsp dried shrimp, soak in hot water till softened then minced
  • 5 cloves garlic, minced
  • 2 pcs shallot, minced
  • 1 tbsp white sesame seeds, lightly toasted
  • 1/2 cup cooking oil (I used 1/4 cup shallot oil, 1/4 cup coconut oil)
  • 4 tbsp light soy sauce
  • 1 tbsp sugar
  • 1 tsp fish sauce
  • 1/2 tsp dark soy sauce, for colour, adjust according to preference
  • 1/4 tsp white pepper
  1. In a pot, heat cooking oil on medium heat. Add minced dried shrimp and stir-fry till fragrant for a minute. 
  2. Add garlic and shallot and stir-fry for a minute.
  3. Drain the preserved radish and add into the pot. Stir fry on medium low heat for about 10 mins.
  4. Add the seasonings and adjust according to taste. Add the toasted sesame seeds. Mix well.
  5. Let the mixture simmer for about 10 mins on medium low heat, stirring occasionally.
  6. The chai poh is ready to use.
Kueh
  • 135g rice flour
  • 4 tsp wheat starch
  • 4 tsp corn starch
  • 1 tsp salt
  • 400ml room temperature water
  • 400ml boiling water
  1. In a large mixing bowl, add the flour, starches and salt and mix well.
  2. Add the tepid water and whisk till the dry ingredients are dissolved.
  3. Add boiling water in a steady stream, whisking the mixture at the same time, till batter is well-mixed.
  4. Prepare a steamer and bring water to boil (I'm using a wok with steamer insert). Wrap the cover of the steamer with a piece of towel/cloth to prevent water from dripping into the chwee kueh.
  5. Brush the mini moulds thoroughly with oil, and place the moulds into the steamer with the water boiling.
  6. Pour the batter into a jug with spout (stirring constantly to make sure batter consistency is homogeneous). Then quickly pour the batter into the mini moulds (with the water still boiling), stirring batter after every few pours. Repeat until all batter used up.
  7. Cover and steam the chwee kueh for about 15 mins. *if mould is larger, steam for 3-5 mins more.
  8. After 15 mins, remove the steamer insert from heat and let the chwee kueh cool down slightly and set. 
  9. Use a mini spatula or butter knife, insert in into the sides of the mould and lift the chwee kueh out of the mould. The chwee kueh should be able to be removed easily.
  10. Top the chwee kueh with about 1 heap tsp of chai poh each.
  11. Enjoy by popping one whole piece of chwee kueh with chai poh into the mouth!

02 August 2018

Curry Puff | Karipap

[ Collaboration with Dancing Chef and Singapore Home Cooks ]
Dish 1 - Laksa Yong Tau Foo
Dish 2 - Curry Puff / Karipap

"Curry pok! Curry pok!"
I remember during the 80s when I was in Primary School, every afternoon around 3pm, a Malay boy would carry a basket of freshly fried karipap and make his rounds in my block peddling his wares. There were two flavours, curry potato and sardine, differentiated with a red dot.

This is one of my favourite Malay kuih and needless to say, I would buy one of each flavour as my afternoon snack every other day. I cannot remember how much it cost, I think one piece was 10 cents? I recall savouring the puffs while they were still warm, eating the rounded part with filling first and the crispy edges to the last or sometimes I would do the other way round :p It's a very simple snack, but it's one of those simple pleasures we enjoyed in our childhood, isn't it?


This type of homemade karipap has a very nostalgic old-school taste, with a fragrant and thin crispy blistered crust and an aromatic curry potato filling, or sweet spicy and tangy sardine filling. These days, some Malay stalls at hawker centres or coffee shops still sell such karipap but somehow they don't taste as nice as they used to be.


Nowadays, there are many variations of curry puff, from the buttery flaky ones to thick chunky ones to super crispy spiral ones and many types of fillings as well, such as chilli crab, otah otah, black pepper and more. But the old-school one still holds a special place in my heart.

When I was researching on recipes, there are also many variations to achieve different results. Some recipes use hot oil which apparently makes the pastry super flaky; some recipes use more butter and less water which makes the pastry smoother, more buttery and a bit flaky; some recipes use separate oil and water dough to get the super flaky spiral effect; the recipe I'm using uses less butter and more water, resulting in a slightly blistered pastry skin, which is similar to the old-school curry puff I grew up with.


I made only chicken potato curry filling this time, using Dancing Chef Indian Curry Paste, which has No MSG, No Preservatives, No Artificial Colouring, and super convenient and easy to use! The curry paste has all the aromatics and spices already so no messy chopping, grinding or frying work to do.

I just have to prepare some chicken breast meat, potato, onion, garlic and coconut milk (and water). I simmered the chicken curry potato till the potato is soft but not mushy and with just a little gravy left. The taste is so good without being overwhelming, really suitable as filling for curry puff or pies.


Now to the pastry part, which is trickier. Frankly this is my first proper attempt in making curry puff! I think many many years ago, I tried making it but failed miserably at the dough. Not sure what happened but I simply couldn't close the dough properly and did such a horrible job at pleating the edges that most of my puff opened up before or during deep-frying resulting in a horrible mess.

I guess with more experience in the kitchen, I did a much better job this time round \(^o^)/ The first few pleating were super ugly and my puffs were totally out of shape, but subsequently I got the hang of the pleating technique and managed to get pretty decent looking ones! But somehow I find it easier to roll the dough into an oval shape and make the puff round and fat. I think I need more practice to make the conventional long and slim one :p


Curry Puff | Karipap
(makes 18-20 pcs)

Filling
  • 1 packet Dancing Chef Indian Curry Paste
  • 300g potato, cubed
  • 200g chicken breast, cubed
  • 1 small onion, diced
  • 1 clove garlic, diced
  • 1/4 cup water
  • 1/4 cup coconut milk
  • 2 tbsp cooking oil
  1. Marinate cubed chicken breast with 2 tbsp of curry paste for about 30 mins.
  2. In a frying pan on medium heat, add 2 tbsp of cooking oil, stir-fry diced onion and garlic till fragrant and translucent.
  3. Add the marinated chicken breast and stir-fry till the meat turns opaque/slightly cooked. 
  4. Add potato and remaining curry paste and stir-fry till all ingredients are well-coated with paste.
  5. Add water and coconut milk, and bring to boil.
  6. Lower heat,  cover and simmer till potato is soft, and gravy is reduced and the filling is moist (do not let the gravy dry up).
  7. Set aside to cool completely.

Dough
  • 375g plain flour
  • 1/2 tsp salt
  • 75g butter (I use Golden Churn canned butter)
  • 200ml water (could be slightly more or less)
  1. Add flour and salt into a large mixing bowl, stir till well-mixed for about a minute.
  2. Add butter and water (bit by bit) into the flour mixture, use a spatula to fold and mix the ingredients together. 
  3. Once the ingredients are mixed and a rough dough is formed, use the hand to knead the dough till smooth and non-sticky. 
  4. Cover the bowl with clingwrap or towel and let the dough rest for 15-20 mins.
  5. Transfer the dough to a lightly-floured mat. Roll the dough to about 4mm thickness, use a 9cm round pastry cutter to cut out as many circles as possible. Knead the leftover dough into a ball, and repeat till all the dough is used up.
Wrapping
  1. Take a piece of round dough, roll the dough to oval shape, place the dough onto the palm, scoop about 1 tbsp of chicken potato curry onto the dough and fold the dough to close.
  2. Seal the edges by pressing the dough using finger tips. Pleat the edges together starting from right to left, by pressing a small piece of dough using finger tip into scallop, then push the scalloped piece of dough downwards. Repeat till the whole puff is pleated.
  3. Repeat with the rest of the dough and filling till all ingredients are used up.
  4. The curry puffs are best eaten freshly fried. If a big batch is made, at this point, the curry puffs can be stored in freezer. Lay each piece on a lined tray single layer and cover tray with cling wrap or aluminium foil. Place the tray into the freezer. Once the puffs are frozen, they can be transferred to a ziplock bag or box and stacked.
 Deep-frying
  1. Heat a pot of cooking oil to medium heat. Make sure the depth of cooking oil is able to fully cover the curry puff.
  2. Deep-fry the curry puffs till they turn golden brown on both sides. 
  3. Drain the curry puff with kitchen towel or metal strainer.
  4. Best eaten warm.


I must say I'm quite pleased with how the curry puffs turned out :) The HB also gave thumbs up!

They are not perfect yet, but better than nothing right? This is not readily available at where I stay, and can't recall whether I see them in BKK or not. Anyways, I'm happy that I can now make a big batch and freeze them so that I can satisfy my cravings anytime!

I'm gonna explore other fillings next time round, like sardine and even Thai flavours like Tom Yum or green curry!

Meanwhile, let me enjoy a few more shiokalicious curry puffs with a nice warm cuppa Teh Tarik and reminisce the good old days!

Happy National Day in advance to all Singaporeans!


From 1 to 31 August 2018, purchase 3 packets of Dancing Chef™’s pastes or sauces at just S$7.85 (UP: S$2.85/packet), and stand a chance to win a pair of passes to a cooking workshop helmed by local celebrity chef Lisa Leong on 16 Sep 2017. There are 30 pairs of passes to be won.

Dancing Chef promotion is available at FairPrice supermarkets exclusively.

#dancingchef #dancing chefs

31 July 2018

Laksa Yong Tau Foo

[ Collaboration with Dancing Chef and Singapore Home Cooks ]
Dish 1 - Laksa Yong Tau Foo

How time flies, next week is already Singapore's National Day and my family has been away for almost 8 months! As true blue Singaporeans who love to makan, we tend to miss local food from time to time.

Premix pastes like Dancing Chef really comes in handy whenever we have cravings. Sometimes it's too much hassle to cook from scratch or there are certain ingredients not readily available. I always stock up on our favourite pastes whenever we return to SG for visits; it's great that the packs are small and doesn't take up too much luggage space.


One of the SG local dish that we miss is Yong Tau Foo! Here in Thailand, there's no YTF stall where you can pick and choose the various ingredients like beancurd, bitter gourd, vegetables, fishballs etc...
Back in SG, we used to eat YTF at least once a week, and we always ended up ordering laksa gravy as the pairing is simply shiokalicious!

Using Dancing Chef Laksa paste, all I have to do is to prepare the YTF ingredients, cook the gravy and viola, a piping hot bowl of Laksa Yong Tau Foo!!


Laksa Yong Tau Foo
(makes 3-4 servings)

Minced fish & pork filling
  • 200g fish meat (I use spanish mackerel/batang), chop into small pieces
  • 200g minced pork
  • 10g salted fish
  • 4 tbsp water
  • 2 tsp corn flour
  • 1/2 tsp sea salt
  • 1 stalk spring onion, finely chopped
  • 1 stalk coriander, finely chopped
  1. Add fish meat, minced pork, salted fish, water, corn flour and sea salt into a food processor or electric chopper. Grind/chop the ingredients into a paste.
  2. Transfer the paste into a large solid bowl, add in the finely chopped spring onion and coriander. 
  3. Wear a plastic disposable glove, pick up small portions of the mixture/paste and slap it back into the bowl. Do this several times until the paste turns into very soft and smooth texture. Set aside.

Yong Tau Foo
(filling above is enough for the listed ingredients)
  • 2 small or 1 big brinjal, cut into 6 pcs about 1" thick with slit inbetween
  • 1/4 bittergourd, cut into 6 rings about 1cm thick and hollow out the middle seed portion
  • 2 blocks tau kwa/firm beancurd, cut diagonally into 4 pcs
  • 3 pcs tau pok/fried beancurd, cut diagonally into 6 pcs
  • 1 big red chilli, cut a slit inbetween and scrap away the seeds
  • 4 pcs ladyfinger, cut a slit inbetween and scrap away the seeds
  • Pot of cooking oil
  1. Wash, pat fry and prepare the ingredients accordingly.
  2. Using a small butter knife, stuff and spread the fish/pork filling into the prepared Yong Tau Foo ingredients.
  3. Heat up a pot of cooking oil to medium heat and deep fry the yong tau food until cooked and golden brown. Drain using kitchen towel. Set aside. 

Laksa Yong Tau Foo
  • 1 packet Dancing Chef Laksa paste
  • 450ml water
  • 250ml coconut milk
  • 400g thick rice vermicelli (laksa noodles)
  • 2 bunches kang kong (water spinach)
  1. In a cooking pot, add laksa paste and water and bring to boil on medium heat.
  2. Lower heat to simmer and stir in coconut milk. Simmer for another 5 mins and the laksa gravy is ready.
  3. In a separate pot, blanch rice vermicelli for 15-20s, drain and scoop into individual bowls.
  4. Blanch vegetables for 10-15s, drain and add into the individual bowls.
  5. Top the bowls with desired pieces of Yong Tau Foo and finally ladle laksa gravy into the bowls.
  6. Best serve hot.


Yum yum yum! This bowl of Laksa Yong Tau Foo was so satisfying! The HB also gave thumbs up! How I wish I could have more, but alas I ran out of the Laksa paste already :( Time to go back to SG to stock up?


From 1 to 31 August 2018, purchase 3 packets of Dancing Chef™’s pastes or sauces at just S$7.85 (UP: S$2.85/packet), and stand a chance to win a pair of passes to a cooking workshop helmed by local celebrity chef Lisa Leong on 16 Sep 2017. There are 30 pairs of passes to be won.

Dancing Chef promotion is available at FairPrice supermarkets exclusively.

#dancingchef #dancing chefs

15 June 2018

Bak Chang 肉粽 ~ Glutinous Rice Dumpling

The Chinese Duan Wu Festival (端午节)or commonly known as Dragon Boat Festival is upcoming next Monday! There's a story behind how this festival came about (to commemorate a patriotic poet/exiled official by the name of Qu Yuan in the warring states period of China (just google to find out more).

In Singapore, the festival is typically celebrated with dragon boat race and eating Bak Chang aka glutinous rice dumplings (it could be more elaborate in China). Nowadays, many people have long forgotten about the significance of this festival and affectionately call this day Rice Dumpling Day without knowing the true meaning behind it.

My knowledge of rice dumpling is very limited, I only know a few variations or flavours, such as Hokkien savoury rice dumpling which typically includes pork belly, mushroom, dried shrimp and chestnut; Nyonya sweet rice dumpling which includes minced pork and candied winter melon; Kee Chang or Alkaline rice dumpling which is basically tasteless and eaten with coconut palm sugar syrup. These days, there are of course more flavours and additional ingredients such as salted egg yolk, abalone, scallop and sweet ones with red beans etc etc.


My mum learnt to wrap the Hokkien-style bak chang from my paternal grandmother and auntie, and from there she adapted her own taste for the ingredients and texture of the glutinous rice. My mum's bak chang is lighter on the palate; the glutinous rice is softer in texture and less salty so I can still taste the aroma from the bamboo leaf. Each ingredient is pre-cooked separately so each has its own flavour/aroma yet complement one another in the dumpling.

That said, every household has their own recipes and personal flavours but since young I grew up with my mum's bak chang so I'm very used to this particular taste and texture. So much so that I'm quite picky when it comes to bak chang. Usually commercial ones don't impress me much as they tend to be overwhelming in taste and heavy on the palate. I like my bak chang small, less seasonings, less rice and more ingredients.

Anyways, all these years I have not bothered to learn how to make bak chang as my mum would wrap a few dozens for giveaways. However she has stopped in the recent years. So I reckoned I ought to pick up the skill from her, else this heritage cuisine might be lost in my family! Haha. Sounds so serious.

So last year during the Duan Wu Festival period, I asked my mum to teach me how to make bak chang from scratch. She already prepared most of the ingredients, and showed me how to fry the glutinous rice and wrap the bak chang the proper way. As with folks of her generation, everything was done with estimation, so I simply asked her for the ingredients and method and try to figure out the quantity on another day. Frankly cooking is the easier part, the tough part is the wrapping and I'm lousy at wrapping! I remembered I took like 10 mins to wrap one bak chang, as I was trying to figure out how to shape and secure it properly. I even asked my mum to buy a full set of ingredients for me to practise (and figure out the recipes). As usual I procrastinated till late November (before my shift to Thailand) and I think I only wrapped 18 pieces, and some of the bak chang turned out quite ugly. But at least I figured out the quantity of ingredients and noted the proper steps.


Few weeks ago I was back in SG and the shops were beginning to sell bak chang materials/ingredients, just the right time! Ok, yep I brought back the key stuff and did my wrapping two days ago! My second solo attempt in wrapping bak chang \(".)/

My target this time is 3 dozens as I intend to gift them to my girlfriends here (if the bak chang turns out good). Preparation work started on Tuesday night, where I soaked some of the ingredients first. Spent Wednesday morning pre-cooking all the ingredients and finally started wrapping and cooking in the afternoon. By the time I completed 30 pieces of bak chang, it was evening. Underestimated the quantity of glutinous rice and I still had some leftover ingredients. Was in a dilemma whether to prepare an additional batch of glutinous rice as I was very tired already and my kitchen was like a war zone. In the end, I decided to push ahead and made another 9 pieces. So it's literally a full day's work and I managed to wrap 39 pieces of bak chang in total!

I'm quite happy with my attempt this time, most of the bak chang turn out well and resemble the triangular shapes. LOL! However, I was a little inconsistent, the first batch had slightly more rice than ingredients and as I progressed, managed to adjust such that there were more ingredients or at least balanced amount.


Here are the key ingredients for bak chang.

Dried mushroom (Japanese shiitake) - I bought the smaller ones (from SG) so that I can wrap the whole piece in each dumpling without cutting. Wash and soak them overnight.

Dried shrimp - These were bought from Laem Chabang, a coastal port north of Pattaya. I chose the large ones to have more bite. Wash and soak in hot water for 15-20 mins.

Pork belly - I bought them from the supermarket here, they came in long strips of about 1.5 inches width. Remove the skin (else too tough) and bones (if any). Cook the strips in a broth water (recipe below) till just cooked (able to poke through meat with chopsticks), remove and cut into bite-size pieces. *Strain and reserve the broth water for later use.

Dried chestnut - These were bought in whole pieces from SG, imported from Italy. My mum bought Canadian ones last year but I couldn't find. Boil the dried chestnut and soak overnight, the next day remove the tough brownish membrane bits from the chestnut.

Glutinous rice - If possible buy a special breed called Rat Tooth (鼠牙)only available during this period. It's more refined and softer in texture. Otherwise, any good grade of glutinous rice is fine. Wash and soak for 2-3hrs.


Pre-cooking for the ingredients (detail recipes below):

Pork belly - stir-fry the pork belly pieces with shallot oil, five-spice powder, coriander powder, white pepper, salt and broth, till fragrant.

Dried chestnut - braise the chestnut in broth water (used to cook pork belly strips) till soft (not mushy).

Dried mushroom - Stir-fry the mushroom with shallot oil, coriander powder, five spice powder, pepper, dark soy sauce, sugar and salt and braise in broth water.

Dried shrimp - Stir-fry the shrimp in shallot oil, coriander powder and white pepper till fragrant.

Glutinous rice - stir-fry the rice in shallot oil, season with salt, white pepper and dar soy sauce (for colour), to taste. Fry till fragrant and slightly sticky.

Bamboo leaf and string - wash and soak in water till ready to use. Choose the mid-size ones, trim edges if necessary.

Once the mise en place is done, the wrapping which is the tough part begins!

Here are three videos I took last year, my mum giving tutorial on how to wrap the bak chang. They are now my previous go-to guide!


Bak Chang 肉粽 ~ Glutinous Rice Dumpling
(makes around 39-40 pieces)

(A) Pork Belly

  • 6 strips pork belly (about 880g after removing skin & some fats, 1.5 inches in width)
  • Broth water: 5 cloves garlic, 1 spring onion, 1 tbsp salt, 1 tbsp dark soy sauce, 1.25L water
  • Seasonings: 2 tbsp shallot oil, 1/2 tsp five spice powder, 1/2 tsp coriander powder, 1/4 tsp white pepper, 1/2 tsp salt, 8 tbsp broth water
  1. Wash the pork belly, remove skin and bottom bone layer (if any).
  2. Place pork belly into a pot, add the broth water ingredients, bring to boil and cook till chopstick is able to go through the meat (just cooked).
  3. Remove from broth water and cut the pork into bite-size pieces (about 45 pcs)
  4. Strain the broth water and set aside for use later.
  5. In a frying pan, add shallot oil and stir-fry the pork bites till slightly browned. Add five spice powder, coriander powder, white pepper and salt and stir till well-mixed. Add broth water and simmer for 5 mins. Dish and set aside.

(B) Chestnut 

  • 250g dried chestnut (around 45 pcs)
  • 2 cups broth water (from cooking the pork belly)
  1. Wash and place chestnut into a small pot. Add enough water to cover more than 1 inch of the chestnut. Bring the water to boil. Off heat, cover and let the chestnut soak overnight.
  2. The next day, remove the tough bits of brownish membrane in the chestnut.
  3. Place the chestnut in a small pot, add broth water and cook till the chestnut turns soft (not too soft). Dish and set aside.
(C) Dried Shrimp
  • 70g dried shrimp (around 90 pcs)
  • Seasonings: 2 tsp shallot oil, pinch of coriander powder and white pepper
  1. Wash the dried shrimp a few times. Soak in hot water for 15-20 mins. Clean throughly and drain.
  2. In a frying pan, add shallot oil and stir-fry the shrimp with the coriander powder and white pepper till fragrant. Dish and set aside.
(D) Mushroom
  • 45pcs dried mushroom
  • Seasonings: 1 tbsp shallot oil, 1/2 tsp coriander powder, 1/2 tsp five-spice powder, 1/4 tsp white pepper, 1 tsp sugar, 1/2 tsp salt, 1/4 tsp dark soy sauce, 1 cup broth water
  1. Wash and soak mushroom in water overnight.
  2. The next day, drain water and squeeze dry the mushroom slightly.
  3. In a pot, add shallot oil and stir-fry the mushroom with the seasonings till fragrant. Add broth water and braise for 15 mins (or liquid almost becomes dry). Dish and set aside.

(E) Glutinous Rice

  • 1.85kg glutinous rice
  • Seasonings: 10 tbsp shallot oil, salt, white pepper, dark soy sauce (to taste)
  1. Wash and soak the rice for 2-3 hrs. Drain.
  2. In a large wok or frying pan, add shallot oil and drained rice. Stir-fry till rice is shiny and coated with oil. Season with salt, white pepper and dark soy sauce. Stir-fry till seasonings well-mixed and rice is slightly sticky.
  3. ***Salt and pepper is to taste (take a few grains of rice to try, I added around 5-6 tsp of salt). Dark soy sauce is for colour, add tsp by tsp till desired colour tone. My wok is not big enough, I had to fry in 2-3 batches. After frying the batches, I mix all the rice together in an extra large mixing bowl and mix them well. Set aside.
(F) Bamboo leaf and string
  • 90-100 pcs bamboo leaves
  • 40-50 string (not sure what string they are, they come together in the pack, maybe banana string)
  1. Wash and soak the bamboo leaves and string till ready to use.
  2. Tie the string in bundles of 10 for easy counting and cooking. Hang the bundle using hook at height level for ease of tying the bak chang.
Assembly and cooking
  1. Take 2 bamboo leaves, place them opposite sides of each other.
  2. Twist the leaves to become a "cup". Add about 1 tbsp of glutinous rice into the cup, add pork, mushroom, dried shrimp and chestnut. Add another 1+ tbsp of glutinous rice to cover the ingredients, drizzle 1-2 tsp of chestnut water.
  3. Wrap up the rice dumpling and securely it tightly using the string. 
  4. Once 10 pieces of dumping per bundle is completed, they can be sent for cooking. To cook, add  water to a large pot (around 2/3 depth), bring to boil and add 1 tbsp of salt. Lower the bundle of dumplings into the pot and boil on medium heat for about 1 hour (make sure the water covers all the rice dumplings). Once done remove from water and hang to cool slightly (optional) before eating.
  5. *** My cooking pot is small, can only boil 10 pieces of dumplings at one time. For bigger pots, may be able to cook larger quantity, but avoid overcrowding the pot to ensure dumplings are properly cooked.
  6. *** Rice dumplings are best eaten warm. Steam for 10-15 mins before eating. They can be stored in freezer for up to 1 month or fridge for a week. Thaw before steaming.
*Shallot Oil
Shallot oil is a key ingredient in bak chang making. It's available at supermarkets but quite easy to prepare at home. 
  • 150g shallot, thinly sliced
  • 1 cup cooking oil
  • 1/2 tsp salt
  1. Add cooking oil and salt to small pot on medium low heat, add sliced shallots and fry till shallot turns golden brown. Watch closely towards the last few minutes as the shallots can get burnt easily.
  2. Drain and set aside oil for use. For the crispy shallot, it can be enjoyed as a condiment for stir-fried vegetables, fried rice, noodles etc etc.


My very first batch of bak chang fresh from the pot two days ago. Quite pleased that they turned out reasonably well =D


Gifted half of the bak chang to my girlfriends and they loved it! The hb and I have also been having bak chang for breakfast for the past two days. LOL! The rest are kept in the freezer and we will eat them whenever there's a craving!

Overall, really happy with how my bak chang turns out, most of them look reasonably nice =D Although it's a lot of hard work and effort involved, the satisfaction is immense. Hopefully I will be able to practise making bak chang at least once a year! Or maybe next year I should learn to make Nyonya Chang?

01 June 2018

Braised Chicken with Bamboo Shoot & Mushroom

[ Collaboration with Borges Singapore and Singapore Home Cooks ]
Dish 1 - Braised Chicken with Bamboo Shoot & Mushroom
Dish 2 - Thai-themed ~ Tod Mun Pla (Thai Fish Cake) and Khao Pad Sapparod (Pineapple Fried Rice)

In the recent years, I've switched to using olive oil and grapeseed oil for most of my cooking, because they are healthier and boast of multiple health benefits. Many people have this misconception that olive oil and grapeseed oil can only be used for western cooking or drizzling on salad; however both oils are good for stir-frying and deep-frying as well!

Really pleased and honoured to be partnering with Borges Singapore and Singapore Home Cooks to demonstrate the use of olive oil and grapeseed oil in our common daily Asian dishes :)

For my first dish, I'm using the Borges Classic Olive Oil to cook this simple but wholesome one-pot meal, Braised Chicken with Bamboo Shoot & Mushroom. I believe most chinese families would have our own rendition of this classic chicken stew at home, as it's like a comfort and homey dish to many of us.


Olive oil is considered as the healthiest fat due to its high content in oleic acid. For the Borges Classic Olive Oil, it is a blend of quality refined olive oil and a high quality of Extra Virgin Olive Oil. Due to its less accentuated flavor and aroma, it is the most suitable oil for frying, braising and for vegetable and meat stews. 

Some useful information about using olive oil in the kitchen (source from Borges Singapore and Singapore Home Cooks):
1. Whether fried, boiled or roasted, any food should be cooked at low heat. The temperature should never exceed 200ºC so that the olive oil does not deteriorate.
2. The best temperature to fry green vegetables and fish is between 155 and 160ºC. For other foodstuffs, between 175 and 185ºC. Never exceed 210ºC, as olive oil starts to burn beyond this temperature.
3. If the recommended temperature is respected, olive oil hardly penetrated the food, does not increase its calorific value and maintains its nutritional qualities.
4. Filtering olive oil after frying allows to be re-used 4 times.


Braised Chicken with Bamboo Shoot & Mushroom
(served 4-5)

Ingredients
  • 1.2kg chicken meat, chopped into pieces
  • 12pcs dried mushroom, soaked in water to re-hydrate
  • 200g bamboo shoot, sliced
  • 6 stalks spring onion, lower portion only
  • 5 slices ginger, sliced
  • 3 cloves garlic, sliced
  • 5 tbsp Classic Olive Oil (Borges)
  • 1/2 cup mushroom water (used to soak the mushroom)
  • 1 tsp dark soy sauce
  • Corn starch slurry (1 tsp corn starch + 2 tsp water) 
  • Garnish: spring onion, chilli, coriander
Marinate
  • 3 tbsp oyster sauce
  • 2 tbsp soy sauce
  • 2 tbsp hua tiao cooking wine
  • 2 tsp sesame oil
  • 1 tbsp corn starch
  • 1/4 tsp white pepper
Steps
  1. Marinate the chicken pieces with oyster sauce, soy sauce, hua tiao cooking wine, sesame oil, corn starch and white pepper for 3-4hrs.
  2. Heat a cooking pot to medium high heat, add olive oil and saute spring onion, ginger and garlic till fragrant.
  3. Add the marinated chicken pieces and stir-fry till slightly browned.
  4. Add the mushroom and bamboo shoot, and stir-fry with the chicken for a minute.
  5. Add the mushroom water and bring the mixture to boil.
  6. Turn heat to low and let the chicken simmer for about 20-25 mins.
  7. Add dark soy sauce to the braised chicken for some colour and corn starch slurry to thicken sauce slightly. (add sea salt to taste if desired, I didn't add as I find the sauce flavourful enough from the marinate).
  8. Garnish and serve hot with rice.


This pot of wholesome goodness smells so aromatic when I'm cooking it, even my mum who's with me exclaimed that the aroma is tantalising. And indeed, the sauce is heavenly and goes so well with rice! Couldn't resist second helping :d~~~

Do give this simple one-pot dish a try with Borges Classic Olive Oil :)

Want the best from the Mediterranean? We are giving away three sets of Borges Gift Basket worth $60 at http://bit.ly/2INmCz4 

Be sure to check it out!
#BorgesRecipes

01 April 2018

Butterfly Pea Flower Nasi Lemak

It's been more than three months since my family relocated to Chonburi, Thailand. Although I mentioned that I would resume my blogging once we settle down, the truth is, I've been procrastinating. Yes, I have visited some interesting places, dined at some lovely cafes and restaurants and been cooking a lot, but simply couldn't find the mojo to write. I really have a lot of backlogs. Urgh.

So yes, I'm forcing myself to kickstart with this piece! Initially thought of starting with a Thai recipe since I've been cooking more Thai food, but on the other hand, I've also been cooking SG local dishes due to our cravings :p

Frankly this is my first time cooking a whole set of Nasi Lemak from scratch. In SG it's simply too convenient and relatively easy to find reasonably good Nasi Lemak; plus I'm lazy lah! But now that we are away and it's not readily available anymore, I start to miss it.

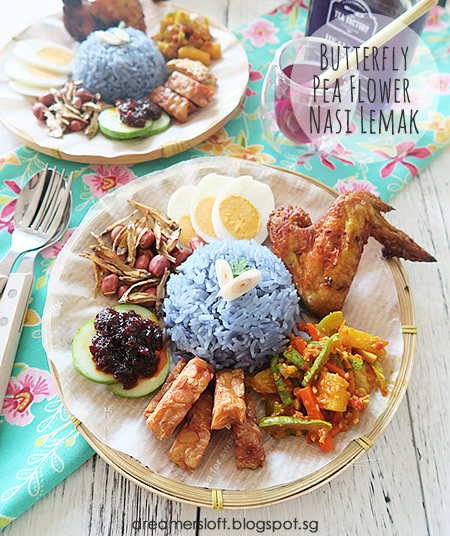
My Nasi Lemak set consists of Butterfly Pea Flower Coconut Rice, Tumeric Chicken Wings, Nyonya Achar, Tempe, Sweet Sambal Chilli, Ikan Bilis with Peanuts as well as hardboiled egg. I separated the process into different days so that it's not too rush. Spent a day making the Nyonya Achar, another making the Sweet Sambal Chilli and marinate for chicken wings and finally ready to cook the rice, fry the wings, assemble and eat!


How does my Nasi Lemak set look? Love the addition of butterfly pea flower tea to the coconut rice, it gives the rice a lovely bluish hue and somehow the whole set looks much more sexy, exotic,  appealing :p

Here are the recipes, with reference from several sources, such as Nasi Lemak Lover, Noob Cook, LadyHomeChef (hosted under Miss Tam Chiak).

Butterfly Pea Flower Coconut Rice
(1 cup of rice, serves 2A1C)
  • 20 pcs dried butterfly pea flower
  • 1/2 cup boiling water
  1. Infuse the dried flowers in boiling water till the flowers are fully bloomed, around 30mins.
  2. Set aside 1/4 cup + 2 tbsp infused butterfly pea flower water
  • 1 cup Thai Jasmine rice, washed and drained
  • 1/2 cup coconut milk
  • 2 pcs lemon grass, lower portion, smashed
  • 3 pcs pandan leaves, tied into a knot
  • 1/4 tsp sugar
  • Pinch of salt
  • 2 pcs shallot, slightly smashed
  • 2 slices galangal
  1. Add coconut milk, sugar and salt to a small pot, bring to boil till sugar is dissolved.
  2. Off heat, add lemongrass and pandan leaves to the coconut milk and let them infuse till mixture is cooled down.
  3. Stir in the infused butterfly pea flower water.
  4. Place rice into rice cooker, add the coconut-butterfly pea flower mixture (together with the lemongrass and pandan leaves) and stir to mix well.
  5. Add shallot and galangal, and set the coconut rice to cook.
  6. After rice is cooked, let it rest for 10 mins before fluffing the rice.

Tumeric Chicken Wings
(serves 3)
  • 6 chicken wings
  • 3 pcs shallot
  • 3 cloves garlic
  • 1 tsp coriander seeds
  • 1/2 tsp turmeric powder
  • 2 tsp curry powder
  • 1/2 tsp salt
  • 1 tsp shallot oil
  • Cooking oil for brushing
  1. Pound shallot, garlic and coriander seeds in a mortal into a paste.
  2. Add turmeric powder, curry powder, salt and shallot oil and stir till well-mixed.
  3. Place chicken wings and marinate paste into a ziplock bag.
  4. Seal and rub the marinate till each piece of chicken wing is well-coated.
  5. Marinate for at least 4hrs or overnight in fridge.
  6. Remove from fridge 30mins before cooking to bring the wings to room temperature.
  7. Place the chicken wings in the basket of an air-fryer, brush cooking on both sides of the wings.
  8. Air-fry for 15 mins at 180 degree celsius, turning over once after 8-9 mins.
  9. Best serve hot. 


Nyonya Achar
(makes 5 jam bottles)

  • 2 small cucumbers (about 450g)
  • 1 small carrot (about 200g)
  • 100g cabbage leaves
  • 200g pineapple flesh, cut into small pieces
  • 40g skinless peanuts, roasted and pounded
  • 2 tbsp sesame seeds, roasted
  • 3 tsp sea salt
  1. Cut the cucumbers into 3-4cm sections, cut each section into quarters and slice away the seed block. Next cut the cucumber into thin strips. Add 1 tsp of sea salt to the cucumber strips and toss to coat well. Set aside for 1hr. After 1hr, squeeze out the excess water from the cucumber strips, pat dry, spread them out on a flat tray and air-dry for 1hr.
  2. Cut the carrot into 3-4cm sections, then cut the carrots into size of matchsticks. Add 1 tsp of sea salt to the carrot sticks and toss to coat well. Set aside for 1hr. After 1hr, squeeze out the excess water from the carrot sticks, pat dry, spread them out on a flat tray and air-dry for 1hr.
  3. Cut the cabbage leaves into bite-size pieces. Add 1 tsp of sea salt to the cabbage pieces and toss to coat well. Set aside for 1hr. After 1hr, squeeze out the excess water from the cabbage pieces, pat dry, spread them out on a flat tray and air-dry for 1hr.
  4. Place the cucumber strips, carrot sticks, cabbage leaves and pineapple pieces into a large glass bowl and set aside.
Rempah
  • 7-8pcs shallots
  • 2 cloves garlic
  • 2 pcs candlenut
  • 3 pcs dried chili, soak in hot water till soften, remove seeds and cut into small pieces
  • 3 pcs big red chilli, remove seeds and cut into small pieces
  • 1 stalk lemongrass, lower section only, sliced thinly
  • 5 slices galangal
  • 1 tsp turmeric powder
  • 1 tsp shallot oil
  • 1 tbsp cooking oil
  • 1/2 cup distilled white vinegar
  • 1/2 cup water
  • 100g brown sugar
  • 1/4 tsp salt
  1. Place the shallots, garlic, candlenuts, dried chilli, red chilli, lemongrass, galangal and shallot oil into a blender, blend into a smooth paste.
  2. Add 1 tbsp of cooking oil in a pan or wok, add the rempah paste and turmeric powder and stir-fry till paste is aromatic.
  3. Add the vinegar, water, sugar and salt to the paste and bring to simmer.
  4. Remove from heat, let the rempah paste cool slightly and add the rempah paste into the mixing bowl of vegetables. Add the pounded peanut and sesame seeds. Stir to mix everything well.
  5. Let the achar cool down completely before bottling. Divide the achar into glass containers (prewash with boiling water) and store in fridge. Let the achar pickle overnight for flavours to develop before consumption. Bottled achar can be stored in fridge for up to 4 weeks, but best eaten within 2 weeks.


Sweet Sambal Chilli
(makes 1 jam bottle)
  • 8 pcs shallot
  • 5 cloves garlic
  • 15 pcs dried chilli, soak in hot water till softened
  • 4 pcs big red chilli
  • 3 pcs chilli padi
  • 1 tsp belachan, toasted
  • 1 tsp shallot oil
  • 1/4 cup cooking oil 
  • 100g brown sugar/white sugar
  • 1/2 tsp sea salt
  1. Remove seeds from the dried chilli, red chilli and chilli padi and cut them into small pieces. Retain some seeds if wish to have a more spicy sambal.
  2. Place the shallot, garlic, chilli, belachan and shallot oil into a blender and blend till a smooth paste.
  3. Add cooking oil into a wok, then add the rempah and fry on medium low heat till the sambal is cooked and aromatic (turns from bright orangey red to dark red).
  4. Add sugar and sea salt and mix till gula Melaka is melted.
  5. Let the sambal cool completely before bottling.


Tempe - store-bought (I lugged back from SG) and freeze. Simply deep-fry or air-fry till golden brown (around 10 mins at 180 degree celsius).
Ikan Bilis and Peanut - store-bought. I air-fry them around 15 to 20 mins at 160 degree celsius, till golden brown.
Hardboil egg - place egg into water (fully covered) and boil for 10-12 mins.

To serve, simply assemble all the ingredients onto a serving plate.


I must say I super love my Nasi Lemak set, it's visually appealing with myriad of colours and tastes totally tantalising! So does my HB and kiddo. (The kiddo only ate the coconut rice, chicken wings and egg))

The coconut rice is fragrant but not too oily or overwhelming. I chose to air-fry the chicken wings as it's more convenient, less oily and cooks more evenly. This chicken wing has a kampung feel to it, like those sold at Malay stalls. Super love the sweet, spicy and tangy achar, so aromatic and flavourful with the spices. Homemade achar seems to taste "fresher". And the sweet sambal chilli, super like it as well, only thing is, I retained a bit of chilli seeds and the sambal is a tad too spicy for me. But the HB says it's just nice.

Very pleased with my first attempt, and this shall be on my regular menu probably once a month =D