Showing posts with label Cooking - vegetable. Show all posts

03 June 2018

Thai-Themed Meal: Tod Mun Pla (Thai Fish Cake), Khao Pad Sapparod (Pineapple Fried Rice), Som Tum (Green Papaya Salad)

[ Collaboration with Borges Singapore and Singapore Home Cooks ]
Dish 1 - Braised Chicken with Bamboo Shoot & Mushroom
Dish 2 - Thai-themed ~ Tod Mun Pla (Thai Fish Cake) and Khao Pad Sapparod (Pineapple Fried Rice)

As I mentioned in my previous post, I have been using olive oil and grapeseed oil for most of my cooking in the recent years, because they are healthier and boast of multiple health benefits. Many people have this misconception that olive oil and grapeseed oil can only be used for western cooking or drizzling on salad; however both oils are good for stir-frying and deep-frying as well! I usually alternate between the two types of oil for my cooking (as well as baking).

Once again appreciate the opportunity given by Borges Singapore and Singapore Home Cooks to demonstrate the use of olive oil and grapeseed oil in our common daily Asian dishes :)

For my second dish (or rather dishes), I'm going Thai since I'm currently residing in Thailand =D That said, many Singaporeans simply love Thailand as well as Thai food, judging from the frequent trips that I see on FB by friends and snaking queues at Thai eateries in Singapore. My family included :p

I've been trying to cook more thai dishes, since I've access to more thai ingredients now. Today's dishes are Tod Mun Pla (Thai Fish Cake), Khao Pad Sapparod (Pineapple Fried Rice), Som Tum (Green Papaya Salad), all popular and quite easy to cook at home, and I'm using Borges Grapeseed oil to cook them (except for Som Tum which doesn't require oil).


Some useful info about Grapeseed oil (source from Borges Singapore and Singapore Home Cooks):
  • Cholesterol Free. Contains vitamin E and A. 
  • Ideal for Wok, sautéing, frying and fondues.
  • Mild taste, light and nutty overstones that allows the flavours of other foods to shine through when used for frying and cooking.
  • Contains acid linoleic essential fats.
  • Low in saturated fats. No Trans Fat.
  • Carbohydrate and sodium free.
  • No added preservatives, flavourings or colorings.
  • With a smoke point 210-245ºC, it is ideal for stir-frying, fondues and deep-frying.
The Grapeseed oil is unique by its polyunsaturated fatty acid concentration and natural antioxidants that contribute to regulating the free cholesterol presence and radicals in the body. Grapeseed oil has a relatively high smoke point approximately 420ºF (260ºC), so it can be safely used for stir-fries, sautéing and fondue. In addition to this smoking point, Grapeseed oil has other positive attributes in relation to cooking. It has a clean, light taste that can be described as “nutty”.


Tod Mun Pla or Thai Fish Cake is a popular snack or appetiser which is very easy to make at home. Simply blend fish meat, red curry paste, egg yolk and sugar into a paste, add long beans, kaffir lime leaf and thai/holy basil, shape into a patty and pan-fry. Taste really good with sweet chilli dipping sauce. I make my own sweet chilli dipping sauce as well, so that I can adjust the sweetness and spiciness level. Mine is less sweet with more vinegar (for a more tangy taste).

Tod Mun Pla (Thai Fish Cake)
(makes about 18-20 pcs)

Ingredients
  • 500g fish meat (choose more tender fish, I use dory and tilapia)
  • 2 tbsp red curry paste (storebought)
  • 1 egg yolk
  • 1 tsp sugar
  • 2 stalks long beans, cut into thin slices
  • 8 pcs kaffir lime leaves, cut very finely
  • Handful of thai basil or holy basil
  • Fish sauce (to taste, if necessary)
  • 10 tbsp Grapeseed Oil (Borges)
Steps
  1. Cut fish meat into small pieces. Add the fish meat, red curry paste, egg yolk and sugar into a food processor or chopper and blend till a paste forms.
  2. Taste-test: Wet both hands and a teaspoon, scoop a spoonful of paste and form into a patty. Heat a frying pan with 1 tbsp of oil and pan-fry the patty till golden brown on both sides. Taste to see if salty or flavourful enough. I use store-bought red curry which is quite salty and flavourful. If not, add 1 tbsp more of red curry paste and/or 1 tsp of fish sauce to the fish paste.
  3. Once fish paste is ready, add long beans, kaffir lime leaves and basil, use a spatula to fold the ingredients till well-mixed.
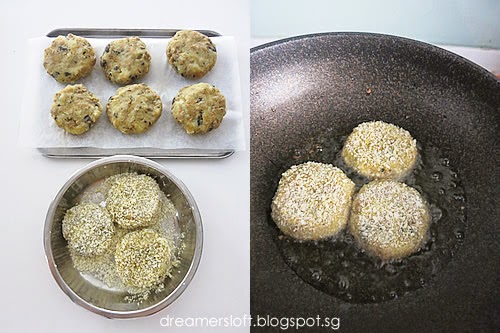
  4. Heat frying pan with 10 tbsp of oil (my pan is 26cm) on medium high heat. Wet both hands and a tablespoon, scoop a spoonful of paste and form into a patty using the hands. Pan-fry the shaped patties in the frying pan till golden brown on both sides.
  5. Best serve hot with sweet chilli dipping sauce.

Sweet Chilli Dipping Sauce

Ingredients
  • 4 cloves garlic
  • 1 big red chilli
  • 3-4 thai chilli/chilli padi (to taste)
  • 1/4 cup + 1 tbsp sugar (to taste)
  • 1/3 cup white or rice vinegar
  • 1/2 tsp salt
  • 3 tbsp water
  • Garnish: sliced shallot, cucumber and coriander
 Steps
  1. In an electric chopper or food processor, add garlic and both chilli and blend coarsely (bits are visible).
  2. Place blended garlic and chilli bits into a small pot, add sugar, vinegar, salt and water and bring to gentle boil over low heat. Taste and add more sugar or chilli if necessary.
  3. Stir till mixture turns syrupy and remove from heat. The mixture will thicken slightly more once cool down. 
  4. To serve, top with sliced shallot, cucumber and coriander.

Pineapple fried rice is yet another favourite dish, as it has a tinge of sweetness from the pineapple (and raisins), aroma from curry powder, seafood freshness from the prawns and different textures from the rice and cashew nuts.


Khao Pad Sapparod (Pineapple Fried Rice)
(serves 4-5)

Ingredients
  • 3-4 tbsp Grapeseed Oil (Borges)
  • 10 pcs prawns, deveined and sliced into half
  • 2 eggs
  • 530g cooked rice (preferably overnight)
  • 1 small onion, finely chopped
  • 10 pcs cherry tomatoes, cut into quarters
  • 150g pineapple flesh, cut into small pieces
  • 60g cashew nuts, lightly toasted
  • 4 tsp thai soy sauce
  • 2 tsp fish sauce
  • 1 tsp sugar
  • pinch of salt
  • 1.5 tsp curry powder
  • 1/2 tsp white pepper
  • 4 stalks spring onion, finely chopped
  • Garnish: coriander, thai lime
Steps
  1. Heat up a large deep frying pan or wok on medium high heat, add 2 tbsp of grapeseed oil and saute the sliced prawns till just cooked. Dish up and set aside.
  2. Add 1 tbsp of oil, add the eggs and scramble lightly. Once eggs are almost cooked, add the rice and toss to mix well with the eggs.
  3. Push the rice aside, add 1 tbsp of oil and saute the onion till slightly cooked (changes colour), then toss the onion with the rice.
  4. Add the seasonings and toss the rice to mix well. Taste and adjust seasonings accordingly. Mine is on lighter side.
  5. Add cooked prawns, cherry tomatoes, pineapple, cashews into the rice. Toss to mix well.
  6. Off heat and add spring onions and toss to mix well.
  7. Best serve hot (in pineapple bowl or plates).


And finally Som Tum (Green Papaya Salad)! This is such a refreshing salad that our family eats it so very often as it's crunchy and appetising with different textures and taste. Many times the HB would tabao from the evening market on his way back from work. It's convenient to buy from street stalls as you can find it everywhere, but the thing is sometimes they are too spicy and sweet for my palate. Of course the advantage of homemade is, you can adjust the taste to suit your own tastebud.

The below recipe is on the lighter side, feel free to adjust the seasonings. As my mortar and pestle is  small and I don't have a big proper som tum mortar, I make my som tum in my own steps by batches, which is not the authentic way of preparing it. Please google or check youtube videos on how it's done properly.

Som Tum (Green Papaya Salad)
(serves 4)

Ingredients
  • 200g julienned green papaya (I use a slicer tool to slice the papaya into thin strips)
  • 10 cherry tomatoes, halved
  • 2 stalks long beans, cut into 1cm pieces
  • 3 cloves garlic
  • 3-4 thai chilli, add more to taste
  • 2 tbsp fish sauce, add more to taste
  • 1-2 tbsp palm sugar, add more to taste
  • Juice from 1 thai lime, add more to taste
  • 3 tsp tamarind juice, add more to taste
  • 3 tbsp raw skinless peanuts, toasted till slightly browned
  • 1 tbsp tiny dried shrimps, lightly toasted
  1. Soak the julienned green papaya in iced water for 10 mins. After 10 mins, dry using salad spinner or kitchen towel.
  2. Add the green papaya into a large mixing bowl, use a pestle to lightly pound/crush the papaya strips.
  3. Add cherry tomatoes and long beans into the mixing bowl and lightly pound/crush them using the pestle.
  4. Add the tiny dried shrimps into the salad.
  5. Add the peanuts into the stone mortar, lightly crush the peanuts into halves or smaller pieces. Add the peanut pieces into the salad.
  6. In the same stone mortar, pound the garlic and chilli till a coarse paste. Add fish sauce, palm sugar, lime juice and tamarind juice. Lightly pound and stir till the palm sugar is melted.
  7. Pour the sauce from the mortar into the mixing bowl, toss everything together till well-mixed. 
  8. Taste the salad and adjust taste to preference.
  9. The salad tastes best freshly prepared.

Hope everyone enjoys these thai dishes! I'll try to post more thai recipes in time to come (if I have the time!). Stay tuned :)

LAST CALL for Borges Giveaway!
Want the best from the Mediterranean? We are giving away three sets of Borges Gift Basket worth $60 at http://bit.ly/2INmCz4 

Be sure to check it out!
#BorgesRecipes

30 April 2017

Fresh Huaishan and Eryngii Mushroom in Huiji Sauce 汇集鲜淮山杏鮑菇

Check out my other dishes created with Huiji Waist Tonic:
Stir-fry Pork & Kidney in Huiji sauce 汇集炒猪肉猪腰


This dish is inspired by a lunch I had at a restaurant specialising in Korean Royal Cuisine when I visited Seoul last year. That particular dish was Abalone with huai shan (aka wild yam), eryngii mushroom, ginko nuts and chestnut braised in an umami seafood sauce.

After that Royal Cuisine meal, I was already thinking of re-creating a vegetarian version with just the wild yam, eryngii mushroom and ginko nuts. As for the sauce, I had a vague idea, probably along the line of vegetable stock and vegetarian oyster sauce, but couldn't figure the umami kick I was looking for.

In case you are wondering, am I a vegetarian? Nope, I love my meat and seafood but sometimes I do like to explore vegetarian dishes using some of my favourite ingredients like fresh huai shan and eryngii mushroom.

Huai Shan 淮山 or Wild Yam 山药 or Nagaimo 長芋 (Japanese) has sweet and neutral properties and medicinal functions such as lower blood sugar and pressure, anti-aging, improve digestive system and so on.


Eryngii or king oyster mushroom 杏鮑菇 has naturally occuring anti-oxidants, rich in nutrients and minerals, doesn't have much taste on its own but once it's cooked, it has this earthy and meaty flavour which I love :)

I digress.

So, thanks to Singapore Home Cooks and Huiji Waist Tonic for offering me a complimentary bottle of the tonic to try and introduce into dishes. After tasting the tonic, I thought the bittersweet tonic taste could work well in the sauce for my dish! And Huiji Waist Tonic itself has benefits such as strengthening the body and waist, as well as invigorating vital energy and blood. Best of all, it's suitable for vegetarians and even halal-certified!


Now cooking this dish is really very easy!

In a pot, add vegetable stock, Huiji Waist Tonic, mirin, goji berries, sugar and salt (both to taste and optional), bring to boil, then thicken with corn starch water. That's it for the sauce.

In a frying pan, add olive or grapeseed oil, and pan fry sliced huai shan and eryngii mushroom till golden brown. Blanch the broccoli forets and ginko nuts (I bought canned ones which are already cooked).

Arrange the huai shan, eryngii, broccoli and ginko nuts in a shallow pan, pour the sauce over the ingredients, turn on stove and bring the mixture to boil on low heat and simmer for 5-10 mins. That's it!


 Fresh Huaishan and Eryngii Mushroom in Huiji Sauce 汇集鲜淮山杏鮑菇


Ingredients
  • 160-180g fresh huaishan, cut into 10 discs
  • 1-2 stalks eryngii mushroom, cut into 15-16 slices
  • 1 head broccoli, separate into stalks
  • 8-10 pieces of cooked ginko nuts
  • 1 tbsp goji berries, soak till softened
  • 150ml vegetable stock
  • 30ml Huiji Waist Tonic
  • 1 tbsp Mirin
  • 1 tsp sugar (to taste, optional)
  • Pinch salt (to taste, optional)
  • 2 tsp corn starch + 2 tbsp water
Steps
  1. In a sauce pot, add vegetable stock, Huiji Waist Tonic, Mirin, sugar, salt and goji berries. Bring the mixture to boil. Add corn starch and stir to thicken the sauce slightly. Set the sauce aside.
  2. Blanch the broccoli and ginko nuts in boiling water. Drain and set aside.
  3. In a shallow pan, add olive or grapeseed oil, pan fry the sliced huai shan and eryngii mushroom till golden brown on both sides. 
  4. Arrange all the ingredients neatly in the pan, pour the sauce over, bring the sauce to boil on low heat and simmer for 5-10 mins.
  5. The dish is ready to be served. Best eaten warm.


I must say I love this dish so much! The sauce really goes very well with all the ingredients and even enhances their natural flavours.

This dish is definitely an energy booster and healthy choice for vegetarians (and non-vegetarians alike)! 就算是素菜也可以补充元气哦! 这可是一道既美味又养生的料理, 希望大家会喜欢!

21 February 2017

Bibimbap 비빔밥

One of my favourite Korean food is Bibimbap 비빔밥 which is "Korean mixed rice with meat and assorted vegetables" and served with a sauce mix of gochujang. But I seldom eat it outside because most of the time the rice portion is very big and after mixing the meat and vegetables, the entire serving is too much for me to finish. I eat very little rice and would prefer more ingredients than rice :p

Last year when I went to Korea, I flew by Korean Air and for supper they served bibimbap in metal bowls!! I don't eat supper so skipped it. Most of the passengers took it and I could hear the entire plane went "tok tok tok tok" (sound of mixing rice and ingredients using the spoon) during meal service hour. It seriously sounded yummy and I regretted not eating it :(

During the trip, I had wanted to try authentic Korean bibimbap at one restaurant in Myeongdong that's highly recommended by many, but the HB didn't like bibimbap so I couldn't eat it until the last day at the airport where I finally ordered it at a foodcourt with many food choices. And during the return flight, bibimbap was served again for dinner and this time, it was a must to eat it!


Actually bibimbap is not difficult to cook, just that the ingredients are prepared/cooked individually and hence quite tedious especially if you use many ingredients. I usually stick to 5 or 6.

Typical ingredients include meat (shredded or mixed), mushroom, spinach, cucumber, zucchini, soy bean sprout or mung bean sprout, carrot, egg etc. I also noticed this ingredient called gosari or fernbrake which is a type of mountain herb/vegetable? I tried to look for it at supermarkets but couldn't find it. Stupidly forgot to search for it at the traditional markets like Gwangjang market as I was too overwhelmed looking at all the food stalls.

For Koreans, I understand that they sometimes use leftover banchan (side dishes) which is super easy coz it's a matter of mixing them up with rice :p

Anyways, here's my version. Since I'm the only one eating it at home and cooking one serving is silly or rather difficult, I usually prepare double portion and eat it over 2 days.


Bibimbap 비빔밥
(makes 2 servings) (reference from Korean Bapsang, Maangchi, My Korean Kitchen)

Ingredients
  • 100g cucumber, sliced into thin pieces
  • 40g carrot, shredded
  • 100g swiss brown mushroom, sliced
  • 120g soy bean sprout
  • 100g spinach, cut into small sections
  • 2 eggs
  • 120g cooked short grain rice
  • Cooking oil, sesame oil, salt, pepper, minced garlic (2-3 cloves), spring onion/chives
  • Sauce: 1 tbsp gochujang, 1 tbsp honey, 1/2-1 tbsp water, 1/4 tsp sesame oil, sesame seeds, spring onion/chives
Steps
  1. Cucumber: Sprinkle generous amount of salt over sliced cucumbers and set aside for 15 mins. Squeeze out excess liquid. Toss with 1/4 tsp minced garlic, 1/4 tsp sesame oil, pinch of salt and pepper.
  2. Carrot: Add some sesame oil to a frying pan, saute the carrot shreds for 1-2 mins, add pinch of salt and pepper. 
  3. Mushroom: In the same frying pan, add some sesame oil, saute the mushroom till soft, add pinch of salt and pepper.
  4. Soy bean sprout: Bring 2 cups of water to boil with 1/2 tsp salt. Add the bean sprouts and cook for 8-10 mins. Drain and squeeze out water. Toss with 1/4 tsp minced garlic, 1/4 tsp sesame oil, pinch of salt and pepper.
  5. Spinach: Using the same pot of water, blanch the spinach till just cooked, about 30 seconds. Drain and squeeze out water. Toss with 1/4 tsp minced garlic, 1/4 tsp sesame oil, pinch of salt and pepper.
  6. Eggs: Fry 2 eggs sunny side-up till egg whites just cooked and yolks still runny.
  7. Sauce: Combine all the sauce ingredients, mix well and sprinkle with sesame seeds and chopped spring onion/chives.
  8. Combine: Scoop 1/2 portion of rice into the middle of a bowl. Place the sunny side-up on top of the rice. Arrange 1/2 portions of the cucumber, carrot, mushroom, soybean sprout and spinach around and on top of the egg white. Sprinkle with sesame seeds and chopped spring onion/chives. Drizzle desired amount of sauce, mix well and enjoy. Repeat for the remaining portion. If storing in fridge, keep in airtight box and steam for 5-6 mins before eating.

13 January 2017

Mille-Feuille Nabe (A Thousand Leaves Hotpot)

I have bookmarked this dish for the longest time and procrastinated in preparing/cooking it because I thought it looked quite complicated with a long list of ingredients. But I realised how simple it is to prepare after trying out today, especially when I "cheated" by using store-bought broth :p 

Mille-Feuille Nabe is a Japanese-style hot pot that is cooked using napa cabbage and pork belly/collar slices in a savoury dashi broth. But traditionally, "Mille-Feuille" means a thousand leaves and is actually a French pastry made up of three layers of puff pastry, and two layers of crème pâtissière. Somehow the Japanese adopted the idea for cooking nabe by packing many layers of napa cabbage and pork slices into a pot :)


Whatever it is, it is just sooooooo pretty to look at, isn't it? And surprisingly easy to prepare. Main ingredients are just napa cabbage and pork slices (either pork belly or collar), whereas mushrooms and carrots are there to enhance visual appeal :p

As for the broth, the Japanese uses a dashi broth made using dried anchovies, kelp, dried shiitake mushroom, dried bonito flakes and seasonings like sake, soy sauce, mirin etc.

However, I'm too lazy too busy HB cannot take too much anchovies I decided to try using store-bought chicken broth instead. So happen I saw CP Food having a "2 for the price of 1" promo of its Clear Chicken Broth Concentrate and thought why not give it a try. Once in a while I will prepare my own chicken/meat stock or broth but it's a lot of work, and sometimes I will simply buy convenient packs chicken stock from the supermarket.

And yep, I simply pour the chicken broth concentrate and water into the pot after preparing the main ingredients, cook for 20-30 mins, viola! So simple! LOL =D


There are many blogs and videos showing exactly how to prepare and arrange the cabbage so I'm not going into details here. My ingredients are customised for my 20cm pot (serving 2-3 pax), so feel free to adjust accordingly. Some recipes use beansprouts and lay them at the bottom of the pot, I omitted this as my hb hates beansprouts. (Laid some enoki mushroom at first but removed them as I cut the cabbage layers too wide and the height became too tall for the pot).

Basically, one set consists of 3 layers of cabbage leaves and in between slices of pork collar. Arrange the layers as follow, 1 leaf, follow by 4 slices of pork, another leaf, another 4 slices of pork and finally 1 leaf to cover. Cut each set into 3 sections. Repeat until all leaves and pork slices are finished. Next, arrange the cabbage and pork layers into the pot. Start from the outer edges and pack the sets towards the centre. Try to pack as tightly as possible, as the cabbage will loosen during cooking. Stuff some enoki mushroom and Shimeji mushroom in the centre and if desired a few petals of carrot slices.


Finally add water and broth concentrate, almost to the brim (about 1/2 inch allowance). The broth is quite concentrated and salty, and the recommended proportion on the package is 40% broth 60% water. As the cabbage will release some water (thereby diluting the soup) during cooking, I decided to use 50% broth 50% water. Cook for about 15 mins covered, and then 10 mins uncovered. Ready to serve.

Mille-Feuille Nabe (A Thousand Leaves Hotpot)
(using 20cm pot, serves 2-3 pax)

Ingredients
  • 1 small napa cabbage, about 800g - 850g (remove first few leaves)
  • 500g thinly sliced pork collar (or belly)
  • Small bunch of enoki mushroom, shimeji mushroom and few slices of carrot
  • 400ml chicken broth concentrate (2 packets of CP)
  • 400ml water
  • Dipping sauce (optional):  3 tbsp soup from nabe, 1 tsp soy sauce, 1 tsp lemon juice, dash of yuzu shichimi togarashi (Jap 7 spice yuzu flavour), 1 tsp spring onion
Steps
  • Remove all the leaves of the napa cabbage, wash and pat drain.
  • Start the layering. First 1 leaf of cabbage, followed by 4 slices of pork collar, then another leaf, another 4 slices of pork and finally top with 1 leaf. This is a set of 3 layers. Cut the set into 3 sections. Repeat until all cabbage leaves and pork slices are finished.
  • Arrange the sets into a cooking pot. Start from the outer edges and pack the sets towards the centre. Try to pack as tightly as possible, as the cabbage will loosen during cooking. Stuff some enoki mushroom and Shimeji mushroom in the centre and if desired a few petals of carrot slices.
  • Add water and chicken broth concentrate. Cover the pot and cook for 15 mins on medium heat. 
  • After 15 mins, remove cover and cook for another 10 mins.
  • Nabe is ready to be served. Best eaten hot, on its own or with dipping sauce.

I think this quick and easy dish looks pretty and is quite presentable for the upcoming Chinese New Year. It can be prepared in advance, store the whole pot in the fridge and cook just before eating. Feel free to play around with the ingredients, probably use some beef slices, add some dark leafy vegetables in between the layers and more mushrooms.


The napa cabbage is tender and savoury, having absorbed the flavours of the broth and pork. The pork is not too heavy since it's thinly sliced and quite flavourful as well. The soup is light and soothing to the palate. Overall quite a balanced and wholesome dish, very tasty even though no other seasonings are added.


This recipe is a keeper for me, whenever I crave for some easy-to-cook and wholesome 3-in-1 (meat, veggie, soup) meal =D

12 January 2017

Bittergourd & Pork Ribs in Black Bean Sauce

Oh My 天! 最近的天气真是热到... 动不动就汗流浃背, 火气都上来了! 

我十二月份到香港的时候在一家菜馆尝了这道 "凉瓜排骨豉汁" 就一直念念不忘, 想找机会
如法炮制. 刚好天气这么闷热, 听说苦瓜 (也叫凉瓜) 有清暑下火清心明目等功效, 就试着来煮一煮吧!

OMG, the weather really hotdieme! I'm literally drenched in sweat all day long, making me super frustrated and quick tempered!

When I went to Hong Kong for holiday last December, I tried this particular dish "Bittergourd & Pork Ribs in Black Bean Sauce" at a restaurant and fell in love with it. Since the weather is so hot, and bittergourd has cooling properties, this gave me the opportunity to try cooking it =D


小时候最讨厌吃苦瓜了, 可是现在却爱上了它! 是不是因为老了? 哈哈!

这道凉瓜排骨豉汁带咸又微苦, 如果有放辣椒还有点辣味, 真的超下饭的. 我想往后应该会常煮哦 :)

I used to hate bittergourd as a kid, but nowadays totally love it. Is it a sign of aging? LOL!

The dish is salty with tinge of bitterness, and if chilli is added, slightly spicy as well, perfect to go with a big bowl of rice! This recipe is definitely a keeper for me :)


Bittergourd & Pork Ribs in Black Bean Sauce 凉瓜排骨豉汁
(Serves 2) *reference: https://www.youtube.com/watch?v=2qYgoKe2kxk

Ingredients
  • 300g Pork ribs, chopped into small pieces
  • 1/2 pc Bittergourd
  • 18g Salted black bean
  • 3 tbsp Rice wine
  • 2 cloves Garlic, minced
  • 1 knob Ginger, grated
  • 3 pcs dried chilli (I use 1 stalk chilli padi) *Chilli is optional
  • 250ml, Water or Chicken stock
  • 1 tbsp Oyster sauce
  • 1 tbsp Sugar
  • 1 tsp Soy sauce
  •  1/4 tsp Sesame oil
  • 1 tsp corn starch + 2 tbsp water
Steps
  1. Cut bittergourd lengthwise into half, remove white pith portion and discard. Slice bittergourd into about 6mm thickness. Soak in salt water for 30 mins. Once ready, drain and set aside.
  2. Soak the salted black bean in the rice wine for 30 mins. Once ready, drain and set aside.
  3. Heat a small pot of cooking oil, deep fry the pork ribs for 2-3 mins and the sliced bittergourd for 1 min. Set aside.
  4. Heat up 1 tbsp of cooking in a frying pan or wok, add minced garlic and grated ginger, stir fry till fragrant. Next add black bean and chilli (if using) and stir fry for a minute.
  5. Add water or chicken stock, oyster sauce, sugar, soy sauce and sesame oil. Bring to a boil.
  6. Add pork ribs, cover and let simmer at low heat for 30-40 mins, stirring every 10 mins.
  7. Add bittergourd, stir fry and then cover and simmer for a minute.
  8. Add corn starch slurry, stir fry to thicken the sauce. 
  9. Serve immediately.

15 November 2016

5-colour veggie tofu stew 五色蔬菜豆腐羹

I know, I have been sooooooo slack in updating my blog! MIA for more than a month already :p Well, for the past month, I've been obsessing with K-drama learning korean language and researching on Seoul, and early November I finally went to Seoul! Couldn't pick up my blogging mojo at all, and I have tonnes to blog about, like my February Kansai trip, June Australia trip and then my latest Seoul trip :p Ottoke?

I digress once again.

Well, been feasting non-stop past few months and realised I piled on at least 1-2kg! *GASP* Not after I spent so much effort exercising and dieting last year right? Time to attempt to eat lean again!

Saw a FB video (https://www.facebook.com/imjunepower/videos/1748120712122196/?pnref=story) about this 5-colours veggie soup 五行蔬菜湯 which supposedly helps in dieting. Yes, certainly suitable for me, since I always try to cut down on carbo and this soup looks quite satiating with so many ingredients.

It's really a quick and easy one-pot meal. I guess the tedious part is the cutting of all the vegetables into shreds so that it's faster to cook and easier to eat.

The 5 colours here refer to:
White - tofu, mushrooms
Yellow - sweet corn, ginger
Orange - carrot
Black - black fungus
Green - spring onion, parsley

I guess there's no hard and fast rule about the variety of vegetables used, feel free to explore various types of vegetables to suit your personal preference :)

I added an egg to sweeten the soup and used chicken stock as soup base; so for vegetarians, the egg can be omitted and stock can be vegetable broth or just those vegetarian mushroom flavouring.


5-colour veggie tofu stew 五色蔬菜豆腐羹
(serves 3-4) 

Ingredients
  • Corn kernels from 1 sweet corn
  • 125g fresh black fungus, cut into thin strips
  • 6 pcs fresh shiitake mushroom, cut into thin strips
  • 2 packets enoki mushroom, cut into 3-4 sections
  • 2 small carrot, finely shredded
  • 25g ginger, finely shredded
  • 1 box pressed firm tofu, cut into strips
  • 3 stalks spring onion, finely chopped
  • 1-2 stalks chinese parsley, finely chopped
  • 400ml chicken stock + 200ml water
  • 1 egg
  • Corn starch and water
  • 2-3 tbsp chinese cooking wine
  • Salt and pepper, to taste
  • Sesame oil, rahyu (Jap chilli oil), black vinegar, to taste (optional)
Steps
  1. Heat up cooking pot with 1 tbsp of olive oil (medium heat), add ginger and stir-fry till fragrant.
  2. Add carrot and stir-fry for a minute. Add the sweet corn, black fungus and mushrooms, stir-fry for a minute and add 2-3 tbsp of chinese cooking wine. Stir-fry till the ingredients are slightly softened.
  3. Add chicken stock and water, mix well with the ingredients. Cover and bring to boil.
  4. Add the tofu, stir gently to mix.
  5. Add slightly beaten egg, stir gently to mix.
  6. Make a slurry with 2 tsp of corn starch and 2 tbsp of water, add to thicken the soup slightly.
  7. Add salt and pepper, to taste.
  8. Serve with chinese parsley, spring onion, sesame oil, rahyu, black vinegar, to taste.
Absolutely love this virtually appealing stew, with all the different textures and taste, and best of all healthy, wholesome and satisfying.

It's yummy to eat on its own, even better with a dash of Japanese chilli oil (rahyu), sesame oil and black vinegar. I can eat this for lunch and dinner and every other day :)

19 October 2015

Goya Chanpuru

It's been 2 weeks since my vacation to Tokyo, and I have to say, I really miss Tokyo very much :(

Been a walking zombie since my return and didn't have the motivation to do anything, not even edit photos for the blog. I blame it on the haze and humid weather. The weather in Tokyo was cool and air was crisp, it felt so good there, food was delicious, shopping was great... I digress :p

As always, I had to buy some grocery and vegetables back, because they were so much cheaper as compared to prices in Japanese supermarkets here. Take for example, a large daikon (white radish) cost less than $4, whereas Isetan supermarket is selling medium size ones at $9+. Same goes for carrot, potato etc, and Japanese vegetables really taste much sweeter with better texture. But in SG, I really cannot bare to spend so much as there are cheaper alternatives; so every time I go Japan, it's so hard to resist the temptation to lug back some vegetables! Seriously I didn't buy that much, just the hardy root vegetables like, a daikon, 3 carrots, a bag of baby taro, some young burdock, a section of mountain yam, 2 goya (bitter gourd)... that's all and I gave some to my mum and MIL.


In Japan, people like to eat bitter gourd dishes during summer to revitalise energy and boast appetite. This particular dish, Goya Chanpuru is a very popular Okinawan home-style dish which is quick and easy to whip up. Ingredients are bitter gourd, pork belly or spam, firm tofu, egg, and seasonings are simple like soy sauce, miso and sesame oil.


The skin of Japanese bitter gourd is much rougher/uglier than the ones we see at local markets here, although I did see similar miniature ones before. One of these days I must try to see if they are the same. It's important to treat the bitter gourd before cooking to remove some bitterness. Basically cut the bitter gourd lengthwise then use a spoon to scrape off the white pith as much as possible. Next, boil some water with salt, blanch the bitter gourd and ready to use!


Goya Chanpuru (Stir Fry Bitter Gourd with Pork and Tofu)
(serves 3-4)

Ingredients
  • 1 bitter gourd
  • 200g pork belly
  • 300g firm tofu
  • 1 egg
  • 2 tbsp soy sauce
  • 1 tbsp cooking sake
  • 1 tsp miso
  • Dash of sesame oil
  • Handful of bonito flakes (optional)
Steps
  1. Cut the bitter gourd lengthwise, use a spoon to scrape off as much white pith as possible. Cut the bitter gourd into 0.5cm thickness. Boil some water, add a tsp of salt and blanch the bitter gourd for a minute. Drain and set aside.
  2. Drain water from the tofu, use a heavy object to press onto tofu for 10 mins to remove additional liquid. Cut into big cubes and set aside.
  3. Slice pork belly thinly and cut into bite-size pieces (I bought pre-sliced ones from supermarket).
  4. Add a tbsp of oil into frying pan, once hot, add pork belly and stir fry till opaque.
  5. Add bitter gourd and tofu and give them a quick stir fry.
  6. Dissolve the miso in cooking sake, then add the mixture together with soy sauce and dash of sesame oil into the frying pan. Give all the ingredients a quick toss.
  7. Lightly beat the egg and pour over the ingredients, give a quick toss. Plate and top with some bonito flakes if desired. Best served hot.


I like to top the dish with some bonito flakes, it enhanced the overall taste. Although the dish doesn't seem that appealing visually, it's very tasty and wholesome. Give this humble dish a try!

10 December 2014

Japanese-style Beef Stew

It's been 3 days since my return from Tokyo, I already missed it terribly and yearning to return once more. Is it the weather, the food or just the overall atmosphere? Each time I visit the city, despite doing mostly the same old (shops, food), somehow I still managed to discover new areas and things. Hope I would get down to blog about it soon.

To cure my love-sickness for Japan, I cooked a Japanese-style Beef Stew yesterday and had it for both lunch and dinner. This recipe is from a NHK programme  きょうの料理 that I watched while I was in Tokyo and I managed to retrieve the recipe from their website.


 Very interesting stew because the method used is slightly different from the Western-style, and the sauces/seasonings used for the gravy is quite different as well. Besides red wine, demi-glace sauce is used, and seasonings like ketchup, tonkatsu sauce and worcestershire sauce. As usual I brought back some root vegetables (yes I'm a weirdo who buys groceries from Japan every time I visit) and used my precious carrot and potato for the stew.

Ingredients - potato and carrot (from Japan), swiss brown mushroom, white onion (recipe uses the small type of Japanese onion which I didn't buy), beef, garlic, bay leaves and celery.

Sauces - the key ones are red wine and demi-glace (I bought the Heinz packet from Japan. demi-glace sauce can be homemade as well); ketchup and tonkatsu sauce. Recipe also calls for worcestershire sauce which I substituted with balsamic vinegar, fish sauce and sugar.


Japanese-style Beef Stew
(serves 2-3 pax, adapted from NHK Kyounoryouri

Ingredients
  • 430g Beef shoulder, cut into 2-3cm chunks
  • 5 cloves Garlic, thinly sliced
  • 2 Bay leaves
  • 1 stalk Celery leaves
  • 1L Water
  • 150ml Red wine
  • 200g Demi-glace sauce
  • 20g Unsalted butter
  • 2pc White onion, peeled and cut into wedges
  • 190g Carrot, peeled and cut into 1cm thick rounds
  • 180g Swiss brown mushroom, remove stem
  • 300g Potato, peeled (I use baby potato)
  • 1 tbsp Ketchup
  • 1 tbsp Tonkatsu sauce
  • 1/4 tsp Balsamic vinegar
  • 1/4 tsp fish sauce
  • 1/2 tsp sugar
  • Sea salt and pepper to taste 
Steps
  1. Marinate the beef chunks with sea salt and pepper and coat thinly with flour.
  2. Heat 2 tbsp of cooking oil in a cast iron pot, add garlic slices. Once fragrant, add beef chunks and sear all the sides till browned.
  3. Add 1L water, bay leaves and celery to the pot, bring to boil and then lower heat, simmer for about 50-60 mins till beef is tender.
  4. In a separate small pot, add red wine and cook on medium heat for 5-6 mins, till wine is reduced by half. Add the demi-glace sauce and cook on low heat for 3 mins. Off heat and set aside.
  5. In a frying pan, melt the butter then add all the vegetables. Sauteed for 5 mins. Off heat and set aside.
  6. Once beef is ready, add the vegetables from (5) to the pot, bring to boil then turn down the heat. Scoop and discard any scums from the soup. *I use the "Akutorishito" (something like a fine mesh cloth) bought from Japan to help absorb the scums and excess oil. Cover the lid and simmer for 10 mins.
  7. After 10 mins, remove the lid and add the red wine and demi-glace mixture from (4). Simmer over low heat for 30 mins, stirring occasionally. The gravy will thickened and reduced.
  8. For finishing, add the ketchup, tonkatsu sauce, vinegar, fish sauce, sugar, salt and pepper to taste.

This dish is best served hot with rice or crusty bread. I had mine with rice because didn't have time to make any bread. The cook recommended sour cream to go with the gravy as well but I was too lazy and didn't bother didn't have the ingredients.

I love the gravy! Although the gravy looks very rich, the taste is mild and not overwhelming on the palate. The texture and taste of beef, onion, carrot, potato and mushroom complemented each other very well. Certainly a comfort stew for the cold weather. This recipe is definitely a keeper and I'm already looking forward to cook this dish again, this time with sour cream and homemade crusty bread.

23 October 2014

Potato & Meat Croquette

The potato croquette is not difficult to make at home, so I wonder why it took me this long to cook it :p Personally I like it a lot especially with lots of tonkatsu sauce. But hubby didn't seem to like it when I order this item at Japanese restaurants. Anyways, the kiddo started to order this item himself at Japanese restaurants so I took it as a sign to start preparing it as a home dish.

I like to use russet potato or Australian potato for mashed potato as the texture is finer. Added some minced beef to enhance the taste and also sneaked in some yellow onion, carrot and portobello mushroom since the kiddo doesn't like these usually. Actually the onion, carrot and mushroom were scraps leftover from some dishes a few days ago, just perfect to use them up. Didn't add any spices like black pepper or herbs as the kiddo doesn't like it (he's quite picky with sensitive tastebud).


Needless to say, the kiddo loved it and ate two and a half pieces (along with rice and another dish of fish & tofu soup). Surprisingly hubby liked it as well. When I asked him, he said he didn't like the taste of those sold at restaurants. So yeah to home-cook version =D

I cooked half a batch and froze the rest, and I guess this dish will appear from time to time on my dining table from now onwards (may even sneak in more veg next time!).


Potato & Meat Croquette
(reference: Just one cookbook; makes 15 pieces)

Ingredients
  • 3 russet or Australian potato
  • 170g minced beef
  • 4 baby portobello mushroom, finely chopped
  • 1/2 yellow onion, finely chopped
  • 1/4 carrot, grated
  • Cooking oil, sea salt, small knob of butter
  • 1 egg, corn starch, breadcrumbs (I use Korean brand)
Steps
  1. Peel and slice the potato, steam over medium high heat for 10-15 mins till fork tender. (Alternatively boil the potato slices in water.). Drain and set aside.
  2. In a frying pan, heat about 1-2 tsp of cooking oil and saute onion till translucent and fragrant. Add minced beef, grated carrot and mushroom, cook till the beef just cooked (turned from red to brownish).
  3. Add a small knob of butter and 1/4 tsp of sea salt to the cooked potato, mash and mix well.
  4. Drain any juice from the cooked mixture in (2) and add to the mashed potato. Mix well.
  5. Wet the palms and take some mashed potato about the size of a golf ball, shape into a ball, then press gently to flatten slightly. *At this point, the croquette patties can be chilled or frozen till ready to use. Use baking/cooking sheets to separate each layer of patties and store in air-tight container.
  6. Coat each croquette patty with corn starch, beaten egg and finally breadcrumbs.
  7. Shallow-fry or deep fry the croquette till golden brown. Drain on kitchen towel.
  8. Best serve warm with tonkatsu sauce.

05 August 2014

Portobello Mushroom Burger & Yuzu Mint Soda

There are some days I crave for comfort food like burgers but don't feel like eating meat or heavy stuff. The portobello mushroom burger comes into rescue! I love the meaty and juicy texture of portobello mushroom, how satisfying it feels to the bite, yet not overwhelming or sinful.

This burger is in fact inspired by the one I had at Grub Bistro at Bishan Park. Ate the burger there once and feel in love with it. Grub Bistro's serving comes in a regular size, whereas mine is a mini version because I prefer mini burgers which look so dainty and cute. Anyways, I ate 2 mini burgers at one go, so the calorie still added up -_-


Since I wanted mini burgers, the porbello mushroom I bought was medium size (about 2.5"), not those huge ones (4") or mini ones (1.5"). Got them at Sheng Siong supermarket; noticed that only Sheng Siong carries this particular size I wanted which matches the size of a tomato slice.

I also made my own burger bun in mini-size (using 65°C tangzhong method) so everything was matchy-matchy. If you don't want to make your own burger buns, can also buy those mini butter rolls or whole-meal buns by Gardenia and Sunshine. Those are about the same mini size too.


Needless to say, I love these mini portobello mushroom burgers so much! Love the combination of soft, fluffy bread with meaty, juicy portobello mushroom and the crunchy and refreshing vegetables. The taste of vinegar-based marinate with feta cheese and Japanese mayonnaise also complemented each other perfectly. After chomping 2 burgers at one go, I felt like eating more :p Good news is, I can always make them at home easily, without having to travel all the way to Bishan Park to satisfy my craving :)


Homemade mini burger buns
(recipe from 65°C汤种面包 by Yvonne C.)

Ingredients

Tangzhong
  • 100g bread flour
  • 500g water
  1. In a heavy bottom pot, combine bread flour with water until well-mixed.
  2. Heat the mixture over medium-small fire, stirring continuously.
  3. Cook the mixture till 65°C (mixture will become thicker and gluey and visible lines will appear).
  4. Remove pot from heat, cover the top of the tangzhong mixture with clingwrap (to prevent drying out) and let the mixture cool completely before use.
Burger buns
  • 210g bread flour
  • 56g plain flour or cake flour
  • 20g milk powder
  • 42g caster sugar
  • 1/2 tsp salt
  • 6g instant dry yeast
  • 30g egg
  • 85g water
  • 84g tangzhong
  • 22g unsalted butter
  • Egg wash, sesame seeds, melted salted butter
  1. Combine bread flour, plain flour, milk powder, caster sugar, salt and dry yeast into a mixer bowl. Avoid putting the yeast together with the sugar and salt.
  2. Add egg, water and tangzhong into the mixer bowl. Start mixing the ingredients on low speed (using the dough hook).
  3. Once ingredients are combined, increase mixer speed to medium.
  4. Once gluten forms, add the butter.
  5. Knead the dough at medium speed until dough is elastic and smooth. (dough will leave the sides and bottom of bowl). To test if dough is ready, take a small piece of dough, stretch outwards into a rectangle. Dough will be elastic and translucent. When the dough breaks, the hole will be jagged.
  6. Tuck the dough neatly into a ball and place the dough into a large well-oiled bowl. Cover the bowl with clingwrap and leave to proof at room temperature for 40-60 mins or till dough doubles in size (in Singapore, room temperature is about 28 to 30 degree celsius with 70-80% humidity).
  7. To check if dough is proofed, coat forefinger with flour and stick into middle of dough and remove, if the hole remains, the dough is sufficiently proofed.
  8. Cut and weigh dough into desired sizes (Dough weight is about 540g. I made 4 mini burger buns about 38g each and the remaining dough made into sausage buns). Let dough rest for about 10 mins.
  9. Shape the dough into desired shapes (ball for burger/add filling and close for other buns) and let dough proof for another 40-60 mins.
  10. About 20 mins before dough is ready, preheat oven (top and bottom heat) at 180 degree celsius.
  11. Brush the buns with egg wash, sprinkle with some sesame seeds and bake the buns for about 12 to 15 mins at 180 degree celsius.
  12. When buns are baked, remove from oven and brush lightly with melted salted butter.


Portobello mushroom burger
(recipe reference: http://www.mayoclinic.org/healthy-living/recipes/grilled-portobello-mushroom-burgers/RCP-20049669)

Ingredients
  • 2 portobello mushroom (medium size)
  • 2 mini burger buns (homemade or store-bought)
  • 4 cubes feta cheese
  • Coral lettuce, Japanese cucumber, tomato
  • Japanese mayonnaise
Marinate for mushroom
  • 3 tbsp balsamic vinegar
  • 4 tbsp water
  • 1 tsp sugar
  • 1 clove garlic, finely minced
  • 1/8 tsp parika
  • 1 tbsp olive oil
Steps
  1. Clean mushrooms with a damp cloth and remove the stems. Place on a dish bowl, gill side up.
  2. Combine the ingredients for the marinate and drizzle the marinate over the mushrooms.
  3. Cover the bowl and marinate the mushroom in the fridge for 1 hour, turning the mushrooms once.
  4. Lay a piece of aluminum foil over the wire mesh of Air Fryer, and fry the mushrooms for 10 mins at 180 degree celsius, turning over once. When turning, baste the mushroom with marinate to prevent drying out.
  5. Alternatively, place the mushrooms in a Happy Call frying pan and fry over small heat for about 6-8 mins, turning over once. When turning, baste the mushroom with marinate to prevent drying out. *** The mushrooms cooked using direct fire (HCP) will shrink a little, whereas using Air Fryer retains the size.
  6. To combine, half the 2 burger burns and lightly toast them in Air Fryer for 2-3 mins at 160 degree celsius. Once ready, spread some salted butter over the burger buns.
  7. Place 1-2 leaves of coral lettuce on the bottom halves of the buns, top with cucumber and tomato slices. Next, crumble the feta cheese on top of the tomato slices, follow by the portobello mushroom, gill side down. Drizzle some Japanese mayonnaise over the mushroom. Top with burger bun. Serve immediately.

Plate the burgers nicely and tadah! Atas-looking gourmet burgers in the house =D

I also made Yuzu Mint Soda to go with the burger. This drink is also inspired by the one sold at Grub Bistro :p

In a glass combine Japanese yuzu honey (or Korean Citron tea) with soda water, lots of ice cubes and 5-6 mint leaves. A refreshing drink, so quick and easy and absolutely perfect for our hot and humid weather :)


This post is linked to the event, Little Thumbs Up organised by Bake for Happy Kids and My Little Favourite DIY, and hosted by Diana from the Domestic Goddess Wannabe