Showing posts with label Cooking - sandwich/burger/bun. Show all posts

27 July 2019

Hainanese Chicken Rice Pau

[ Collaboration with Dancing Chef and Singapore Home Cooks ]


* "Hainanese Chicken Rice" Pau using Hainanese Chicken Rice Paste *


Presenting my new creation using Dancing Chef Hainanese Chicken Rice Paste!

My family loves chicken rice, so I thought of a "on-the-go" finger food with chicken rice flavour that's different from the conventional.

The concept is like a kong bak bao or gua bao but chicken rice flavour :) In fact, this is versatile and can be made into the traditional enclosed bao too.


Chicken rice paste is added to the Pau dough; in addition I added pandan juice for the green colour Pau as I like the aroma of pandan chicken rice.


The Pau has a subtle taste of chicken rice (smells really aromatic during steaming!) and is good to eat on its own but even better with poached chicken, ginger sauce, chilli sauce as well as cucumber, chilli shreds and coriander. *Both the ginger sauce and chilli sauce have Dancing Chef chicken rice paste added too!

It's literally like eating chicken rice, without the rice!
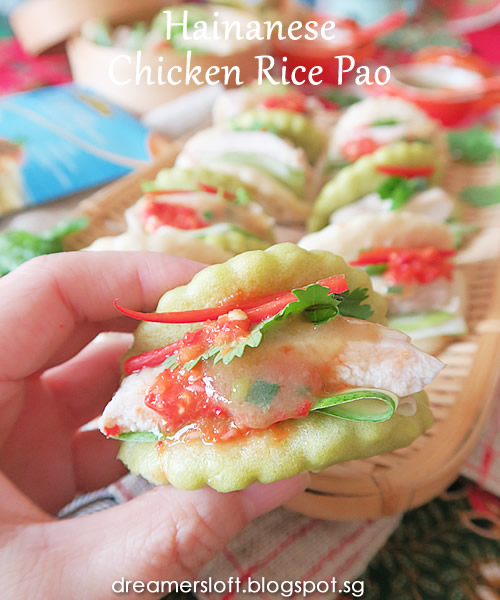

Isn't this cute, I love small size finger food like this, which can be eaten in one or two bites :p

Preparing this Pau is not difficult, just a tad tedious, but trust me it will be popular, especially for those who love chicken rice and/or pau or both LOL :p


For the original chicken rice flavour Pau, the dough is made using Pau flour, baking powder, sugar, yeast/sugar/water mixture, chicken rice paste and water.

Mix all the ingredients together using spatula till a rough dough forms and then knead for 10 mins. Initially the dough might be a little wet and sticky, sprinkle just a little bit of flour will help but not too much, just keep kneading and the dough will turn smooth and non-sticky. Cover and proof for 30 mins.


For the pandan chicken rice flavour Pau, the dough is made using Pau flour, baking powder, sugar, yeast/sugar/water mixture, chicken rice paste and pandan juice.

Likewise, mix all the ingredients together using spatula till a rough dough forms and then knead for 10 mins. Initially the dough might be a little wet and sticky, sprinkle just a little bit of flour will help but not too much, just keep kneading and the dough will turn smooth and non-sticky. Cover and proof for 30 mins.


Once dough is proofed, roll it out to about 5-6mm, use a 7cm mould to stamp the dough skins. Gather the scraps and repeat. If the dough shrinks, let it rest for 5-10 mins before stamping again. I manage to get 7 pcs.

Next use a rolling pin to roll each dough skin into oval shape thickness about 3-4mm. Brush the dough skin with some olive oil, fold it into half, place onto a piece of pau or baking paper (cut into 6cm square), and finally proof for 30 mins. Once proofing is done, steam on high heat for 20 mins and the pau skin is ready!


Repeat the same steps for the pandan chicken rice dough.

My freshly steamed chicken rice flavour paus, they look quite good, don't they? The pau is quite soft and fluffy with nice aroma and subtle chicken rice taste, I couldn't resist eating it plain ;)


Hainanese Chicken Rice Pau
(Makes 14 small size portions, 7pcs of original flavour and 7pcs of pandan flavour)

(A) Pau dough

Original chicken rice flavour (7 pcs)
  • 100g Pau flour or Hong Kong flour
  • 1/2 tsp double acting baking powder
  • 20g caster sugar
  • 30g Dancing Chef Hainanese Chicken Rice Paste (include some oil in the packet)
  • 35-38g water
  • 1/4 heap tsp instant yeast
  • 1/4 heap tsp caster sugar
  • 1.5 tsp water
Pandan chicken rice flavour (7 pcs)
  • 100g Pau flour or Hong Kong flour
  • 1/2 tsp double acting baking powder
  • 20g caster sugar
  • 30g Dancing Chef Hainanese Chicken Rice Paste (include some oil in the packet)
  • 35-38g Pandan juice (blend 10 pandan leaves with 80-100g water, strain to get juice)
  • 1/4 heap tsp instant yeast
  • 1/4 heap tsp caster sugar
  • 1.5 tsp water
  1. Steps are the same for both flavours.
  2. Mix yeast, sugar and water in a small bowl, set aside till the mixture turns frothy.
  3. Add flour, baking powder and caster sugar in a large mixing bowl, stir till well blended.
  4. Add chicken rice paste, water (or pandan juice) and yeast mixture into the mixing bowl. Mix the ingredients together till a rough dough forms.
  5. Transfer the rough dough onto a kneading mat. Knead the dough for 10 mins. The dough may be a little wet and sticky initially, dust just a little bit of flour but not too much. Keep kneading and the dough will turn smooth and non-sticky.
  6. Cover and proof the dough (first proof) for 30 mins.
  7. Once dough is proofed, roll it out using rolling pin to about 5-6mm thickness.
  8. Use a 7cm scalloped round mould to stamp out the dough skins. Gather scraps and repeat. If the dough shrinks, rest for 5-10 mins before continuing. Total yield is 7 pieces for each flavour.
  9. Using the rolling pin to roll the dough skin into oval shape about 3-4mm thickness. Brush the surface with some olive oil, fold into half, place onto a piece of pau paper (6cm square). Repeat for all, cover and proof for another 30 mins (second proof).
  10. Once the dough skins are proofed, steam on high heat for 20 mins and the Pau are ready to serve. Best eaten warm.
(B) Poached chicken
  • 2-3 pieces boneless chicken thighs
  • 2 stalks spring onion, 3 slices ginger, 2 cloves garlic
  1. Bring a pot of water to boil, add chicken thigh, spring onion, ginger and garlic.
  2. Let the ingredients simmer for 10 mins.
  3. Remove the chicken thighs and place in iced water for 10 mins.
  4. Drain and brush the thighs with sesame oil, set aside till ready to use.
(C) Chilli sauce
  • 2 pcs big red chilli
  • 2 pcs chilli padi
  • 20g Dancing Chef Hainanese Chicken Rice Paste
  • 2 cloves garlic
  • 2 tbsp chicken stock
  • 1 tbsp ketchup
  • 1 tsp sugar
  • Juice from 1 lime
  1. Blend all the ingredients in a food processor till fine and well-blended. Adjust seasonings to taste.
(D) Ginger & Spring Onion Sauce
  • 20g Dancing Chef Hainanese Chicken Rice Paste
  • 2 stalks spring onion, finely chopped
  • 80-100ml chicken stock
  • 1 tsp sugar
  • corn starch water
  1. Add chicken rice paste and spring onion to a small pot, stir fry on low heat for 30s.
  2. Add water and sugar, stir till well-mixed.
  3. Thicken with corn starch water if the sauce is too watery.

(E) Assemble
  • 14 pcs original and pandan flavour chicken rice pau (from A)
  • 14 pcs chicken thigh (from B, cut the chicken thigh into sizes that fit the pau)
  • Cucumber, coriander, chilli shreds
  • Chilli sauce, Ginger & spring onion sauce (from C & D)
  1. To serve, take a piece of pau, open up, place cucumber, chicken thigh, coriander and chilli into the pau, and finally drizzle some chilli sauce and ginger spring onion sauce.
  2. Best eaten warm.

NOTES:

  • This pau is best eaten warm, it will turn a little hard when cold (just like mantou). To reheat, steam for 5 mins. 
  • As no preservatives, bread improvers or softener is added, the pau is best eaten on the same day, or keep in fridge for 1-2 days. Reheat before eating.
  • I made the pau to be small size, eaten in 1-2 bites. For regular or bigger size pau, increase quantity of ingredients and use bigger mould to stamp the dough.
  • This dough can be made into conventional enclosed pau too, or simply eaten as mantou.


This Pau is visually appealing and taste yummy, suitable for parties and gatherings, especially for the upcoming National Day!

So this is also my tribute to Singapore's 54th Birthday :)


Hope that all of you like my creation :)

Dancing Chef™️: One Paste, Many DishesBe (surprisingly) different

#DancingChefSG

AUGUST PROMOTION:  Dancing ChefTM Pastes 100g 2 for S$5.00 (UP: S$2.85) Available at Cold Storage, Giant, NTUC FairPrice and Sheng Siong

Give it a try today with Dancing Chef convenient pastes!

15 October 2018

Beef & Chicken Rendang Burgers

[ Collaboration with Dancing Chef and Singapore Home Cooks ]

* Beef & Chicken Rendang Sliders using Padang Rendang Paste *


I'm very fond of making mini burgers because I think they look so cute and I feel less sinful about eating them sine they are mini ;p

I've been making different flavours of sliders such as classic beef & cheese, fish fillet and teriyaki chicken, this time I thought of using #DancingChef #RendangPaste to create my very own Beef & Chicken Sliders, an East-meet-West creation.


For the chicken patty, I use boneless chicken thigh and cut them into pieces around 5-6cm. Marinate the pieces with the Padang Rendang paste for around 2-3hrs. Coat the marinated chicken with tapioca flour, rest for 5 mins then deep-fry on medium heat till crispy and golden brown.

For the beef patty, I use minced beef; marinate the beef with the paste for 2-3hrs, shape into mini patties around 5cm, then pan-fry on medium heat till browned on both sides.

*If your family doesn't take beef, simply use chicken only and omit beef.

I also use the leftover paste to make a thick and creamy sauce, to add to the burger as well as a dipping sauce for the fries. The sauce tastes so aromatic, creamy and yummy! Similar to McD's curry sauce but much more fragrant and rich. I like!


And not forgetting the mini burger buns which I baked using the Yudane method, which yields a soft and fluffy texture, very suitable for making burgers. Dough weight for each bun is 35g, and each burger is around 5 - 5.5cm in diameter.

If you don't have time to bake your own burger buns, Gardenia and Sunshine have mini butter rolls which can be used as well.


Assembling the burgers is always fun, feel free to add any ingredients you fancy or none at all! For me, besides the chicken and beef patties, I added just coral salad leaves, cucumber, rendang sauce, as well as some cherry tomatoes and pickled gherkins as decorations.


Just look at these tantalising sliders, I bet you couldn't stop at one! They make great party food and everyone especially kids love burgers right?

The rendang marinate and sauce goes really well with the chicken and beef, it's a western burger yet with our favourite curry and spices flavouring that we Asians love. The paste is not overwhelming and not too spicy, even my son who doesn't take much spicy food enjoyed the burger.

I'm going to serve these for my next gathering!


Beef & Chicken Rendang Sliders
(Makes 12 sliders)

  • 250g boneless chicken thigh, cut into 6 pieces around 5-6cm
  • 300g minced beef
  • 1 packet Dancing Chef Padang Rendang Paste
  • 1 large shallot, finely chopped
  • 150g coconut milk
  • 1 stalk lemongrass, smashed
  • 3 pieces kaffir lime leaves, remove centre vein and tear into pieces
  • 1 tbsp desiccated coconut
  • Tapioca flour, cooking oil
  • Salad leaves, cucumber, cherry tomatoes, pickled gherkins, mayonnaise
  1. Marinate chicken pieces wth 2 tsp of rendang paste for 2-3hrs.
  2. Marinate minced beef with 1 heap tbsp of rendang paste and finely chopped shallots for 2-3hrs.
  3. Rendang sauce: Add remaining rendang paste (around 50-55g left), coconut milk, lemongrass, kaffir lime leaves into a cooking pot, bring to boil, stirring continuously to prevent burning. Add desiccated coconut and reduce heat, simmer till sauce thickens. Set aside.
  4. Coat the marinated chicken pieces with tapioca flour and set aside for 5 mins. Deep-fry the chicken pieces using medium heat till golden brown and crispy.
  5. Shape the minced beef into patties around 5-6cm diameter each. Pan-fry the beef patties using medium heat till browned on both sides.
  6. Assemble the burgers: Slice burger bun into half, spread a dollop of mayonnaise on the bottom half of the bun, top with a few pieces of salad leaves, follow by a slice of cucumber. Add a tsp of rendang sauce, top with chicken or beef patty, add another tsp of rendang sauce, cover with top half of burger bun. Finally decorate top of burger bun with halved cherry tomatoes or sliced pickled gherkins using toothpick or skewers.
*If not using beef, replace with another 250g boneless chicken thigh.

Mini Burger Buns (bonus recipe!)
(dough weight is about 500g, makes 14 buns about 35g each)

Japanese Yudane
(prepare night before)
  • 50g bread flour
  • 50g boiling water
  1. Place the bread flour in a heat-proof bowl. Add boiling water and quickly mix the flour with the water using a spatula.
  2. Initially the dough will be bits and pieces but keep pressing and bring the dough together, a rough dough will form.
  3. Cover the bowl with clingwrap and once the dough cool to room temperature, transfer the bowl to chill in fridge till next day.

Dough
  • Yeast mixture: 20g lukewarm water, 6g instant dry yeast, 5g caster sugar
  • 200g bread flour
  • 1 recipe Japanese Yudane (above recipe)
  • 1 recipe yeast mixture (above recipe)
  • 50g water 
  • 45g caster sugar
  • 2g fine sea salt 
  • 1 egg yolk
  • 1/2 egg white (reserve remaining half for brushing on burger bun)
  • 40g unsalted butter, cubed and slightly softened
  1. In a small bowl, mix water, yeast and sugar and let the mixture rest for a few minutes to turn frothy.
  2. Add bread flour, Yudane, yeast mixture, water, sugar, salt, egg yolk and egg white into a mixing bowl. Using a dough hook, mix the dough ingredients on low speed (speed 1 KitchenAid) for a minute, then switch to medium low speed (speed 2) and knead the dough till rough dough forms. 
  3. Add the butter, piece by piece into the dough. Once all the butter cubes are added, turn up mixer speed to medium (Speed 4) and knead the dough for about 10-12 mins. The dough is ready when it leaves the bottom of the bowl and "rides up" to the top of the dough hook. Or use the window pane method by stretching a piece of dough, it will be stretchy and almost translucent without breaking.
  4. The dough is quite soft and slightly sticky, oil both hands and take out the dough from the mixing bowl. Lightly knead for a minute, round the dough and place the dough into a well-oiled bowl for first proof. Cover the bowl with clingwrap and let the dough proof for about 30-45 mins or till dough doubles in size. *based on summer weather, hot & humid
  5. After 30-45 mins, take out the dough and knead lightly to press out the gas. Divide the dough into desired portions. Dough weight is about 500g, I divided the dough into 14 pieces of 35g each. Slightly round the dough portions, cover them with clingwrap and rest for 10 mins.
  6. After 10 mins, tighten and round the dough (by cupping the dough in the middle of your palm), and place the dough on a baking tray lined with baking paper. Cover loosely with clingwrap and proof for 45 mins. *Preheat the oven at 200 degree celsius after 30 mins.
  7. Bake the burger buns at 190-200 degree celsius for 10-12 mins. *turn down temperature to 180 or 190 degree celsius, and cover buns with aluminum foil if the buns browned too fast.
  8. Let the buns cool on a wire rack. If keeping till next day, cool completely before storing in an airtight box.

20 November 2017

Premium quality clean products from Sasha's Fine Food

Collaboration with Sasha's Fine Food

Back in August, I had the great privilege to partner with Sasha's Fine Food to create dishes with their premium quality products. Check out the dishes:
Dish 2 - Asian chicken skewers with peanut sauce
Dish 3 & 4 - Teriyaki salmon, Chirashi Sush

Sasha's Fine Food is an online F&B company that sourced ethically produced goods with preference to free-range, organic and/or fair trade food and drinks, and at the same time avoiding foods with unacceptable or unhealthy addictive. There's a wide variety of produce available in the webstore, from meat and fish to dry goods and groceries, dairy to beverages.


And in October, I was once again blessed to collaborate with Sasha, this time with an even larger batch of produce - Stir-fry beef from Hellaby New Zealand, Salmon portions from Mount Cook Alpine New Zealand, Cold Smoked Salmon from Aoraki Smokehouse New Zealand as well as various cuts of local chicken which are hormone and antibiotic free from Southern Malaysia.

I had a blast cooking with all these premium quality products, and below were some of the dishes I cooked.


Beef Bulgogi Rice Bowl - using Hellaby Stir-Fry Beef from New Zealand

This has been on my to-cook list for some-time. Love the combination of the sweet and succulent beef with spicy tangy kimchi and the runny yolk! 


Beef Bulgogi Rice Bowl

470g stir-fry beef
3 tbsp soy sauce
2 tbsp light muscovado sugar
2 tbsp cooking rice wine
2 tbsp pear puree
2 tbsp Coke Zero

1 tbsp honey
1 tbsp sesame oil
2 tsp sesame seed
1 tsp gochujang
1/2 tsp black pepper
5 cloves garlic, finely chopped
2 stalks spring onion, finely chopped
1 stalk coriander with root, finely chopped

Simply marinate the stir-fry beef overnight, quick fry over a very hot grill pan and serve with kimchi, rice and poached egg.


Baked Chicken Thigh and Potato - hormones free, antibiotics free chicken thigh

This is such a quick and easy one-pot dish, great for busy days. Simple yet wholesome and tasty!

Just toss chicken thighs, potatos, carrots, onion, garlic along with olive oil, thyme, salt and black pepper, arrange in a casserole and bake for about 60-70 mins.

Serve with rice, pasta, salad or even on its own.


Chicken Cordon Bleu - hormones free, antibiotics free chicken breast

This is yet another dish that I wanted to try for the longest time. And surprisingly it's not as difficult as I thought. I made small rolls so that it's easy to eat and even the kiddo loved it.


Chicken Cordon Bleu

4 small chicken breast
4 slices ham
4 slices cheese
Salt & pepper
Corn starch, egg, panko breadcrumbs

Use a meat tenderiser to flatten the chicken breast, marinate lightly with salt and pepper on both sides, place a slice of ham follow by cheese, roll up into a log, clingwrap and place in chiller to set. Before cooking, coat with corn starch, egg and finally panko breadcrumbs. Deep-fry the chicken roll on low heat till light brown. Remove from heat, rest for 5 mins, then deep-fry in high heat till golden brown. Drain, slice into pieces and serve with honey mustard sauce.

Honey Mustard Sauce
10g butter
1 tbsp flour
1/2 cup milk
1/2 cup cream
2 sprigs thyme
1 tbsp wholegrain mustard
1 tbsp honey

Melt butter in a pan, add flour and stir to make a roux. Add milk and cream and bring to boil, then add fresh thyme, wholegrain mustard and honey to taste.


Chicken Teriyaki Onigirazu - hormones free, antibiotics free boneless chicken thigh

My kiddo and I love this Japanese-style "rice sandwich" as it's quick and easy to put together and very convenient to eat. Simply marinate the chicken thigh with teriyaki sauce, air-fry till cooked and assemble with seaweed, japanese rice and some vegetables like cucumber and carrots.


Lemon Garlic Herb Butter Bake Salmon - Salmon portions from Mount Cook Alpine New Zealand

This was the first time I tried baking salmon with herb butter and I must say it was really tasty!
 

The herb butter was so fragrant and the salmon was so sweet and tender!


Add minced garlic, chopped herbs like parsley, thyme & dill, lemon juice, salt & pepper to unsalted butter, mix well, spread on top of salmon and veggies, bake and ready to eat!


My son who's a salmon lover couldn't stop raving about how tender and juicy the salmon was.


Tobiko Mayo Salmon - Salmon portions from Mount Cook Alpine New Zealand

This was specially prepared for the kiddo as he loves salmon, Japanese mayonnaise and tobiko! One portion of this and he was totally satisfied, and he already requested me to make it very often for him.

Making it was such a breeze as well. Mix Japanese mayonnaise with tobiko, spread the mixture generously on top of the salmon, and air-fry till golden brown.
 

Air-fried Salmon with Mango & Pomegranate Salsa - Salmon portions from Mount Cook Alpine New Zealand

Was feeling the heat one of the days and didn't have much appetite so made a fruit salsa to go with air-fried salmon (seasoned with sea salt and black pepper).


Who knew that this combination worked so well together? Totally refreshing!


Smoked Salmon Tartine - Cold Smoked Salmon from Aoraki Smokehouse New Zealand

Last but not least, a dish that I have to rave about! This gorgeous smoked salmon from Aoraki Smokehouse tasted so smooth and tender with subtle smokey and salt taste that I felt like eating it everyday!


Served them on toasted sour dough bread with cream cheese & dill as well as avocado yogurt and greens.


Once again, shout-out and big thanks to Sasha's Fine Food for giving me this opportunity to try the lovely produce and hope to work with her again in the future!

02 October 2017

Chicken Rice Burger

Rice burger has been on my to-make list for a long time! Initially I have plans to make Teriyaki Rice Burger this week, but after knowing that Prima Taste is organising a "Prima Taste Authentic Asia Cooking Sauces Contest" (in collaboration with Singapore Home Cooks), I decided to make a different Rice Burger instead.


Yep, a Chicken Rice Burger using Prima Taste "Fragrant Hainanese Chicken Rice Paste".

Actually I twisted my wrist last week and have barely recovered. Luckily the paste is really convenient and easy to use and it's so flavourful on its own that I don't have to prepare additional seasonings. In fact, I already have most of the ingredients at home :)


Preparation is quite easy. I already have boneless skinless chicken thighs at home (courtesy of Sasha's Fine Foods), so I just cut the chicken thighs to the size I want and marinated them using a packet of the Chicken Rice Paste overnight. The next day, coat the chicken generously with potato starch then pan-fry till golden brown.

For the rice, I use Japanese short-grain rice as it's more sticky and easier mould into rice patties. To make the rice burger more healthy, I added some ten-grain rice. After washing the rice, mix a packet of chicken rice paste and water to the rice and cook in the rice cooker. After the rice is done, mould them into rice patties.


I reckoned it might be too dry with the rice and chicken alone, so made some chicken rice chilli as well. What's chicken rice without chilli right? 

Finally assemble the chicken rice burger  with rice patty, lettuce, tomato, cucumber, chicken thigh, some chicken rice chilli, dark or sweet soy sauce and top with another rice patty.

I've put together a short video-clip of the process below as well.

Chicken Rice Burger
(makes 4 burgers)

Ingredients

Chicken
  • 250g boneless skinless chicken thighs, cut into 4 pieces (about 7cmx7cm)
  • 1 packet of Prima Taste Fragrant Hainanese Chicken Rice Paste
  • Potato Starch
Chicken Rice
  • 1 cup Japanese short-grain rice 
  • 25g ten-grain rice
  • 1 packet of Prima Taste Fragrant Hainanese Chicken Rice Paste

 Chicken rice chilli
  • 3 large chilli
  • 5 cloves garlic
  • 2 slices ginger
  • 1 tbsp chicken stock
  • 1 tsp soy sauce
  • 2 tsp rice vinegar
  • 2 tsp sugar, to taste
  • Juice from 1 lime
Additional
  • 4 slices tomato
  • 4 slices cucumber
  • 4 leaves lettuce
  • Kecap manis or dark soy sauce
  • Coriander, spring onion (garnish)
Steps
  1. Marinate the chicken thighs with chicken rice paste and store in fridge overnight. Before cooking, remove the thighs from the fridge to bring to room temperature.
  2. Cook chicken rice: Wash and rinse short-grain rice and ten-grain rice a few times, drain and add the rice into a rice pot. Add a packet of chicken rice paste to the rice and mix well. Add water to about 1 and 1/4 marking on the rice pot, place rice pot into cooker and set to cook. After rice is cooked, let it rest for 15 mins before sitrring the rice.
  3. Make rice patties: Place a piece of clingwrap over a 7cm ring mould, add about 2-3 tbsp of chicken rice into the mould, press hard to compress, wrap up the rice and set aside. Repeat till all the rice are used up.
  4. Cook the chicken: Coat the chicken thighs with potato starch. Add cooking oil to frying pan on medium heat. Pan-fry the chicken till golden brown on both sides.
  5. Make chicken rice chilli: Blend all the ingredients into a watery paste.
  6. Assemble: Remove clingwrap from one rice patty, place lettuce leaves on the rice patty, follow by tomato, cucumber and chicken thigh. Add desired amount of chilli sauce and kecap manis/dark soy sauce (optional) and top with another piece of rice patty. Best eaten warm.


When the chicken rice was in the midst of cooking in the rice cooker, the whole house was filled with an intoxicating aroma! After the rice was cooked, I couldn't resist stealing mouthfuls of it!

Likewise when I was frying the chicken thighs, they looked and smelled so fragrant that I wanted to bite into them immediately! Well, actually I prepared two extra pieces (just in case) so I could taste test first. They tasted soooooo yummy! Crispy on the outside with very flavourful meat texture as the meat was marinated in the paste overnight and absorbed all the wonderful seasonings.


The chicken rice burger was totally yummy! Aromatic rice patties, crispy and juicy chicken, crunchy and refreshing vegetables and tantalising chilli sauce with sweet soy sauce. Very satisfying indeed.

So happy that I managed to make this Chicken Rice Burger, wish me luck for the contest!

07 September 2017

Homemade Beef Burger

Before I started cooking more adventurously, I would dine at restaurants or cafes that offer good quality burgers whenever I crave for beef burgers. Have tried those pre-made/pre-seasoned beef patties sold at supermarkets, sorry but somehow they sucked! Either the seasonings weren't to my liking (too overwhelming on the palate) or the mince was so compact that the whole patty turned out very hard after cooking.

These days I prefer making my own beef patty and I realise it isn't difficult at all. All you need is some good quality mince beef and half the job is done!


Earlier this week, I received a package from The Meat Club Singapore and they have kindly offered some premium lean mince, assorted sausages as well as lamb chops for me to try!

These premium quality produce are directly imported from Australia and they arrive here fresh and chilled and not frozen. Apparently when you freeze meat, the cellular structure of the protein is compromised, causing the meat to "bleed" when cooked and thus resulting in less tender and juicy texture. The meat produce from The Meat Club are specially vacuum packed which helps seal the freshness and quality.

The Meat Club actually has an interesting subscription service where if you opt for an Auto-Pilot service, your selection of meat will be delivered in line with their import cycle (every 28 days) ensuring that you get the freshest batch of produce with a longer shelf life monthly. That said, they do offer one-off, just in time delivery for meat as well. Visit their website to find out more!


The first produce I'm trying is the premium lean mince which comes in a 500g pack.


I usually like to create mini burgers as they are cuter and easier to eat, but this time decided to go for a full-size burger, just like those gourmet ones sold at restaurants and cafes =D

I even made my own burger buns to match the size of the beef patty, so these are truly homemade beef burger!


Basically I seasoned the mince with some grated garlic, onion, shredded cheese, tonkatsu sauce (which is the Japanese version of Worcestershire sauce), ketchup, sea salt, mixed herbs and egg.

After mixing the seasonings into the mince, they are divided into 4 patties, about 160g each. Shape into rounds, flatten with a dent in the middle and chill in the fridge before cooking.


Besides the usual lettuce, tomato and cheese slice, I also added a topping of sauteed onion and portobello mushroom in teriyaki sauce. Initially was even thinking of topping with a sunny side-up with runny yolk, but I figured it's going to be overkill for my family.

Homemade Beef Burger
(makes 4 full-size burgers)

Beef Patty
  • 500g lean mince
  • 1 clove garlic, grated
  • 1/2 pc onion, grated
  • 50g shredded cheese
  • 1 tbsp Tonkatsu sauce or Worcestershire sauce
  • 1 tbsp ketchup
  • 1 tsp sea salt
  • 1 tsp mixed herbs
  • 1 egg
  1. Mix all the seasonings into the lean mince until just combined.
  2. Divide the mince into 4 portions, each about 160g. Roll into balls, flatten into patties and press a dent into the centre of each patty using the thumb. *this prevents the patty from forming a dome and shrinking when cooking.
  3. Cover and chill the patties until ready to use.

Sauteed onion and portobello mushroom in teriyaki sauce
  • 1/2pc onion, cut into thin rings
  • 1pc large portobello mushroom, sliced
  • 2 tbsp mirin
  • 2 tbsp cooking sake
  • 2 tbsp soy sauce
  • 1 tbsp sugar
  • 1/4 tsp corn starch
  • 1 tbsp water
  1. In a frying pan, heat 1 tbsp of olive oil, add onion and sauté till slightly softened.
  2. Add sliced mushroom and sauté till softened.
  3. Combine the teriyaki sauce ingredients except corn starch and water, and add the sauce to the onion and mushroom.
  4. Stir-fry sauce with onion and mushroom till fully cooked.
  5. Mix corn starch and water and add the mixture into the frying pan.
  6. Stir till sauce thickens slightly. Dish and set aside.
Homemade Burger Bun

The burger buns are made using water roux method. Please refer to recipe at this link.

Dough total weight about 320g, divide dough into 4 portions, each about 80g.

Assemble
  • 4 beef patties
  • 4 burger buns
  • 4 leaves lettuce
  • 4 slices tomato
  • 4 slices cheese
  • Sauteed onion and mushroom
  • Mayonnaise (optional)
  1. In a frying pan, heat 2 tbsp of olive oil, add the beef patties and cook for 4-5 mins on one side.
  2. Flip to the other side and cook for another 1 min. 
  3. Add 1 slice of cheese to each beef patty, cover and cook for another 30secs.
  4. Remove beef patties from pan onto a plate and let them rest.
  5. Slice the burger buns into halves, butter on both sides and toast till slightly browned.
  6. Squeeze 1-2 tsp of mayo on the bottom half of the bun, add a piece of lettuce, follow by tomato, beef patty and lastly onion and mushroom. Close with top half of the bun. Use a bamboo skewer to hold the burger in place if necessary. Repeat for the remaining burgers.
  7. Best serve warm.


So do my burgers look tantalising and can they passed off as those gourmet ones sold at restaurants and cafes?


They sure are very satisfying and yummy! Well, I enjoyed my burger very much, but it's kind of too big for me, felt really bloated after eating the full burger. Will probably make smaller size burgers next time :p

Stay tuned as I try the other products from The Meat Club!

05 September 2017

Breaded Chicken Taco with Pineapple Salsa

Another hot and humid day! Makes me crave for something light yet hearty, something tangy and sweet, oh, throw in something crispy as well :p

I love taco and burrito very much and would make it quite often for my own meal as I'm not sure if the HB and kiddo like it or not. Yesterday when I asked the HB what he would like for dinner, he said something light, so I threw him a few options such as porridge or soup but he didn't want those. Since I was craving for some taco wraps, I asked him if he would like to try it and he agreed! Yay, saves me the trouble of preparing something separately!


As Woh Hup is currently running a contest on Singapore Home Cooks FB group, I thought of killing two birds with one stone, that is, make my taco wrap and use one of the specified sauces at the same time! Heehee :p

Basically I have decided on a breaded chicken taco already, so initially I wanted to make a creamy sesame mayo sauce (using Woh Hup Sesame Sauce) to go with it. But couldn't find the sauce at the supermarkets near my place. In the end after reading through the ingredients of various sauces available, I decided to use the Pineapple Sweet & Sour Sauce to make a Pineapple Salsa! Because the sauce itself already contains tiny bits of pineapple, onion and tomato =D


Making the breaded chicken is relatively easy, simply cut deboned chicken thigh (or use chicken fillet if preferred) into strips, marinate with some salt and pepper, coat with corn starch, egg and panko breadcrumbs and finally deep-fry!

As for the Pineapple Salsa, it's even simpler. Since the Woh Hup Pineapple Sweet & Sour Sauce is already very flavourful, sweet and tangy, I simply finely chopped some pineapple, tomato, yellow bell peppers, onion, parsley and mix them together with the sauce. To enhance the tangy flavour, I added some more lime juice.

To assemble, take a piece of taco wrap, place some lettuce, shredded cucumber and carrot or any preferred vegetables, follow by a piece of breaded chicken. Finally top with 1-2 tbsp of pineapple salsa, wrap/fold and enjoy!

One point to note here, I actually trimmed the tortilla wraps slightly smaller for photography presentation purpose. Couldn't find smaller size tortilla wraps in the supermarkets; had wanted to make my own but didn't have time!


Breaded Chicken Taco with Pineapple Salsa
(makes 6 rolls)

Ingredients

(A) Breaded chicken

  • 2pcs deboned chicken thigh, cut into 6 strips
  • 1/4 tsp salt
  • Dash of pepper
  • Corn starch, egg, panko breadcrumbs
  • Cooking oil 
(B) Pineapple salsa

  • 2 tbsp Woh Hup Pineapple Sweet & Sour Sauce
  • 3-4 rings canned pineapple, finely chopped
  • 1 large tomato, finely chopped 
  • 1 small yellow bellpeppers, finely chopped
  • 1/4pcs purple onion, finely chopped
  • 2 stalks parsley, finely chopped
  • Juice of 1/4 - 1/2 pc lime
(C) Assemble
  • 6pcs tortilla wrap
  • 6pcs lettuce
  • 1/2pcs cucumber, shredded
  • 1/2pcs, carrot, shredded

Steps
  1. Marinate the 6 strips of chicken thigh with salt and pepper.
  2. Coat the chicken strips with corn starch, follow by egg and finally panko breadcrumbs.
  3. In a pot/pan, heat cooking oil using medium fire. Deep-fry the chicken strips till slightly brown, drain from oil and set aside for 10 mins. 
  4. Heat the cooking oil again on high heat this time, deep-fry the chicken strips a second time till golden brown. Drain from oil and set aside.
  5. In a small mixing bowl, add sweet & sour sauce, pineapple, tomato, bell peppers, onion, parsley, lime juice and stir till well-mixed. If desired, chill the pineapple salsa in fridge before use.
  6. In a shallow frying pan, heat the tortilla wraps till slightly crispy. Remove from heat and set aside.
  7. Take a piece of tortilla wrap, place 1pc of lettuce, some shredded cucumber and carrot, follow by 1pcs of breaded chicken, top with 1-2 tbsp of pineapple salsa, fold or wrap and serve. Repeat for the remaining wraps.


Oooooh, I love the different textures, the soft and slightly crispy tortilla wrap, the crunchy vegetables, the crispy and juicy breaded chicken and best of all, the fruity, sweet and tangy Pineapple Salsa which enhances the flavour of the entire chicken taco! Yum yum yum!


The Pineapple Salsa is more than enough to make 6 wraps, so I made some more popcorn chicken to go with it! The popcorn chicken is cooked using the same method, except that the chicken pieces are cut into bite-size pieces.


This Pineapple Salsa is in fact very versatile and can be used as sauce for chicken, fish, prawn, corn chips, veggies sticks and more!


This recipe is definitely a keeper for me :)

Meanwhile, will be submitting this dish as my entry for the Woh Hup Contest! Wish me luck!

#WohHupKitchen #SingaporeHomeCooks