
* "Hainanese Chicken Rice" Pau using Hainanese Chicken Rice Paste *
Presenting my new creation using Dancing Chef Hainanese Chicken Rice Paste!
My family loves chicken rice, so I thought of a "on-the-go" finger food with chicken rice flavour that's different from the conventional.
The concept is like a kong bak bao or gua bao but chicken rice flavour :) In fact, this is versatile and can be made into the traditional enclosed bao too.

Chicken rice paste is added to the Pau dough; in addition I added pandan juice for the green colour Pau as I like the aroma of pandan chicken rice.

The Pau has a subtle taste of chicken rice (smells really aromatic during steaming!) and is good to eat on its own but even better with poached chicken, ginger sauce, chilli sauce as well as cucumber, chilli shreds and coriander. *Both the ginger sauce and chilli sauce have Dancing Chef chicken rice paste added too!
It's literally like eating chicken rice, without the rice!
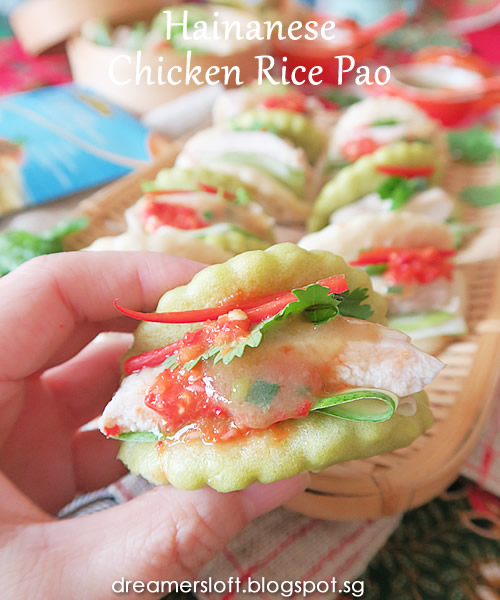
Isn't this cute, I love small size finger food like this, which can be eaten in one or two bites :p
Preparing this Pau is not difficult, just a tad tedious, but trust me it will be popular, especially for those who love chicken rice and/or pau or both LOL :p

For the original chicken rice flavour Pau, the dough is made using Pau flour, baking powder, sugar, yeast/sugar/water mixture, chicken rice paste and water.
Mix all the ingredients together using spatula till a rough dough forms and then knead for 10 mins. Initially the dough might be a little wet and sticky, sprinkle just a little bit of flour will help but not too much, just keep kneading and the dough will turn smooth and non-sticky. Cover and proof for 30 mins.

For the pandan chicken rice flavour Pau, the dough is made using Pau flour, baking powder, sugar, yeast/sugar/water mixture, chicken rice paste and pandan juice.
Likewise, mix all the ingredients together using spatula till a rough dough forms and then knead for 10 mins. Initially the dough might be a little wet and sticky, sprinkle just a little bit of flour will help but not too much, just keep kneading and the dough will turn smooth and non-sticky. Cover and proof for 30 mins.

Once dough is proofed, roll it out to about 5-6mm, use a 7cm mould to stamp the dough skins. Gather the scraps and repeat. If the dough shrinks, let it rest for 5-10 mins before stamping again. I manage to get 7 pcs.
Next use a rolling pin to roll each dough skin into oval shape thickness about 3-4mm. Brush the dough skin with some olive oil, fold it into half, place onto a piece of pau or baking paper (cut into 6cm square), and finally proof for 30 mins. Once proofing is done, steam on high heat for 20 mins and the pau skin is ready!

Repeat the same steps for the pandan chicken rice dough.
My freshly steamed chicken rice flavour paus, they look quite good, don't they? The pau is quite soft and fluffy with nice aroma and subtle chicken rice taste, I couldn't resist eating it plain ;)

Hainanese Chicken Rice Pau
(Makes 14 small size portions, 7pcs of original flavour and 7pcs of pandan flavour)
(A) Pau dough
Original chicken rice flavour (7 pcs)
- 100g Pau flour or Hong Kong flour
- 1/2 tsp double acting baking powder
- 20g caster sugar
- 30g Dancing Chef Hainanese Chicken Rice Paste (include some oil in the packet)
- 35-38g water
- 1/4 heap tsp instant yeast
- 1/4 heap tsp caster sugar
- 1.5 tsp water
Pandan chicken rice flavour (7 pcs)
- 100g Pau flour or Hong Kong flour
- 1/2 tsp double acting baking powder
- 20g caster sugar
- 30g Dancing Chef Hainanese Chicken Rice Paste (include some oil in the packet)
- 35-38g Pandan juice (blend 10 pandan leaves with 80-100g water, strain to get juice)
- 1/4 heap tsp instant yeast
- 1/4 heap tsp caster sugar
- 1.5 tsp water
- Steps are the same for both flavours.
- Mix yeast, sugar and water in a small bowl, set aside till the mixture turns frothy.
- Add flour, baking powder and caster sugar in a large mixing bowl, stir till well blended.
- Add chicken rice paste, water (or pandan juice) and yeast mixture into the mixing bowl. Mix the ingredients together till a rough dough forms.
- Transfer the rough dough onto a kneading mat. Knead the dough for 10 mins. The dough may be a little wet and sticky initially, dust just a little bit of flour but not too much. Keep kneading and the dough will turn smooth and non-sticky.
- Cover and proof the dough (first proof) for 30 mins.
- Once dough is proofed, roll it out using rolling pin to about 5-6mm thickness.
- Use a 7cm scalloped round mould to stamp out the dough skins. Gather scraps and repeat. If the dough shrinks, rest for 5-10 mins before continuing. Total yield is 7 pieces for each flavour.
- Using the rolling pin to roll the dough skin into oval shape about 3-4mm thickness. Brush the surface with some olive oil, fold into half, place onto a piece of pau paper (6cm square). Repeat for all, cover and proof for another 30 mins (second proof).
- Once the dough skins are proofed, steam on high heat for 20 mins and the Pau are ready to serve. Best eaten warm.
(B) Poached chicken
- 2-3 pieces boneless chicken thighs
- 2 stalks spring onion, 3 slices ginger, 2 cloves garlic
- Bring a pot of water to boil, add chicken thigh, spring onion, ginger and garlic.
- Let the ingredients simmer for 10 mins.
- Remove the chicken thighs and place in iced water for 10 mins.
- Drain and brush the thighs with sesame oil, set aside till ready to use.
(C) Chilli sauce
- 2 pcs big red chilli
- 2 pcs chilli padi
- 20g Dancing Chef Hainanese Chicken Rice Paste
- 2 cloves garlic
- 2 tbsp chicken stock
- 1 tbsp ketchup
- 1 tsp sugar
- Juice from 1 lime
- Blend all the ingredients in a food processor till fine and well-blended. Adjust seasonings to taste.
(D) Ginger & Spring Onion Sauce
- 20g Dancing Chef Hainanese Chicken Rice Paste
- 2 stalks spring onion, finely chopped
- 80-100ml chicken stock
- 1 tsp sugar
- corn starch water
- Add chicken rice paste and spring onion to a small pot, stir fry on low heat for 30s.
- Add water and sugar, stir till well-mixed.
- Thicken with corn starch water if the sauce is too watery.
(E) Assemble
- 14 pcs original and pandan flavour chicken rice pau (from A)
- 14 pcs chicken thigh (from B, cut the chicken thigh into sizes that fit the pau)
- Cucumber, coriander, chilli shreds
- Chilli sauce, Ginger & spring onion sauce (from C & D)
- To serve, take a piece of pau, open up, place cucumber, chicken thigh, coriander and chilli into the pau, and finally drizzle some chilli sauce and ginger spring onion sauce.
- Best eaten warm.
NOTES:
- This pau is best eaten warm, it will turn a little hard when cold (just like mantou). To reheat, steam for 5 mins.
- As no preservatives, bread improvers or softener is added, the pau is best eaten on the same day, or keep in fridge for 1-2 days. Reheat before eating.
- I made the pau to be small size, eaten in 1-2 bites. For regular or bigger size pau, increase quantity of ingredients and use bigger mould to stamp the dough.
- This dough can be made into conventional enclosed pau too, or simply eaten as mantou.

This Pau is visually appealing and taste yummy, suitable for parties and gatherings, especially for the upcoming National Day!
So this is also my tribute to Singapore's 54th Birthday :)

Hope that all of you like my creation :)
Dancing Chef™️: One Paste, Many DishesBe (surprisingly) different
#DancingChefSG


