

Since I'm

Using the exact recipes, managed to yield 13 mini egg tarts, with a little bit of egg filling left. Probably coz my tart pastry was a little thicker, could probably make 14 or even 15 tarts.
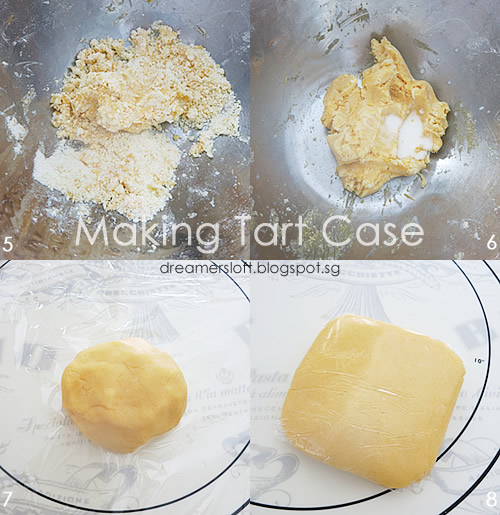
Borrowed the below pictures of making tart pastry from my Hokkaido Bake Cheese Tart page coz I was rushing and didn't have time to take photos.

(A) Tart Pastry
1. Sift flour and icing sugar into a large bowl. Add cold salted butter cubes.
- 100g plain/cake flour
- 20g icing sugar
- 50g salted butter, cut into cubes, cold
- 1 egg yolk
- 1/2 tsp fresh milk
2. Using finger tips, break the butter and rub the butter into the flour mixture, until it resembles bread crumbs.
3. Add an egg yolk to the mixture.
4. Use a scrapper to mix the egg yolk.
5. The mixture will come together and thereafter, use the hands to form the mixture into a dough.
6. Add fresh milk, the dough will become very soft and pliable.
7. Knead the dough gently into a ball. Place on a piece of clingwrap.
8. Wrap the dough and place in fridge to rest for about 1 hour.
(B) Egg tart filling
While the dough is resting in the fridge, prepare the egg tart filling. Mix all the ingredients together till the sugar is melted. Sieve the mixture.
- 100g Fresh Milk
- 50g Caster Sugar
- 2 Eggs
- 1 drop Vanilla Extract

Now for the making of the egg tarts. Roll the dough to desired thickness, mine was about 3mm. Stamp a piece of dough using a fluted cutter (7cm). Repeat till all the dough is used up.

Use a small fork to prick some holes at the base (not too hard else filling will leak) of the dough. Fill with the egg tart filling almost to the brim.


From the pictures, can see that during baking, the egg tart filling will have a nice dome shape, unfortunately, the filling will sink a bit after it cools down. To prevent the tart filling from sinking too much (due to difference in temperature), I left the tarts to cool down slightly in the oven before removing them. If anyone knows how to retain the nice dome shape of the tart filling, please let me know!
Place the tray of egg tarts at the bottom most rack of the oven. Bake at 200C (top and bottom heat) for 15 mins. After 15 mins, bake at 180C for 10
mins. At this point, can see that the egg tarts will have a dome shape. After 10 mins, slightly open the oven door, slip a cloth or oven
mitt by the door and let egg tart bake in residual heat for another 10
mins. This is to prevent the filling from sinking too much. After 10 mins, remove the tray from the oven and let egg tarts cool slightly before removing the tarts from the casing.

I adore these cute little pop-in-the-mouth egg tarts! Although it's small enough to pop in the mouth, I still take it in two bites, more ladylike :p. To satisfy my craving, I ate three at one go. My kiddo loves it as well and ate two at one go after dinner!
These are best served warm. The tart pastry is the "short" and slightly crisp type and not the cookie crunchy type, I like it this way. The filling is fragrant and not too sweet. The tarts will turn slightly soft the next day, I just pop them into the oven for a few minutes and they are good to eat again.

Mini Egg Tarts
(yield 13-15 mini egg tarts)
(A) Tart Pastry
- 100g plain/cake flour
- 20g icing sugar
- 50g salted butter, cut into cubes, cold
- 1 egg yolk
- 1/2 tsp fresh milk
(B) Egg tart filling
- Sift flour and icing sugar into a large bowl. Add cold salted butter cubes.
- Using finger tips, break the butter and rub the butter into the flour mixture, until it resembles bread crumbs.
- Add an egg yolk to the mixture.
- Use a scrapper to mix the egg yolk.
- The mixture will come together and thereafter, use the hands to form the mixture into a dough.
- Add fresh milk, the dough will become very soft and pliable.
- Knead the dough gently into a ball. Place on a piece of clingwrap.
- Wrap the dough and place in fridge to rest for about 1 hour.
- 100g Fresh Milk
- 50g Caster Sugar
- 2 Eggs
- 1 drop Vanilla Extract
(C) Assembly
- While the dough is resting in the fridge, prepare the egg tart filling.
- Mix all the ingredients together till the sugar is melted. Sieve the mixture.
- Preheat oven to 220C, top and bottom heat.
- Remove dough from the fridge, roll to desired thickness, about 2-3mm.
- Stamp the dough using a fluted cutter (7cm). Repeat till all dough is used up.
- Place a piece of cut dough onto a tart case (5cm). Push it downwards and using finger tips to mould the dough into the tart case.
- Use a small fork to prick some holes at the base of the dough. Fill the tart with the egg tart filling almost to the brim.
- Place the tray of egg tarts at the bottom most rack of the oven.
- Bake at 200C for 15 mins.
- After 15 mins, bake at 180C for 10 mins.
- After 10 mins, slightly open the oven door, slip a cloth or oven mitt by the door and let egg tart bake in residual heat for another 10 mins.
- After 10 mins, remove the tray from the oven and let egg tarts cool slightly before removing the tarts from the casing.
- Best served warm.
Hi Meg, I just stopped by our local Taiwanese bakery here in LA and was pleasantly surprised to see their new offering is the "Hokkaido Cheese Tart," with buy 3-get-1 free. I bought some and they're lovely! Wondering if they taste just as nice as those you've tried at Jiyugaoka. I'm happy they reached our shores! Happy holidays to you and your family!
ReplyDeleteHi Anne,
ReplyDeleteThe Hokkaido Cheese Tart is certainly very popular now, whether in Japan, Hong Kong or Taiwan. Good to hear that your local bakery is now selling it, I'm sure good and tasty food gets around the world :)
Happy Holidays to you and your family too!
Hi! Can I know how long and what temperature to bake if I'm using the ready made tart skin?
ReplyDeleteHi,
ReplyDeleteDo you mean those already baked tart shells? I'm not very sure because my tart pastry is raw and baked together with the custard. Probably you can try 10-15 mins, watch the tarts carefully and increase or decrease timing as necessary, to prevent over-baking of the tart shells and under-baking the custard.