19 April 2015

Hua Hin July 2014 Part I - Journey, Chatchai market, Hua Hin night market, Asia Herb Association

Pardon for this super late account of my trip to Hua Hin last year. I took so many photos that it took me a long time to resize and edit them!

Anyways, Hua Hin isn't on my travel radar for the longest time because it's not directly accessible by flight. Travellers would have to fly in to Bangkok and then take a coach or rent a car for a 2-3hr journey. I thought it's too troublesome and brushed off the idea a few times when hubby talked about going to Hua Hin, until I read a Taiwanese travel blog about Hua Hin that it ignited my interest. And so, we took a 3D2N recce trip last July and I've been thinking about going back again!

I will be breaking down the posts into different parts covering different topics/areas of interest.

Part I - a bit about the journey from Bangkok to Hua Hin, Chatchai market (day time), Hua Hin Night Market, Asia Herb Association (for spa experience)
Part II - accommodation in Hua Hin at Amari Hotel
Part III - Santorini Park at Cha-Am (located 30 mins before reaching Hua Hin)
Part IV - Dining in Hua Hin, namely Chao Lay seafood, Koti restaurant, Sangthai seafood and Meekaruna seafood
Part V - Cicada Weekend Art Market (CICADA - Community of Identity Culture Arts & Dynamic Activities)
Part VI - Plearn Wan Vintage Village, Baan Sillapin Artists Village

Journey from Bangkok to Hua Hin


We chose an early flight to Bangkok so that it gave us ample time for a leisurely drive. After touched down at Suvarnabhumi Airport, we proceeded to pick-up our rental car from Budget service counter located at the arrival hall. Hubby brought his GPS along, which is essential for navigation since we weren't familiar with the roads. The drive along the outskirts of Bangkok was straightforward with mostly highway until we reached a toll area where there were many diversions and intersections. Thank goodness we had the GPS with us.

After the intersections, we got onto Highway 4 which is a long and seemingly endless drive towards Hua Hin. Along the way we saw many eateries and rest points and decided to have a pitstop to fill our tummies.

We love this type of thai street-food, serving cook-to-order noodles and rice.

I ordered a bowl of rice noodle soup and hubby ordered kway teow. Both rice noodle and kway teow were yummy, very smooth and springy texture, and the soup broth was delicious!

Hubby wanted a side dish of stir-fried roast pork with kailan but due to miscommunication, it was served together with rice. Nevertheless, it was so good!

After filling our tummies, we travelled a further 10 mins and saw this pitstop that looked like a mini-mall. Decided to stop and look for restroom.

Pleasantly surprised that the toilet is so nicely decorated with a nautical theme, very clean too!

After Highway 4, we hit the Samut Sakhon area, where we saw many roadside stores selling these white bags of stuff, and fields and fields of "pond". Then we realised that those are salt farms and the bags of white stuff were salt! Interesting!


After Samut Sakhon, we would reach Cha-Am town first (where several outlet malls and Santorini Park are located; will talk about Santorini Park in another post), before reaching Hua Hin. The journey took almost 3hrs, depending on traffic condition and number of stops taken.

Chatchai Market, Hua Hin


Chatchai Market is located in the centre of Hua Hin town, and near to the night market location. By day, it's a wet market selling all types of fresh goods, groceries and sundry goods.


We took a quick stroll around just to "look see look see". Didn't go up to level 2, not sure if it's food stalls or more shops.


Came across this ice-cream cart selling coconut ice-cream! The lady was so nice, she let me try a spoonful and naturally I couldn't resist :p

Ended up buying a cone. The base of the cone was filled with glutinous rice, followed by a generous scoop of coconut ice-cream and some peanut toppings. Aroy mak mak!


Hua Hin Night Market (http://www.huahin.bangkok.com/hua-hin/night-market.htm)

The Hua Hin Night Market is opened every night and offers an array of merchandise from souvenirs to clothing & fashion accessories to small electronic gadgets etc, as well as food stalls selling seafood, snacks and desserts. As the streets were narrow, it could quite quite crowded and difficult to walk around unlike Cicada Night Market which I will talk about in another post.


As the weather was hot, this dessert stall was popular and very crowded. Customers could select your own dessert and toppings. Yums!


These souvenirs were affordable and attractive, thus very popular among the tourists.


Located next to the night market is another night market called Chatsila. Actually not much difference, mostly clothing and fashion accessories. Surprisingly quiet, unlike the hustle and bustle of the Hua Hin Night Market which is just on the adjacent street.


Asia Herb Association Spa (http://www.asiaherbassociation.com/en/index.html)
 

There's no shortage of spas in Thailand, likewise in Hua Hin. We decided to drop by Asia Herb Association which is located in the centre of Hua Hin town (opposite Koti restaurant, near to the night market). This is a spa chain very popular among the Japanese expats and tourists, and we've also been to the branch in Bangkok before.

Reservation is recommended. We walked in and appointments were fully booked till about an hour later. So we decided to head for lunch at Koti restaurant first and strolled at Chatchai market before the treatment.


Spa treatment rooms were cozily furnished. Hubby had a traditional thai massage whereas I opted for their signature aromatherapy massage with herbal compress. Overall the service and skills of the therapists were efficient and quite good. Due to time constraint of our short trip, we managed to try only one spa salon, hopefully we could be back for more next time!


End of Part I.

Stay tune for Part II on our accommodation, Amari Hua Hin.

16 April 2015

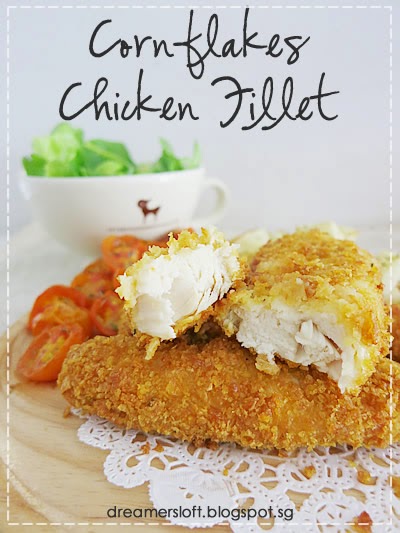
Cornflakes Chicken Fillet

Recently Kellogg's came up with a very clever marketing promotion of its cornflakes product, by selling it in a vintage design tin box that comes in 4 different designs! Naturally I couldn't resist even though my household is not a big eater of cornflakes or rather, we seldom eat cornflakes. I guess this is a very successful campaign for Kellogg's because it made people like me who don't eat cornflakes regularly, buy the product and think of ways to eat it.


These are the 4 designs of the vintage tins. Cool right? Each set comes with 2 packs of cornflakes, 1 of which is packed inside the tin. I've gotten myself 1 set for a start and already contemplating on another :p


Well, to use up the cornflakes, I have to think of different ways of eating it since it's not exactly my favourite and I will get sick of it quickly. Besides eating it with milk, I serve it with yogurt, make cornflake cookies and honey cornflakes cups as well. In addition, I started to incorporate cornflakes into my cooking, like this Cornflakes Chicken Fillet. Basically I just crushed the cornflakes, added some melted butter, used it as a coating for the chicken fillet and air-fried the fillet.

Other than chicken fillet, the coating can be used for chicken thigh, pork chop, fish fillet, prawns etc, essentially this cornflake coating is a perfect substitute for breadcrumbs.


The cornflakes coating makes the chicken fillet (or any food) crispy and has a tinge of fragrance that I enjoy. The fillets were a tad dry but I didn't bother making a separate sauce or dip, just ate them with a bit of tonkatsu sauce or thai chilli sauce. The other day I used boneless chicken leg and served it to my picky son and he actually loved it! Chicken leg or thigh meat would be more juicy and tender than chicken fillet of course. I think next up I'll be trying on fish fillet and prawns :)


To prepare the cornflakes coating, place the cornflakes in a ziplock bag and crush them using a rolling pin or cup or bottle. Then drizzle with some melted butter and it's ready to use. I used unsalted butter as I ran out of salted ones, I think it'll be more fragrant if salted butter is used.

For the chicken fillets, I just marinated them with some sea salt and black pepper. First coat the chicken with some cornstarch, followed by lightly beaten egg and finally roll the fillet around the crushed cornflakes. The fillets were then air-fried for 10-12 mins at 180 degree celsius. After coating the fillets, they could be stored in ziplock bags and freeze for future use.

The chicken fillets looked so crispy after air-frying. For side dish, I air-fried some cherry tomato and potato that have tossed with olive oil, sea salt and mixed herbs.


Cornflakes Chicken Fillet

Ingredients
  • 300g Chicken fillet, cut into 6-7 strips (can be replaced by boneless chicken thigh, fish or prawn)
  • 50g Cornflakes
  • 25g Butter, melted
  • Sea salt, black pepper
  • Corn starch, egg (lightly beaten)
Steps
  • Marinate the chicken fillet with sea salt and black pepper. Set aside.
  • Place cornflakes in a ziplock bag, crushed using rolling pin or bottle.
  • Add melted butter into crushed cornflakes and mix well.
  • Coat fillet with corn starch, follow by egg and finally the cornflakes.
  • Air-fry for 10-12 mins at 180 degree celsius, turning over once. (alternatively, pan-fry or bake).
Side dish
  • Potato - cut into cubes, toss in olive oil, sea salt and mixed herbs. Air-fry for 10-12 mins at 180 degree celsius.
  • Cherry tomato - cut into halves, toss in olive oil, sea salt and mixed herbs. Air-fry for 10-12 mins at 180 degree delsius.


So there you go, serve with some greens and we have a simple yet yummlicious lunch for one. Bon appetit!

This post is linked to the event, Little Thumbs Up organised by Bake for Happy Kids and My Little Favourite DIY, and hosted by Diana from the Domestic Goddess Wannabe.


13 April 2015

Gula Melaka Banana Walnut Cake

Once in a while, I will craze for a slice of wholesome banana cake, but I'm very particular about my banana cake. It has got to be fragrant, rich, moist yet tender without addition of artificial flavours. Have tasted some store-bought ones and they were, ahem, let's just say not to my expectations. The best is naturally home-made and my go-to recipe is Annielicious Food Moist Banana Cake, which uses the "chiffon" or "meringue" method to achieve the super tender and moist texture of cake. Recently I came across Cuisine Paradise rendition of Gula Melaka Banana Cake with Walnuts and the thought of using Gula Melaka instead of caster/brown sugar is so tempting! So I decided to adapt both recipes, by using the "chiffon" method and adding gula melaka as well as walnut to my usual banana cake.


The batch of Gula Melaka I bought from Melaka is quite moist and I spent some time trying to shave the required amounts for the bake. The effort was certainly worthy because the fragrance of the cake was so alluring during baking! I was salivating all the way and it was tough waiting for the bake to be completed (it took almost 70 mins) and for the cake to be cooled completely (another 2hrs wait).

The cake turned out to be darker than usual due to the use of Gula Melaka, but the taste wasn't obvious, except for the small amount that I topped on the surface of the cake. Next time I would add more Gula Melaka toppings for a more pronounced taste.


It's best to serve the cake the next day after baking so as to let the flavours develop and infuse fully. As usual I couldn't resist and ate a small piece immediately after the cake was cooled. The cake turned out really yummy and I had to resist another. The addition of walnut was a nice touch and provided an additional texture to the cake. I took another slice the next morning, tasted even better! Hubby brought the rest to his office. Apparently it was very well-received with his colleagues and many went for seconds or more. Hubby also commented that he liked the addition of walnuts.


Gula Melaka Banana Walnut Cake
(Makes one 8"x8" square cake)

Ingredients

(A) Dry ingredients
  • 250g Plain Flour
  • 1 tsp Baking Powder (I use double acting)
  • 1 tsp Baking Soda
  • 1/2 tsp Sea Salt
(B) Wet Ingredients
  • 250g Bananas (about 6 pieces)
  • 180g Unsalted Butter, slightly softened
  • 120g Gula Melaka/Palm Sugar, shaved
  • 4 Egg Yolks (I use 60g egg with shell)
  • 4 Tbsp Fresh Milk
  • 1 Tbsp Rum (can be replaced by Vanilla Extract)
(C) Egg White Meringue
  • 4 Egg Whites
  • 40g Caster/Brown Sugar
(D) Additional Ingredients and Toppings
  • 60g Walnuts, coarsely chopped
  • 6 pieces Walnuts, break into 12 halves
  • 1-2 Bananas, slice into 13 discs
  • Shaved Gula Melaka, to preference
Steps
  1. Preheat oven to 175 degree celsius. Grease and line a 8"x8" square baking pan.
  2. Sift the dry ingredients together. Set aside.
  3. Mash the bananas. Set aside.
  4. In a mixing bowl, beat the unsalted butter and Gula Melaka (using paddle attachment on medium high speed) till light and fluffy. This will take a few minutes.
  5. Turn mixer to medium low speed, add the egg yolks, one at a time, make sure each is incorporated before adding another. Stop to scrap mixing bowl as necessary.
  6. Add the fresh milk, rum and mashed banana, mix well.
  7. Turn mixer to low speed, add flour mixture in 2 additions, each time mixing till just blended.
  8. Fold in the chopped walnuts and mix well. Set the batter aside.
  9. In a separate mixing bowl, whip the egg whites on high speed using whisk attachment. Add the sugar gradually and beat till stiff peak.
  10. Add 1/3 of the egg white meringue to the batter and fold gently till almost incorporated. Add another 1/3 of the meringue and fold again.
  11. Pour the batter into the mixing bowl containing the remaining 1/3 of egg meringue and fold gently. This is to ensure the bottom-most batter gets to be folded thoroughly.
  12. Pour the final batter into the prepared baking pan and smoothen surface using spatula.
  13. Top with banana slices, walnuts and shaved Gula Melaka.
  14. Bake at 175 degree celsius for 60-70 mins, until skewer comes out clean.
  15. Let the cake cool down completely before removing and slicing.
  16. Best served the next day.

This recipe is certainly a keeper and I think I gonna bake this more often now. Already having a craving as I'm writing this post :p


02 April 2015

Meg's Pastry Studio - 2015 1st Q orders

Wow, time really flew by. 3 months of 2015 gone by just like that! The past 3 months have been fun as usual; once again very grateful to my friends and customers especially those who have enjoyed my baked goodies previously and ordered from me again =D

Here's a summary of some of my baked goodies :)

First of all, dear son's 5th birthday celebration at his childcare centre. After discussing with his teachers, instead of just the usual birthday song/cake-cutting, we decided to let all the children be involved and have fun decorating their own cupcakes!


There were close to 40+ children in the childcare centre, so I made 50 vanilla-chocolate marble cupcakes and prepared 50 mini bags of buttercream frosting, as well as M&M chocolates and assorted marshmallow. The celebration was a blast! We started off with a simple birthday song/cake-cutting. Then dear son took over and demonstrated to his friends how to frost and decorate the cupcakes. It was hilarious to watch as he looked really serious during the demo, just like a little teacher. Anyways, all the kids had fun and they were so proud of their own work, which they got to eat too :) Very grateful to the teachers who were so supportive!

The cupcake DIY decor kit is available for orders and can be customised accordingly. Do drop me an email if interested :)


And so, since the children already had their own cupcakes, I just baked a simple Red Velvet Cake with Cream Cheese Frosting for the cake-cutting. This version of Red Velvet is moist, dense yet tender with a subtle taste of chocolate, and perfectly complemented by a rich cream cheese frosting.


This lovely rainbow cake was ordered by a mum for her daughter's sweet 16 birthday. Instead of the usual fruit decoration on top of the cake, I piped some pink and purple rosettes using buttercream to make the cake look more dainty and girly.


This Captain America theme cake was ordered by my Secondary School friend for her son's birthday. When she approached me for a themed cake, I was hesitant because I usually don't do themes or fondant. At most, I would go along with a colour scheme that's close to the theme and get cake toppers. So in the end, after taking reference from Instagram, decided to pipe the cake with Captain America's signature shield and do a miniature shield using fondant. As I used cream cheese, I couldn't achieve the supposedly white colour of the shield so it became an off-white/beige colour. Nevertheless very glad that my friend and her family liked the cake.


This pretty Frozen themed cake was ordered by a mummy whom I met at a playgroup few years back when I brought dear son for lessons there. She managed to source the cake toppers so I designed a base cake with the Frozen theme. The sponge layers were rainbow colours and the chantilly cream tinted light blue. The piping was done using buttercream so it was beige/off-white instead of pure white. Unless I use non-dairy whipping cream, pure white couldn't be achieved. But I don't do non-dairy so have to make do with the off-white colour. (Couldn't use chantilly cream which is close to white because it melts more easily and the piping designs wouldn't be able to stay visible). I also added some fondant snowflakes and dragees to make it closer to the theme. Had to borrow the snowflake fondant cutter from a friend as the bakeware shops I went to were out of stock for the cutter. Thank you to E for the loan!

Anyways, I think the cake turned out well and the birthday girl liked it :)


A sweet little cake ordered by my Uni/Hall friend for her daughter's birthday. Her daughter likes the Butterfly character from BabyTV and she asked me if I could incorporate the character onto the cake. Initially I proposed using cut-outs and stick the cut-outs onto the cake (using satay sticks). After some discussion, she asked me if I could just make a simple fondant figurine of the number "3" (from BabyTV). Although I used fondant to cut out names once in a while, this was my first time making a proper figurine so I wasn't confident. In the end I decided to make a butterfly as well. I certainly need more practice. Glad that my friend didn't mind how the figurines turned out, and they enjoyed the cake very much.


A simple strawberry shortcake with chantilly cream frosting ordered by a very supportive friend for his office's monthly birthday celebration.


This was ordered by an ex-colleague cum friend who is an avid baker herself. She would usually bake the birthday cakes for her family members. But this time as she was curious about the taste of my rainbow cake, she decided to order one from me :) Feedback was that the cake was indeed very tender and moist, but the tenderness made it difficult to cut and serve. This point is something that I have been and still pondering about, to make the cake more firm, yet tender enough and without resorting to any added chemicals. Hmmm...


This cake was ordered for an office birthday celebration. A simple and elegant red velvet cake with rosette cream cheese piping.


This cake was ordered by a mummy for her son's 3rd birthday. The cake layers were ombre shades from beige to pink (I forgot to take a photo!). Once again, enjoyed by all the children.


This cake was ordered by a hubby for his wife. His wife, Kelly had actually ordered the same cake from me a few months back for her hubby and now it's his turn to order. They liked the previous cake very much and so ordered the exact same cake!

Looking forward to more orders in the coming months!

30 March 2015

Salmon, Potato & Cheese Croquette

This is my son's absolute favourite home-cook dish for the past few months. He would request for it every week but I try not to over-indulge and cook it probably fortnightly. I first came across the recipe shared at Singapore Home Cooks FB page and thought that the little rascal would definitely like it coz it consists of his favourite foods like potato and cheese and it's crispy!
Salmon is a healthy food too, high in omega-3 and vitamin D. My family doesn't really enjoy salmon in cooked form; we like it better in sashimi. Somehow the fishy odour and taste accentuates after cooking. But with the addition of potato and cheese, the strong taste is slightly masked.


As the kiddo didn't like vegetables, I decided to adapt the recipe and added vegetables so that he would eat them unknowingly. Haha. I tried cauliflower and carrot since these are easy to mash (once cooked) and complementary to the rest of the ingredients. I guess other types of vegetables like broccoli or pumpkin should work well too. Didn't add any other seasonings since the ingredients are flavourful enough.

Ingredients are simple - salmon, potato, cauliflower, carrot, sliced cheddar cheese and cream cheese. First steam the salmon, potato, cauliflower and carrot till cooked. Thereafter mash them up and tear the cheddar cheese slices into small pieces and add in the mixture. Then take about a (big) fish ball size of mixture, place a small cube of cream cheese in the middle, close up, roll into a ball and flatten into a patty. Refrigerate to firm up the patties.

To cook, coat the patties in corn starch, dip in slightly beaten egg and then coat generously with breadcrumbs. Shallow fry the patties till both sides are golden brown and drain on kitchen towel. Best served warm, although the croquettes stay crispy for up to an hour.


Salmon, Potato & Cheese Croquette
(makes 25 pieces of 1.5-2" diameter)

Ingredients
  • 200g Salmon fillet (advisable to use the tail end where they are no bones or carefully remove the bones before steaming)
  • 200g Potato (use Russet potato for more creamy texture), cut into slices
  • 100g Cauliflower, separate into florets
  • 100g Carrot, cut into slices
  • 2 slices Cheddar cheese
  • 25 cubes Cream cheese (about 8-10mm)
  • Corn flour/starch, egg, bread crumbs, cooking oil (I use grapeseed oil)
Steps
  1. Steam the salmon, potato, cauliflower and carrot till fork tender. The salmon takes about 15 mins, cauliflower and carrot about 20 mins and potato about 25 mins.
  2. Place all 4 ingredients in a large bowl and mash using a potato masher or fork, till smooth.
  3. Tear the cheddar cheese slices into small pieces, add to the mixture and stir till well blended.
  4. Take about a big fish ball size of mixture, stuff a cube of cream cheese in the middle, close up then roll into a ball and finally flatten slightly. Chill the patties in the fridge for at least 30 mins before use. *The patties can be chilled in an airtight container for up to 2 days in the fridge.
  5. Coat the patties in thin layer of corn flour/starch, gently tapping away excess. Next dip in slightly beaten egg and finally coat generously with bread crumbs.
  6. Shallow fry the breaded patties in medium low fire till golden brown. (I fill the frying pan with oil till half depth of the patties.
  7. Drain using kitchen towel and best served warm.


Although the croquette tasted good on its own, our family still likes to dip them in our preferred sauces. For dear son, it's either ketchup or mayonnaise. He was crazy about ketchup for a while, but now mayonnaise (I use the Japanese kewpie brand). As for me, I love the Japanese tonkatsu sauce which is tangy and fruity, perfect to go along croquette or thai sweet chilli sauce, or thai plum sauce.


Whenever I cook this dish, the little rascal would hoard the entire plate and proclaim the dish his. Of course he couldn't finish all of them. His record was 8 pieces (together with some rice) which is a lot.

Give it a try, I'm sure kids and adult alike would enjoy it =D

04 March 2015

CNY Bakes 2015 三羊开泰新年年饼

Happy Chinese New Year! Oh my goodness, tomorrow is already the last day (15th day) of the Lunar New Year celebrations! The past 2 weeks have really gone by in a flash, and I have been so busy with visiting, cooking and hosting. Should be written this post long ago but seriously no energy :p

This year, I was rather ambitious in my bakes and decided to come up with three flavours in line with the CNY theme. Besides baking for my own consumption, I invited some close friends to place orders if they were interested.

My CNY Bakes 2015 三羊开泰新年年饼
  • Salted egg yolk cookie "金"玉满堂
  • Hae bee hiam cookie 喜"虾"(哈)大笑
  • Salty chewy chocolate chip cookie "朱"光宝气
What is the similarity between these 3 cookies? They are all savoury cookies! Haha. Somehow I prefer savoury cookies with a tinge of saltiness, as I tend to get sick of sugary sweet cookies very quickly.


One of my favourite cookie recipe, the Salted Egg Yolk Cookie. Baked this cookie last year and received very good feedback so decided to include it in the baking list this year. The salted egg yolk was procured from Hong Kong; got a few packs when I visit Hong Kong last December. In Hong Kong salted egg yolk is sold on its own (without the egg white) in vacuum packs.

Love this melt-in-the-mouth cookie which is very slightly sweet with a tinge of saltiness and with an added fragrance from the salted egg yolk.


The hae bee hiam cookie is something new. I love the mini hae bee hiam rolls so making it into a cookie is something different. A little sweet, a little salty, a little spicy and very fragrant. But somehow I got mixed reviews about it, some people liked it while some don't. Hmmm, maybe I still need to refine the recipe further.


Another of my favourite cookie recipe, the Salty Chewy Chocolate Chip Cookie. Made with Valrhona Chocolate Perles and topped with Maldon Sea Salt, the exterior is crispy while interior is chewy. I love how the sea salt breaks the monotonous sweetness of the chocolate and the different texture of the cookie. Simply addictive!


Besides packing the cookies in tubs, I also offered them in sampler boxes.


I must say that baking cookies is more tiring than baking cakes, because it's tedious to produce hundreds of cookies ensuring they are of the same quality, size and shape. Really need to think twice whether or not to take orders for next CNY! Well, I have a year to ponder, till then :p