21 November 2011

9th Anniversary Celebration - Maldives August 2011 Part II


Continued from Introduction

Male, Seaplane transfer, Land & Seascape of Hilton Iru Fushi

We took the morning flight from Singapore and landed at Male before noon. After exiting from the airport, with the help of a local guide, we proceeded to check in for our seaplane transfer. Thereafter, we boarded a mini van and headed towards the Seaplane Terminal which was just a short 8 min drive away.

Didn't have a chance to visit Male city at all as we didn't have time both to and fro journeys to make a tour. And we certainly didn't want to take a 45 min (one-way) seaplane journey just to take a look. If we choose an island that is nearer to Male, probably we could have spared some time.

Anyways, upon reaching the Seaplane (or Air Taxi) Terminal, we were ushered to a lounge to relax while waiting for our flight to Hilton Iru Fushi Resort & Spa.

Quite a spacious lounge with lots of comfy sofa for us to laze around.
Including a mini food and beverage corner. I took some fruits and juice.
Even an alfresco area.
The lounge overlooks the docking platforms for the seaplanes.
Soon it was time to board the plane and we were ushered to our ride. I was pretty excited, first seaplane ride of my life! And look at the pilots and co-pilots, they were either wearing slippers or none at all with casual bermudas. Must be the most relaxed pilots in the whole world :)
It was free seating, but we only managed to get the second row, not a good view coz blocked by the propeller. The seaplane is very small and non air-conditioned. I think seating capacity is less than 15 and seats are quite tight, so the ride wasn't really comfortable.
Here's our pilot, he's driving the plane barefooted, how cool is that? =D

The seaplane flew at quite a low altitude so we could have a bird's eye view of the islands. Unfortunately, it was cloudy and started rainy not long after, so we couldn't see much of the sights. Ride was also rather turbulent due to the heavy rain and wind. It was so boring that we fell asleep.
The following photos were taken during our return flight from Hilton Iru Fushi to Male. The skies were clear and we could then catch the breathtaking views of the atolls and islands. We took the seats at the second last row and could take better photos.
Beautiful and amazing wasn't it :)
This looked a little spooky like ghost, haha :)
This was the overview of Hilton Iru Fushi, quite a large island. In fact, one of the larger properties in the atolls.

The two photos below were taken when we were departing on the last day, that's our sea plane for the return flight.

Ok, we have landed on Hilton Maldives Iru Fushi Resort & Spa. All excited and raring to go!

We were requested to check our luggage, and found out that only one piece has arrived with us, the other would only arrive the next flight :(((( Why was it so? The concierge assured us that the luggage would reach us in an hour's time (but eventually we waited for two hours and had to call the concierge two times to check the whereabouts of our luggage). We realised the concierge/porters/management had a luggage problem as we had another nasty encounter two day's later (will talk about it in the accommodation post).

Anyway, our host brought us to the Water Edge's Bar for our check-in.
Our welcome drink, a Pineapple and Lime juice, quite refreshing after the boring and uncomfortable ride earlier on.


While waiting for our host to help us with the check-in procedures, we admired at the architecture of the buildings here, really like the dome-shaped ceiling, which makes the whole place look spacious and airy too.


After check-in, we were led to our Beach Villa. As mentioned, we would be staying two nights in a Beach Villa, and two nights in a Water Villa.

Will do a run-through of the land and seascape of the island here. The photos were taken over the few days whenever there was great sunshine. In fact, it rained quite a fair bit (apparently the rainy season, afternoons on first, third and fourth day, night on second day).

However, when there was sunshine, the whole island looked brilliant, just like what we saw on postcards and stock photos on the internet. And it was so glaring that we couldn't open our eyes!


Surprisingly the sand on some parts of the the sea are rather coarse, we would expect powdery sand, but apparently not.

Poor coconut trees almost bending over.
Lots of hammock around the island for people to laze around.

We walked around the whole island one of the days, along the long stretches of beach.

We swam in the sea quite a fair bit in the last two days as well.

Love the long stretches of wooden bridges.
The two retail boutiques on the island, Fire and Sand, selling ornaments, souvenirs, jewellery, clothing and accessories. Everything on the island is in US dollar and no cash transaction (charge to room only).

The Reflections Infinity Pool, which we didn't use at all. Heard that it's great to catch sunset here, but it was either raining or cloudy during the days we were there.

Ok, this concludes my post. Will touch on the accommodation, food, spa and diving in the next few posts. Stay tuned!

17 November 2011

9th Anniversary Celebration - Maldives August 2011 Part I

Introduction

August 2011 marked our 9th (ROM) Anniversary, and in celebration we embarked on a 5D4N vacation to atoll paradise Maldives! Our initial plan was to go Maldives for our 10th Anniversary, but when we saw Singapore Airlines having an airfare promotion, we jumped at the chance :) Well, we'll think of where to go for our 10th Anniversary next year :p

Since this could probably be "once-in-a-lifetime" journey for us, we decided to stay at Hilton Iru Fushi which required us to take a 45min seaplane transfer from Male Airport. We thought it would be a great experience to have a bird's eye view of the atolls. And we opted for 2 nights' stay at a Beach Villa and 2 nights' stay at a Water Villa. Must experience both types of accommodation mah :p

We booked the resort package through an online agent Atoll Paradise based in Male, which offered us a good deal including seaplane transfers, four nights accommodation (Beach & Water Villas) and buffet breakfast. Service was very prompt and the travel consultants were very helpful even though it was an online agent.
So how is the "Atoll Paradise"? Well, both of us agreed that while the island(s) is beautiful, the overall experience didn't totally overwhelm us. You know, those kind of feelings where you go "OH WOW!""? Perhaps it was due to the boring and uncomfortable 45min seaplane transfer to the island (Hilton Iru Fushi) we were going (it was rainy heavily so lots of turbulence and no view of course); perhaps it was due to the bad weather (it rained heavily for 2-3 mornings/afternoons we were there); perhaps the bad weather affected the sea visibility so diving was blah (anyway, dive guides told us not to expect a feast like Sipadan); or perhaps the less-than-satisfactory service standards of Hilton Iru Fushi (on arrival our luggage took more than an hour to reach us, our luggage got lost when we transfered villas, air-con was spoilt for our water villa, staff didn't deliver their promises to us...). In the end, we got upgraded to an Infinity Water Villa but that was after a few hours of waiting, frustrations and demands to see the General Manager. So I guess all these added up to just an OK trip to us, unlike the raving reviews of other travellers.

Nevertheless, Hilton Iru Fushi is lovely for the days where there were great sunshine, brilliant blue sky with fluffy white clouds and sparkling clears waters of turquoise blue. As always I took thousands of photos and had a hard time selecting which to feature, and how to write my posts here. After deliberating (yes, for 3 months :p), decided to post based on the following themes:
So yep, please stay tuned for the next few posts ya? Promise to have lots of photos (I really mean it, many many photos!!!)

Travelling Resources

11 November 2011

Tofu Pandan Chiffon Cake

I just came back from a 5D3N trip (2D being red-eye flights) to Hiroshima/Miyajima, totally deadbeat. Hopefully could regain my energy soon to sort out the photos and blog about the trip (as well as 2 other previous trips to Maldives and Hong Kong, GOSH, I'm so slacked!).

Anyway, I did this before my trip and realised that I forgot to publish the post. Here goes :p

I came across this Tofu Pandan Chiffon Cake in a Tofu Recipe Book called Hanky-Panky with  Beancurd "吃豆腐" (I know, such corny titles!) recently and was totally drawn to it (to the recipe and not the title)! The recipe is slightly different from the usual Pandan Chiffon Cake that I'm familiar with. Baking powder and coconut milk are not used; in replacement of coconut milk, silken tofu/soft beancurd is used. Some steps are also new to me, such as preheating the chiffon pan.

Tofu is definitely a healthy alternative to coconut milk so I was raring to try the recipe. Yes, I bought the recipe book as it features 50 recipes using tofu. Since tofu has such high nutritional value, the book will definitely come in handy for my family meals (perfect excuse to buy yet another recipe book :p).

So the very first recipe I attempted was the Tofu Pandan Chiffon Cake :) With the experience gained from past attempts on Pandan Chiffon Cake and Orange Chiffon Cake, the steps were fairly manageable this time. As usual, extracting pandan juice is tedious and luckily it was only a small quantity. The arm breaking part came with the beating of the egg whites till stiff peak form. I should have used my electric mixer but decided to "exercise" my arm muscles :p

After 50 minutes of baking, the chiffon cake turned out quite alright though not as pretty as my other attempts. The top part cracked a little but at least the cake looked decent enough. It was raining when I took this photo so the photo didn't turn out well (heehee, lousy excuse).

Now for the taste test. The cake texture was cottony light, moist and fluffy with tender crumbs. The tofu taste was not very distinct, just a tinge from the bits of mashed tofu in the cake. I only mashed the tofu this time, and I wondered whether the results would be different if I were to puree the tofu? Shall try that next time. Yep, I'm definitely baking this cake again. Will update the result of pureeing the tofu then.

And oh yes, hubby and son love the cake too :) But it's better not to keep the cake for more than a day, as I think the tofu turned a little sourish the next day.


Tofu Pandan Chiffon Cake
(Makes one 8 inch chiffon cake, serving 10 to 12)

Ingredients
  • 80g low protein flour (I use Prima Cake Flour)
  • 1/8 tsp salt
  • 40g egg yolk
  • 50g caster sugar
  • 35g salad oil (I use canola oil)
  • 50g pandan juice (extracted from about 70g of pandan leaves)
  • 110g silken tofu
  • 160g egg whites (about 4-5 eggs, depending on size)
  • 30g caster sugar
  • 1/8 tsp cream of tartar
Method
  1. Preheat an 8 inch chiffon cake pan at 180 degree celsius for 10 minutes.
  2. Sift flour and salt into a mixing bowl and set aside.
  3. Rinse pandan leaves, cut into small pieces and blend them into grassy green using food processor or chopper. Squeeze the grassy green to extract 50g of pandan juice (add a little water will make it easier to squeeze).
  4. Rinse tofu, dry with kitchen towel and mash.
  5. Combine egg yolks with 50g sugar and mix well. Add salad oil, pandan juice and mashed tofu, stir until blended.
  6. Add the egg yolk mixture into the flour mixture and fold till just blended.
  7. Combine egg whites with 30g sugar in a large, clean and grease-free mixing bowl. Beat using a hand whisk till slightly thickened. Add in cream of tartar and beat until stiff, glossy peak form. Do not over-beat. (alternative to manual whisking, an electric mixer could be used, but end off with hand whisking to make sure egg whites at the bottom of the mixing bowl are well blended).
  8. Add one-third of the egg white mixture into the egg yolk-flour batter, and fold gently until almost blended. Add half of the remaining egg white mixture to the batter and likewise fold gently. Lastly, scrape the batter into the egg white mixture bowl and fold into the remainly one third egg whites.
  9. Pour batter gently into the chiffon pan. Bake for 40-50 minutes. If surface of cake browns too fast, cover the top with a piece of aluminium foil after 30-35 minutes of baking.
  10. Remove cake from oven and immediately turn it upside down. Remove the cake from the pan when slightly warm. Best eaten within a day.

01 November 2011

Delicious Holiday Gifts Workshop

I attended the Delicious Holiday Gifts Demo Class by Chef Joycelyn Shu at Shermay's Cooking School the past weekend, mainly because of the Cake Pop recipe. I first knew about Cake Pop from Bakerella's website and was inspired by all the cute and lovely cake pop designs. I even bought the cake pop recipe book. Tried making it previously, it seemed so darn easy but really wasn't. All I could say, it was totally a messy affair dealing with  candy melts which was the essential coating for cake pops, and I had a tough time. So, I simply had to attend this class to find out how Joycelyn does it. I was pretty sure she could offer lots of useful tips, as always.

Besides cake pop, other lovely holiday baked goodies recipes include Chocolate Peppermint Whoopie Pies, Luxury Fruitcake Cupcakes, Eggnog Sandwich Cookies, as well as bonus sections on cake pop and cupcake decorating ideas and essential techniques, gifting, packaging and display tips, and even bonus recipes of eggnog and Pâte à Tartiner au Chocolat et Noisette (homemade Nutella).

The Eggnog Sandwich Cookies are basically buttery nutmeg-flavoured shortbread cookies sandwiched with a creamy filling of rum and Madagascar Bourbon vanilla.
We got to taste the cookie in class. The shortbread was almost melt in the mouth and good to eat even on its own. I thought the filling was a tad sweet, would probably reduce the amount of sugar if I were to attempt this. Or probably just skip the filling altogether.

The Fruitcake cupcake was a luxe version of a fruitcake, heavily ladened with dried figs, dates, apricots and hazelnuts. In fact, there were more fruits and nuts than the batter! The result was a very densed and moist cupcake. I thought it was a little too heavy on the palate, would probably omit the dried figs or cut down amount of fruits and nuts.

The cupcake would make a lovely holiday gift, with loads of decorating options. How about topping with some vanilla swiss meringue buttercream and a star moulded from candy melt.
Or pretty snowflakes made from rolled fondant, and tinted with luster dust and crunchy pearls.
I'm sure recipients of these cupcakes won't bear to eat them. Too pretty to eat!
Chocolate Peppermint Whoopie Pies, rich chocolatey tender and cake-like cookies sandwiched with peppermint filling. Unfortunately, I didn't really like the texture of the cake nor peppermint taste...
But oh, these cupcake toppers are too cute and irresistible! I was tempted to buy them, but I have yet to decide on what to bake for my holiday gifts.


And now, for the star of the show! The cake pops! It's basically crumbled chocolate cake mixed with chocolate cream cheese frosting, rolled into balls, inserted with lollipop sticks, coated with Wilton Candy Melts and then decorated with candy melt moulded figurines or other sprinkles.

Joycelyn showed us each step meticuously, to ensure that the process would be smooth and less painful :p Well, it looked easy but needed lots of planning, and patience. One important tip was the handling of the candy melts which was the toughest part (I knew it!!!). The key was to microwave the candy melts and mixed with a little Crisco (veg shortening), to achieve the dipping consistency. Ahhhh! Now I know! Why can't Wilton invent something easier to handle?

Anyways, the cake pops that Joycelyn made were so pretty to look at. Each piece was an art.

One big rose or three small roses? These roses were made from candy melts too.

How about a Christmas Tree Cake pop?
My favourite among all. Tiffany-coloured cake pop with white snowflake and dusted with some luster dust.

I was almost sure that I'm going to make cake pops as holiday gifts to my friends... well, hmmm... ok, under serious consideration.
Each participant brought home a Fruitcake cupcake as well as a cake pop =D I really think that the cake pop makes a nice gift, just one pop per person would do, coz the cake was really really really sweet and one bite itself would send one on a sugar high already.

I only took a bite and dear son saw it and literally snatched the lolly away from me, and refused to return it. Then he savoured it slowly and happily of course. Hmmm... I'm tempted to try making this but let's see if we could reduce the amount of sugar in the cake and frosting, since the candy melt coating is sweet as it is already. Ok, this shall be my mission for the holiday gifts. Wish me luck!

23 October 2011

Chocolate Banana Bread/Cake

I have 2 over riped bananas in my pantry once again. A little tired of making banana muffins and hence searched the internet for new ideas. Came across this Banana Bread/Cake recipe by David Lebovitz and found it interesting as chocolate is added. Actually I was equally baffled about the term "bread", why do they call it bread when it's a cake? Never mind whether it is supposed to be Banana Bread or Banana Cake, I was more intrigued by the chocolate component. Banana and chocolate are always good together, aren't they? I happened to have some Valrhona Araguani 72% dark chocolate in my fridge and decided to have a go at this recipe.

The whole process was fairly simple and quick, just like making muffins actually. I changed some components of the ingredients like Greek-style Yogurt instead of sour cream and almost half the amount of sugar. Instead of chocolate chips or cocoa nibs, I used dark chocolate. The batter was enough to fill one aluminium tray and the balance I used a Winnie-The-Pooh Silicone Mould bought from Hong Kong last year. Hopefully dear son would be attracted to Pooh :) The intense aroma of the banana as well as cinnamon (yes, a bit of cinnamon was added) filled the entire kitchen and I was salivating throughout the 50 minutes wait coz I love cinnamon.

Though the cake didn't look that appetizing but trust me, it tasted good! It was tender and moist, with wonderful combination of banana, chocolate and cinnamon. It was not too sweet (as I reduced the amount of sugar) and had a tinge of bitterness due to the dark chocolate. Hubby brought some to his office and apparently it was quite well received coz the cake was not too sweet.
Pooh didn't turn out too pretty :p and I thought the crust was a little too thick. My son was naturally attracted to the bear-bear (he doesn't know Pooh yet). At first bite, he didn't seem to like the cake and didn't want more. I cut the cake into smaller pieces and used toothpicks for each piece. He became more receptive and even asked for more. Probably he wasn't used to the taste of cinnamon initially.

Ok, another banana recipe added to my list :)


Chocolate Banana Cake
(Adapted from Banana Bread/Cake recipe by David Lebovitz)
(Makes one 8"x 4"x 2" Disposable Aluminium Pan and four 2" silicone mould bears)
(Or one 9" square pan)
210g Plain Flour
1 tsp Double Acting Baking Powder
½ tsp Baking Soda
½ tsp Salt
1 tsp Ground Cinnamon
80g Caster Sugar (original recipe uses 150g)
55g Unsalted Butter, melted and cool to room temperature
1 large Egg White, room temperature
1 large Egg, room temperature
2 very ripe medium/large bananas, mashed
115g Greek Style Yogurt (original recipe uses sour cream)
½ tsp Vanilla Extract
60g Dark Chocolate, coarsely chopped (I used Valrona Aruguani 72%, original recipe uses chocolate chips/cocoa nibs)
1. Preheat oven to 180 degree celsius. If using square pan, butter and line the bottom with a sheet of parchment paper.
2. Sift together in a bowl the flour, baking powder, baking soda, salt and cinnamon. Add the sugar and mix well together.
3. In a separate bowl, mix together the melted butter, egg white, egg, banana puree, yogurt and vanilla extract.
4. Make a well in the center of the flour mixture and fold in the wet ingredients with a spatula until almost mixed. Add the chocolate chips and fold until just combined, stop when any traces of flour disappear.
5. Scrape the batter into the prepared pan and bake for 40-50 minutes, or until a toothpick inserted comes out clean.
6. Cool on a baking rack and slice only after the cake has cooled down.
Storage: This cake will keep well for 3-4 days, or can be frozen, wrapped in plastic wrap, for a few months.

20 October 2011

Homemade Chicken Pau

After attending Chef Valerie's Pau Workshop back in August, I've finally succeeded in my first Homemade Chicken Pau. Well, actually I attempted a batch of Pork Pau shortly after the workshop, but uh-oh, I'd  rather not talk about it (read: failure).

The process was much smoother this time, the pau dough looked ok, with the right texture as I remembered from the class. I do need lots more practice though! Was supposed to roll each piece of dough into a flat disc with the centre being slightly thicker than the sides. But somehow I could never get a perfect piece of round flat disc and I could never manage to roll the sides thinner. When I rolled the sides thinner, the disc became an odd shape; when I didn't/couldn't, the sides were too thick to pleat properly.

I don't know why the pleats of the Pau cracked after steaming. Will ask Chef Valerie if I have a chance to next time. Nevertheless, I was quite happy with the result; the Pau looked pretty decent and edible of course.
I can't share the recipe here due to copyrights stipulated by the Chef and Cooking School. So here's just a pictorial run-through. Top left photo showed the minced chicken aka the filling of the pau. Instead of turnip as stated in the recipe, I added water chestnut. I also reduced the amount of seasonings. Important step in preparing the filling, was to whack it, so that the meat would bind together and more crunchy. Top right photo, started to wrap by putting a bit of filling in the centre of the pau dough. As you could see, my pau dough wasn't very round. Bottom left photo, I topped the filling with hald a quail egg. Bottom right photo, tadah, my wrapped pau. The pleats were a little too thick, as a result of the sides of the dough not rolled thin enough. But still, looked ok lah.
So here's my chicken pau before steaming. I thought I rolled 12 pieces of dough but I realised after wrapping that I had only 11 paus! Haha :p (I think the dough wasn't enough or something, well never mind).
And tadah, the chicken paus after 15 mins of high heat steaming. Not bad, except some of the pleats cracked.
After the paus cooled "sufficiently" (as usual I was dying to try), I quickly took one large bite. Hmmm, the pau was soft and fluffy and the filling juicy. The filling was not as savoury due to less amount of seasonings but I was trying to go more healthy here :p I seriously need to practise more coz the bottom of the pau was quite thin and the top (pleated parts) too thick, a bit unbalanced.

Making pau at home is not that difficult, just tedious and time consuming (and my son couldn't be at home or he'll mess around - he's too young to appreciate or help out at his age). Ok, adding to my to-do list - Vegetable Pau, Char Siew Pau and Egg Yolk Custard Pau. Till then :)

17 October 2011

Tofu Burger

Dear son has taken a very very great interest in fast food recently, you know, burgers and fries. He used to be satisfied with hotcakes when we went McDonalds for breakfast but these days, he wanted my Egg Muffin instead. He ended up eating half of my Egg Muffin and I had to take his hotcakes -_-

Hubby had a dinner appointment the other night and I thought of making tofu burger and oven baked fries for dear son and my dinner. 2 years back, I made Minced Pork & Tofu burger before but this time I wanted to try something slightly different. After taking reference from several blogs and online cooking guides, I decided to concoct my own recipe.

The tofu patties were really easy to make, besides firm tofu (tau kwa), I added minced chicken, carrot, mushroom, broccoli, onion, cheese and breadcrumbs. For flavouring, some sea salt, mixed herbs and spices like ground cumin (whatever I had in my pantry). It's actually quite versatile, different types of veggies could be added. Minced chicken is optional, I just wanted more texture. Next time, I would probably add seaweed and sesame seeds :) I made the tofu patties in the morning and chilled them in the fridge till evening so that the patties would be firmer for pan frying. Didn't have time to make my own burger buns, so I bought the Sunshine Butter Rolls which are the right size for my mini tofu patties (about 2 inch rounds).

To make the burger, I simply pan-fried the patties till slightly golden brown, and sandwiched it between the butter roll with some lettuce. The butter rolls could be lightly toasted with some butter or spread with some mayonaise or even ketchup for additional flavours.
The tofu patties could even be eaten on its own :)

Dear son loves the tofu burger! He ate one whole burger and an additional tofu patty. Besides that, he also ate at least 10 pieces of oven baked fries. Big appetite for a little fellow!

Tofu Patties
(Makes 10 pieces of 2 inch rounds)

Ingredients
  • 1 block firm tofu (tau kwa)
  • 3 tbsp minced chicken breast
  • 1 medium purple onion, finely chopped
  • 1/3 piece carrot, grated
  • 3 fresh shiitake mushroom, finely chopped
  • 3 stalks broccoli, finely chopped
  • 3 tbsp shredded mozzarella cheese
  • 4 tbsp Japanese panko (breadcrumbs) + additional for sprinkling on top of patties
  • 1/4 tsp sea salt
  • Herbs and spices, dash
Method
  1. Heat some olive oil in a frying pan. Once hot, fry the onion for a few minutes until soft and fragrant. Add the carrot, broccoli and mushroom and stir fry for a few minutes till softened. Set aside and let the mixture cool down.
  2. Mash the tofu using a potato masher or fork, add the minced chicken breast and cooled mixture (1) and mix well together.
  3. Add the shredded mozzarella cheese and breadcrumbs, and mix evenly till mixture is firm. If mixture is too sticky and soft, add more breadcrumbs.
  4. Shape the tofu mixture into patties depending on size and thickness desired. I made them into about 2 inch rounds (to fit the Sunshine Butter Rolls) and got 10 pieces.
  5. Place the patties on a tray with greaseproof paper or Silpat. The patties will be slightly soft as tofu is used instead of all meat.
  6. Sprinkle some bread crumbs on top of each patty and press down gently. Cover with clingwrap and chill in the fridge for 3 - 4 hours.
  7. When ready, fry the burger in a little oil or butter on medium high heat for few minutes, depending on the thickness of the patty. Serve warm, nice eaten on its own or with dips like mayo, ketchup, chilli sauce.

14 October 2011

Fruit Jelly

My final bid to use up the excess strawberries in my fridge *phew* finally! No more strawberries for the next few weeks!

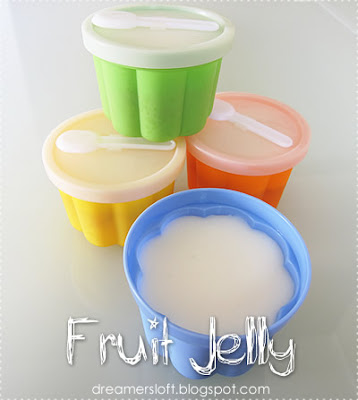
The recipe is a guest post on Cuisine Paradise, by Ann of Anncoo Journal. Dear son hasn't tried agar agar before so I thought I could give this a try. I like the dual layer effect, one layer being milk agar agar and the other plain agar agar with fruits. Besides strawberries, I added peach as I have some in my fridge and I didn't want to buy the additional fruits (blueberries, kiwi) mentioned in the recipe. I halved the recipe and managed to yield 4 plastic cups and additional 2 glasses of the fruit jelly.

For the glasses, I did the exact layering as stated in the recipe but for the plastic cups, I reversed the layering so that when the jelly was turned out, the white part was at the bottom and top part was the jelly with fruits.

Looked quite pretty and sweet right?
These were the plastic cups I used for the jelly. Very nostalgic right? I remember we used similar cups for our jellies when we were young :)

Dear son didn't seem to like the fruit jelly very much, he took only half a cup and wasn't quite enthusiastic about it. Probably the agar agar was a bit too hard. Offered a cup to hubby but he wasn't keen either! Why why why? Now I still have 2 cups and 2 glasses sitting in the fridge. How how how?

11 October 2011

Strawberry Crunch

Another recipe which I attempted (in my quest to use up the excess strawberries) is Strawberry Crunch, from Food 4 Tots.

Once again, it's an easy peasy recipe and I have most of the ingredients in my pantry. I halved the recipe and made just two glasses for our tea break. I love the crunchy bits of oats and sunflower seeds which were dry fried and coated with some honey, as well as the combination of the flavours of strawberries, yogurt and orange juice. Alas, dear son didn't seem to like it very much. He took most of the yogurt and left the oats crunch. Probably he's not used to eating oats like this. I was a little disappointed as this makes a healthy snack/breakfast and I thought I could serve this to him often. Well, we'll try again another time and probably he'd change his mind (you know kids).

If you are interested in this recipe, hop over to Food 4 Tots for details :)


08 October 2011

Strawberry Muffin

I've been making many strawberry desserts recently as I have lots of strawberries left over from making a Strawberry Jelly Heart cake for a gathering. Usually I just buy one big punnet and it would be enough for the cake, but Cold Storage had this promotion of $9.90 for two punnets (usual price $5.90 per punnet), so I thought no harm buying two punnets. Well, I ended up with so many extras that I don't know what to do with them! There is only this much strawberry one can eat. I added diced strawberries to my son's yogurt till he's sick of them, and he won't eat them whole as the strawberries were a little too tangy for his liking. So I started searching for recipes online and attempted a few of them, just to use up the strawberries.

First up, Strawberry Muffins from Noob Cook. A very simple recipe that doesn't require mixer and easily done within 30 mins. I made only 1/3 of the recipe as I just want to make a small batch (my freezer is already filled with a number of baked goods), I also reduced the sugar by a third.

The result? The muffin was tender and moist when warm, and I love how the tangy strawberry bits balanced the sweetness of the muffin. My son liked it so much, he wanted a second one! Now I know what to do with left over strawberries in future :)


Strawberry Muffin
(Makes 9 x 5cm muffin cases)

Ingredients
  • 125g plain flour
  • 1/3 tbsp baking powder
  • 100g caster sugar
  • 83g fresh milk, room temperature
  • 42g unsalted butter, melted and cooled to room temperature
  • 1 large egg
  • 1/4 tsp vanilla extract
  • 6-7 strawberries, diced
Method
  1. Sift flour and baking powder together. Add sugar and mix until well incorporated.
  2. Mix milk, melted butter, egg and vanilla extract and stir well.
  3. Add the wet ingredients (2) to the dry ingredients (1) and fold gently till just incorporated. Do not over mix as it will result in a tough texture.
  4. Fold the diced strawberries into the mixture.
  5. Spoon the batter into the muffin cases (each about 2/3 filled).
  6. Bake for 20 minutes in preheated oven of 200C (400F) or until slightly golden brown. Allow to rest for several minutes before serving.

04 October 2011

Coconut Banana Muffin

Saw the latest blog post on a Coconut Banana Muffin by LK of Food-4Tots. Bingo! I have half a packet of dessicated coconut sitting in my fridge for quite sometime now and thinking of where to use it (instead of tossing it away). I also have a few ripened bananas which my son won't be able to finish before they turn too riped. My son loves bananas and whenever he sees them, he would go "nana, nana!", so bananas have sort of become a staple in my pantry but I limit him to one every two days so usually I'll have a few over-riped ones every other day.

I digress. So there, I decided to go ahead with the Coconut Banana Muffin.

This was how the muffin looked like before popping into the oven. The dessicated coconut topping sure looked like panko (Jap breadcrumbs).

The steps are easy to follow and an electric mixer is not even needed. I was able to go grocery shopping, then make a batch of these muffins, prepare dinner, wash and hang two batches of laundry, all in one morning (while my son was in morning childcare). Heehee, talk about multi-tasking!
The aroma of coconut and banana filled my whole house while the muffins were baking. Heavenly scent! I had to wait patiently for the muffins to be baked, and kept peering through the glass panel of the oven to check on them :p

The crust of the muffin was crispy due to the dessicated coconut topping. The muffin itself was tender and moist, tasted yummy with the wonderful combination of coconut and banana. I didn't know that the flavours of coconut and banana complement each other so well! One point to note, the muffin tasted nicer when warm and hardened slightly when cold; so it's best to pop them into a preheated oven or steam for a few mins before eating.

I offered one to dear son for his afternoon tea break and he devoured it hungrily and even asked for more. Well, I only allowed him to have one. When hubby tried one in the evening, he also gave thumbs up :)

If you are keen in this muffin, hop over to Food-4Tots for a very detail recipe with comprehensive photo guide too!